The Mailboxes page in MSPControl is used to view and manage Exchange Online mailbox-enabled users for the selected organization. This page provides a central list of mailboxes, mailbox-related filters, bulk actions, and a detailed edit view where administrators can manage mailbox configuration across multiple tabs.
The page supports different mailbox types, including Users, Resource, and Shared mailboxes. Administrators can filter the list by location, search for specific mailbox records, apply selected actions to one or more mailboxes, and open an individual mailbox for deeper configuration.
The Mailboxes page gives administrators a practical Exchange Online mailbox management view inside MSPControl. It combines mailbox discovery, filtering, mailbox-type selection, bulk operations, and access to detailed mailbox settings in one place.
This page is useful for daily mailbox administration because it allows administrators to quickly find a mailbox, check its login and primary email address, identify the assigned service level, and open mailbox-specific configuration without switching directly to Microsoft 365 admin tools for every task.
The mailbox list also helps administrators distinguish between different mailbox types. For example, a standard user mailbox, a shared mailbox, and a resource mailbox may require different management actions. The mailbox type filters at the top of the page make it easier to focus on the records that are relevant to the current task.
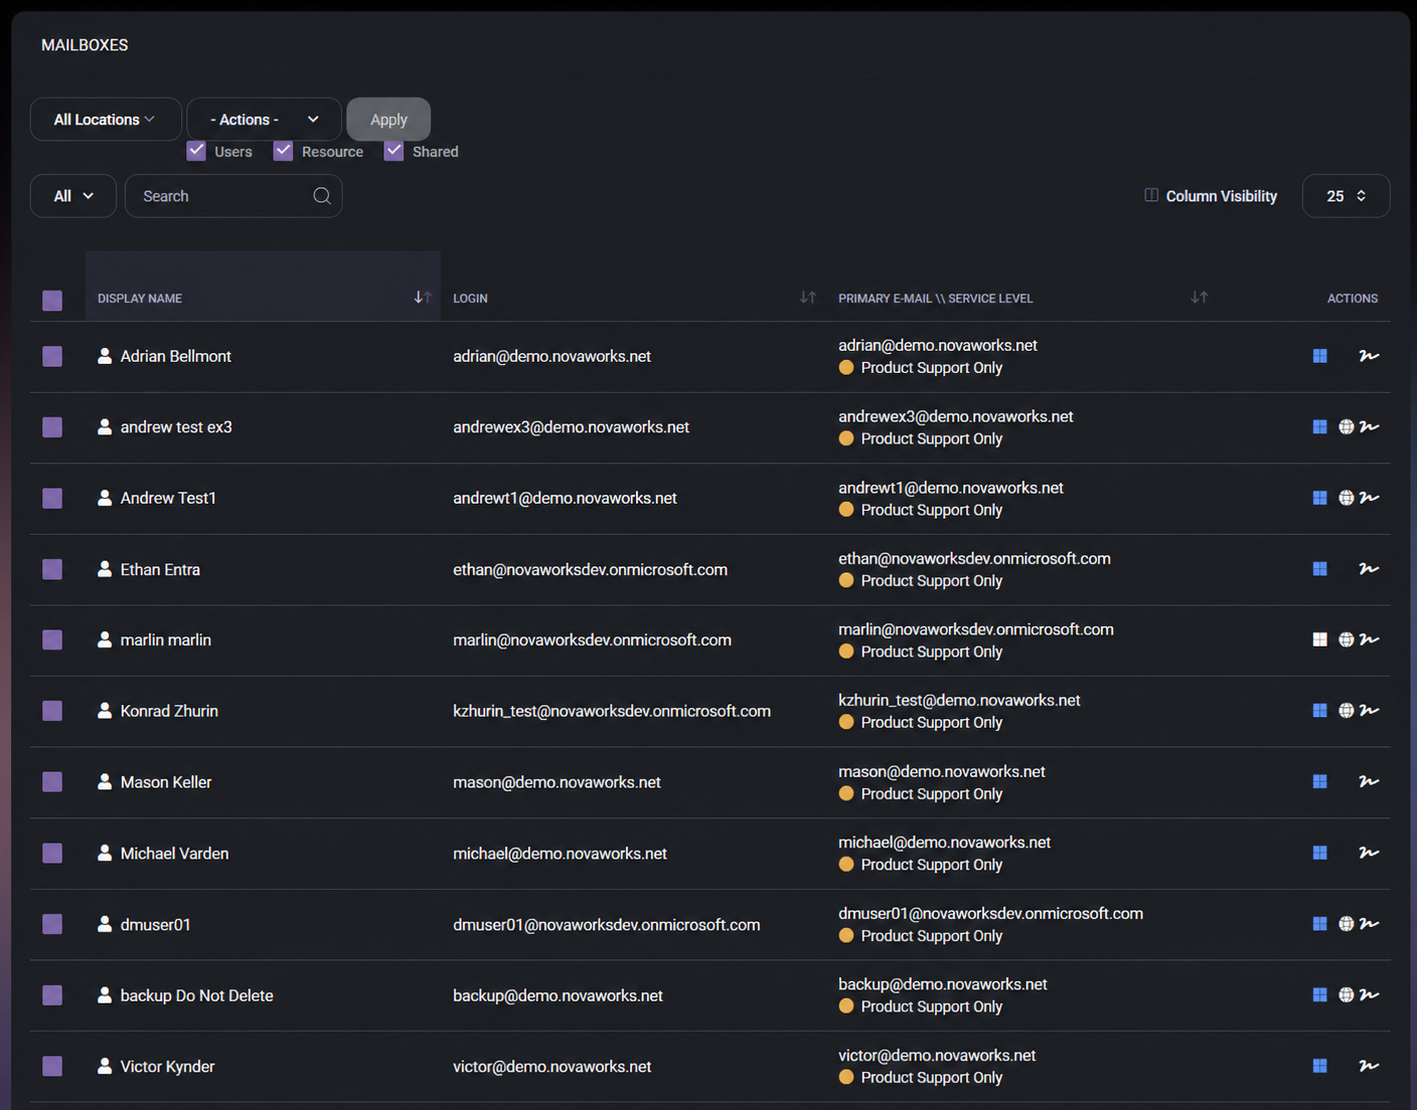
The main Mailboxes page displays mailbox records in a table. Each row represents a mailbox-enabled object and includes mailbox identity details, login information, primary email address, service level, and available row-level actions.
The list page is the starting point for most mailbox tasks. Administrators can select one or more mailboxes, choose a bulk action, apply filters, or open a specific mailbox record for detailed configuration.
The Actions dropdown provides bulk operations that can be applied to selected mailbox records. Based on the screenshots, the available actions include:
Bulk actions are useful when the same mailbox configuration must be applied to multiple users at once. Administrators should review the selected rows carefully before clicking Apply, because these actions can update several mailbox records in one operation.
The list view provides enough information to identify the correct mailbox before making changes. The Primary E-mail \ Service Level column is especially useful because it combines mailbox identity and service classification in the same area.
When a mailbox is opened, MSPControl displays the Edit Mailbox page for the selected account. The header shows the mailbox user name and the assigned service level, helping administrators confirm that they are editing the correct mailbox before changing settings.
The edit page is divided into multiple tabs. Each tab focuses on a different part of mailbox configuration, such as general mailbox identity, mailbox settings, rules, organization values, email addresses, message flow, permissions, out-of-office behavior, mailbox usage, mobile devices, and signature management.
The page also includes an Edit User link, which allows administrators to move from mailbox management to the broader user profile when user-level details need to be changed outside the mailbox-specific tabs.
The mailbox edit page contains 13 tabs. Each tab is used for a specific part of Exchange Online mailbox and user-related configuration.
This tab structure is useful because mailbox administration usually requires several separate types of configuration. By keeping these areas under one mailbox record, MSPControl makes it easier to manage the mailbox as a complete object rather than forcing administrators to search through unrelated pages.
The General tab contains the main identity, sign-in, password, contact, service level, company, location, address, device profile, and custom-field settings for the selected mailbox user. This tab is important because it connects the Exchange Online mailbox to the broader user profile in MSPControl.
Although this page is opened from the Mailboxes section, many fields on the General tab are user-level settings rather than mailbox-only settings. This makes the tab useful when administrators need to update the user’s display name, login name, password state, contact details, service level, location, company information, or account flags without leaving the mailbox edit page.
The General Settings section contains the primary sign-in and identity controls for the mailbox user.
This section should be reviewed carefully before changing login-related values. Updating a login name or UPN can affect how the user signs in, how the mailbox is identified, and how related Microsoft 365 services recognize the account.
The Update section contains the basic visible profile fields and password management controls for the mailbox user.
The Display Name should be kept clear and consistent because it is used in address books, mailbox lists, user search results, and other user-facing places. Password fields should be used only when a password change is intentionally required.
The General tab includes several direct actions for password and session management.
These actions can significantly affect the user’s access. Administrators should confirm the reason before using session revocation, mobile device removal, or group removal, especially for active users.
The Two-Factor Provider area controls the user’s two-factor authentication provider and verification state.
This section is useful when administrators need to manage MFA or verification readiness directly from the mailbox user profile. It helps confirm whether the user has completed the required authentication setup and provides actions to reset or request verification when needed.
The General tab includes several fields and checkboxes that control password lifecycle, account status, and reporting behavior.
These options should be used with care because they can affect security posture, reporting accuracy, synchronization behavior, and account accessibility. Security-related exclusions should always have a clear operational reason.
The Scheduled Actions section allows an administrator to schedule a future disable action for the user.
This section is useful for planned offboarding or temporary access scenarios. Instead of relying on a manual reminder, administrators can define when the user account should be disabled in advance.
The Contact Information section stores personal and contact-related details for the mailbox user.
These fields help keep directory and contact information complete. They can also support reporting, HR-style review, contact lookup, and lifecycle management.
The Service Level Information section defines the service classification of the mailbox user.
This section is useful when mailbox users are grouped by support tier, entitlement level, or internal service model. Marking a user as VIP can help identify users who require special attention or elevated support handling.
The Company Information section stores job and organizational details for the mailbox user.
These fields are useful for directory completeness, reporting, organization charts, approval workflows, and user classification. Manager information is especially important when the organization relies on manager-based notifications, approvals, or reporting.
The Location section connects the mailbox user to an organization location.
Assigning a location helps connect the mailbox user to a physical office, branch, site, or business location. This can be useful for filtering, reporting, user grouping, and location-based administrative workflows.
The Address section stores the user’s postal and phone contact details.
This section is important for maintaining accurate contact information in the user profile. The values may also appear in directory lookups, reports, or user information exports depending on the organization’s configuration.
The Device Profile section controls whether the user should receive a specific device profile override.
This setting is useful when a specific user needs a different device configuration profile than the one normally applied by organization policy or automation.
The Custom Fields section provides a dedicated area for additional organization-specific fields. In the screenshot, the section is collapsed, so the individual custom fields are not visible.
This section is useful when the organization tracks extra user metadata that does not fit into the standard contact, company, location, or mailbox fields.
Because the General tab includes both mailbox-related and user-level identity settings, administrators should review changes carefully before saving. Login, password, MFA, account state, location, and group-removal actions can have immediate operational impact for the user.
The Settings tab contains mailbox-specific controls for address book visibility, email security, mailbox type, Exchange policies, disclaimers, signatures, messaging policy, client protocols, archiving, litigation hold, and advanced mailbox information. This tab is used when administrators need to control how the mailbox behaves in Exchange Online and which mailbox features are enabled for the selected user.
Unlike the General tab, which includes many user-profile and identity settings, the Settings tab is more focused on mailbox behavior and Exchange-related configuration. It is the place to review mailbox policies, protocol access, email protection settings, and signature assignments.
The top part of the Settings tab includes several checkbox options that control mailbox visibility and email security features.
These options help administrators control whether the mailbox is visible to users and whether the mailbox participates in email security and reporting workflows.
The Mailbox Type field shows the current mailbox type. In the screenshot, the mailbox is shown as a User Mailbox, with a Change action available.
This field is important because different mailbox types are used for different purposes. A user mailbox is tied to a normal user account, while shared or resource mailboxes may be used for team mailboxes, rooms, equipment, or other non-personal mailbox scenarios.
The policy fields define which Exchange policies apply to the selected mailbox. These settings help control role permissions, retention behavior, and address book visibility.
These policy settings should be reviewed carefully when the mailbox belongs to a user with specific compliance, retention, or address-list visibility requirements.
The Settings tab includes controls for assigning disclaimers and email signatures to the mailbox.
This section is useful when the organization manages centralized email signatures or requires different signatures for new messages and replies. It helps keep mailbox signatures consistent with the organization’s branding and communication policy.
The Unified messaging policy field controls whether a unified messaging policy is assigned to the mailbox. In the screenshot, the selected value is Disabled.
This setting is relevant when unified messaging features are used in the environment. If unified messaging is not used, the value can remain disabled.
The protocol and access toggles control which mailbox access methods are enabled for the selected mailbox. These settings can affect how users connect to the mailbox from different clients and devices.
These settings are important for both usability and security. Modern mailbox access methods may be required for normal work, while legacy protocols such as POP3 and IMAP should be enabled only when the organization has a clear need for them.
The Settings tab includes mailbox compliance and archive controls. These options determine whether litigation hold, archiving, or auto-expanding archive behavior is enabled.
These settings should be changed carefully because they can affect compliance, storage behavior, retention expectations, and mailbox data preservation.
The Advanced Information section is available at the bottom of the tab as a collapsible panel. In the provided screenshot, this section is collapsed, so the internal fields are not visible.
This section is intended for additional mailbox details that are not part of the main visible settings. Administrators can expand it when deeper mailbox information is required.
Before saving changes on this tab, administrators should review mailbox visibility, policy assignment, protocol access, archive settings, and signature assignments carefully. Several options on this page can affect how the mailbox is accessed, protected, displayed, and retained.
The Rules tab is used to manage mailbox rules for the selected Exchange Online mailbox. Mailbox rules can automate how incoming or existing messages are handled, depending on the rule configuration. This tab allows administrators to add an existing rule, create a new rule, review rules already assigned to the mailbox, and control whether assigned rules are enabled or disabled.
This tab is useful when a mailbox needs automatic message handling, such as routing messages, applying rule-based processing, or maintaining mailbox-specific automation. Rules should be reviewed carefully because they can affect how messages are delivered, moved, or processed for the mailbox.
The top section of the Rules tab allows administrators to choose a rule and add it to the mailbox, or create a new rule if the required rule does not already exist.
This structure supports both reuse and creation. Administrators can reuse existing rule definitions when the same behavior should be applied to multiple mailboxes, or create a new rule when a mailbox needs a different rule configuration.
The Existing Rules section displays rules currently associated with the mailbox. In the screenshot provided, the list is empty and shows No records…, which means there are no rules assigned to this mailbox in the current view.
This table helps administrators confirm which rules are already assigned and whether they are enabled. When multiple rules exist, the order and enabled state should be reviewed carefully because rule behavior can affect mailbox message processing.
The actions below the existing rules table are used to manage selected rules.
The Move Up and Move Down actions are important because mailbox rules can be order-sensitive. If several rules apply to the same message, the processing order may affect the final result.
Before saving changes on this tab, administrators should confirm that the correct rules are assigned, enabled rules are intentional, and the rule order matches the expected mailbox behavior.
The Organization tab contains job, department, company, manager, and direct-report information for the selected mailbox user. This tab is used to maintain the user’s organizational profile values that may appear in directory information, reports, address book details, and internal administrative views.
These fields are especially useful when the mailbox belongs to a real user and the organization wants Microsoft 365 and MSPControl records to reflect the correct business structure. Values such as title, department, company, and manager help administrators understand where the user belongs in the organization and who is responsible for them.
The Manager and Direct Reports fields are important for organizations that rely on hierarchy-based workflows, approvals, notifications, or reporting. Keeping these values accurate can make user management and review processes easier.
The Organization tab helps keep mailbox user records aligned with the real business structure. When these values are populated correctly, administrators can more easily identify the user’s role, department, company association, and reporting relationship.
This tab is also useful during onboarding and employee changes. For example, if a user changes role, moves to another department, or receives a new manager, administrators can update the mailbox user’s organization profile from this tab.
Before saving changes on this tab, administrators should confirm that the title, department, company, manager, and direct-report information reflects the current organization structure.
The E-mail Addresses tab is used to manage the email addresses assigned to the selected Exchange Online mailbox. This includes reviewing the current primary address, adding additional addresses, setting a different address as primary, and removing selected addresses when they are no longer needed.
This tab is important because a mailbox can have more than one email address. The primary address is the main address used for sending and identifying the mailbox, while additional addresses can be used as aliases so the same mailbox can receive mail sent to different addresses.
The top section of the tab allows administrators to add a new email address to the mailbox.
This structure is useful when the organization has multiple accepted domains and the administrator needs to add an alias under the correct domain. Before adding a new address, administrators should confirm that the address is spelled correctly and that the selected domain is the intended one.
The Existing E-mail Addresses section shows all email addresses currently assigned to the mailbox. In the screenshot, the mailbox has one address listed, and it is marked as primary.
This list helps administrators confirm which addresses are currently attached to the mailbox and which one is used as the primary email address.
The buttons above the existing address list are used to manage selected addresses.
The Set As Primary action should be used carefully because it changes the main address associated with the mailbox. The Delete Selected E-Mails action should also be reviewed before use, especially when removing aliases that may still be used by senders, applications, or business processes.
The primary email address is the main address shown for the mailbox and is typically used as the default sending address. Additional email addresses act as aliases, allowing the mailbox to receive messages sent to more than one address.
Aliases are useful when a user changes name, when a company changes domain, when a department uses multiple public-facing addresses, or when legacy addresses must continue receiving mail during a transition period.
Before leaving this tab, administrators should confirm that the correct address is marked as primary and that any aliases removed from the mailbox are no longer required.
The Mail Flow Settings tab controls how messages are delivered to the selected Exchange Online mailbox. This tab is used to configure forwarding behavior, define who is allowed to send messages to the mailbox, and define whether messages from specific senders should be rejected.
These settings are important because they directly affect mailbox delivery. Administrators should use this tab when a mailbox needs controlled inbound mail flow, forwarding to another recipient, or restrictions on who can send messages to the mailbox.
The Forwarding Address section controls whether mail sent to this mailbox should be forwarded to another address or recipient.
Forwarding is useful when messages sent to the mailbox should also be redirected or delivered elsewhere. This may be needed during user transitions, role changes, shared responsibility scenarios, or temporary coverage. Administrators should confirm the forwarding target before enabling this option to avoid unintentionally sending mailbox content to the wrong recipient.
The Accept Messages From section defines who is allowed to send messages to the mailbox.
This section is useful when a mailbox should not accept messages from everyone. For example, some internal-only mailboxes, resource mailboxes, or controlled workflow mailboxes may need to accept messages only from authenticated users or from a defined sender list.
The Reject Messages From section defines whether messages from specific senders should be blocked.
This section is useful when a mailbox should continue accepting normal mail but must block messages from specific senders. It provides a targeted restriction without disabling the mailbox or changing the broader organization mail flow.
Before saving changes on this tab, administrators should verify forwarding, accepted sender restrictions, and rejected sender restrictions carefully. Incorrect mail flow settings can prevent expected messages from reaching the mailbox or cause messages to be forwarded unexpectedly.
The Permissions tab is used to manage delegated mailbox access for the selected Exchange Online mailbox. This tab allows administrators to assign users who can send messages as the mailbox, send messages on behalf of the mailbox, open the mailbox with full access, or access mailbox calendar and contacts data.
This tab is important for shared responsibility scenarios, executive assistant workflows, shared mailbox management, team coverage, and controlled delegation. Permission changes should be reviewed carefully because they affect who can act on or access mailbox content.
The Send As Permission section controls which users can send messages as the selected mailbox.
When Send As permission is granted, the delegated user can send email that appears to come directly from the mailbox. This permission should be assigned only when the delegated user is allowed to represent the mailbox identity itself.
The Send On Behalf section controls which users can send messages on behalf of the selected mailbox.
Send on Behalf permission is different from Send As. Messages sent with this permission usually indicate that one user sent the message on behalf of another mailbox. This is useful for assistants, delegates, or team members who need to send official communication while still showing delegated authorship.
The Full Access section controls which users can open and manage the mailbox content.
Full Access permission allows the delegated user to open the mailbox and work with its contents. This is commonly used for shared mailboxes, support mailboxes, manager-assistant workflows, or administrative recovery scenarios. It does not necessarily grant permission to send as the mailbox unless Send As or Send on Behalf permissions are also configured.
The Calendar Access section controls which users can access the mailbox calendar.
Calendar access is useful when assistants, managers, team members, or scheduling staff need visibility into the mailbox calendar. This can help with meeting coordination, room or resource scheduling, or user calendar management.
The Contacts Access section controls which users can access the mailbox contacts.
Contacts access is useful when another user needs to review or manage contact information stored in the mailbox. This should be assigned only when the delegated user has a real business need to access those contacts.
Before saving changes on this tab, administrators should confirm that each permission type matches the intended access model. Send As, Send on Behalf, Full Access, Calendar Access, and Contacts Access serve different purposes and should not be assigned interchangeably.
The Out Of Office tab is used to configure automatic replies for the selected Exchange Online mailbox. This tab controls whether automatic replies are enabled, whether they should run only during a specific time range, and what message should be sent to internal and external senders.
This tab is useful when a user is unavailable, on vacation, temporarily out of the office, or when a mailbox needs to automatically inform senders about response expectations, alternate contacts, or service availability.
The time range option is useful when automatic replies should be active only during a planned absence. If the time range is not used, automatic replies may remain active until they are manually disabled.
The External Message editor is used to define the automatic reply sent to external senders. The editor supports formatted content, allowing administrators to create a clear and professional message for people outside the organization.
External messages should usually be written carefully because they are visible to outside recipients. Avoid including sensitive internal details, private schedules, or information that should not be shared externally.
The Copy To The Internal Message button copies the external automatic reply content into the internal message editor. This is useful when the same or similar message should be used for both internal and external senders.
After copying the message, administrators can still adjust the internal version if employees should receive more detailed information than external senders.
The Internal Message editor is used to define the automatic reply sent to internal senders. This message can include more organization-specific information, such as internal backup contacts, team instructions, or internal availability details.
Internal automatic replies are useful when colleagues need to know who to contact while the mailbox owner is unavailable or how to handle urgent requests during the absence period.
Before saving changes on this tab, administrators should confirm that automatic replies are enabled only when needed, the time range is correct, and the internal and external messages contain appropriate information for their intended audiences.
The Usage tab provides mailbox usage, storage, compliance, message-size, and timestamp information for the selected Exchange Online mailbox. This tab is mainly used for review and validation, helping administrators understand mailbox size, recoverable items usage, litigation hold duration, message size limits, and mailbox creation or update dates.
This tab is useful when investigating mailbox storage issues, checking whether a mailbox is approaching quota-related limits, reviewing compliance-related storage, or validating when the mailbox was created and last changed.
These fields give administrators a quick snapshot of mailbox storage and operational limits. They can also help confirm whether mailbox settings are consistent with expected Exchange Online behavior and organizational policy.
The recoverable items fields are especially important when litigation hold, retention, or deleted item recovery is involved. Recoverable Items Quota Size shows the available quota for recoverable items, while Recoverable Items Size shows the current usage of that area.
If litigation hold is enabled or the mailbox is subject to retention requirements, recoverable items storage can grow over time. Administrators should review these values when investigating storage growth, compliance preservation, or mailbox cleanup limitations.
Storage Usage Size shows the current storage consumed by the mailbox. This value is useful when reviewing mailbox growth, checking whether a user is using significant mailbox space, or determining whether storage-related action is needed.
Storage usage should be reviewed together with mailbox type, archive settings, retention policy, and oversized mailbox handling settings from other mailbox tabs. A mailbox with low storage usage may not require action, while a mailbox with growing usage may need archiving, cleanup, or policy review.
The Max Receive Size and Max Send Size fields show the maximum message sizes allowed for the mailbox.
These values are useful when users report that large messages cannot be sent or received. Administrators can use this tab to confirm the mailbox-level size limits before investigating transport rules, organization-wide limits, or attachment-related restrictions.
The Creation date and Last change date fields provide lifecycle context for the mailbox.
These fields are useful during audits, migration checks, troubleshooting, or when administrators need to confirm whether a mailbox has been recently modified.
The Mail Tip tab is used to configure a mailbox-specific message that can be shown to senders before they send email to the selected Exchange Online mailbox. Mail tips are useful when senders should see important context about the mailbox before sending a message.
This tab is especially useful for mailboxes that require additional sender guidance, such as shared mailboxes, monitored mailboxes, restricted-use mailboxes, support mailboxes, or mailboxes with special handling requirements.
The mail tip should be short, clear, and useful. It should help the sender understand something important before sending the message, such as expected response time, mailbox purpose, mailbox monitoring status, or whether another contact method should be used.
Mail tips are helpful when a sender should be warned or informed before sending to the mailbox. Examples include:
Because mail tips are visible to senders, they should not include sensitive internal information or details that should not be exposed during message composition.
Before saving changes on this tab, administrators should confirm that the mail tip is accurate, concise, and appropriate for the audience that may see it while composing a message.
The Mobile Devices tab is used to review mobile device associations connected to the selected Exchange Online mailbox. This tab helps administrators check whether any mobile devices are currently linked to the mailbox and review basic synchronization information when records are available.
In the screenshot provided, the table shows No records…, which means no mobile device entries are currently displayed for this mailbox. This is not necessarily an error. It simply means that MSPControl does not show any mobile device records for the selected mailbox in the current view.
These columns are useful when administrators need to understand which mobile devices have accessed or synchronized with the mailbox and whether those device relationships are still active.
The Mobile Devices tab should be checked when investigating mobile mail access, synchronization problems, or account security concerns. If a user reports mobile email issues, the Last Sync Time and Status values can help confirm whether the device has recently connected.
This tab can also be useful after using actions such as Remove Mobile Devices from the General tab. Administrators can return to this tab to confirm whether mobile device records are still visible for the mailbox.
If the table displays No records…, it usually means that no mobile devices are currently listed for the mailbox. This may happen when the user has not connected a mobile device, mobile access records were removed, or the connected devices have not been synchronized into the current view.
Administrators should interpret an empty list together with the user’s expected behavior. For example, an empty list is normal for a user who does not use mobile email, but it may require review if the user expects a phone or tablet to be connected.
The Member Of tab is used to manage group membership for the selected Exchange Online mailbox user. This tab allows administrators to add the user to a group and review existing group memberships that are currently assigned through this mailbox user record.
This tab is useful when mailbox users need to be added to security groups, distribution groups, Microsoft 365 groups, or other available group types depending on the organization’s configuration. Group membership can affect access, communication, permissions, and service targeting, so changes should be reviewed carefully before saving.
The top section of the tab allows administrators to select a group and add the mailbox user as a member.
This workflow is useful when the mailbox user needs access or membership assigned directly from the mailbox edit page instead of opening a separate group management area.
The lower table shows the groups that the mailbox user currently belongs to. In the screenshot provided, the table shows No records…, which means no group memberships are currently displayed for this mailbox user in the current view.
This table helps administrators confirm whether the mailbox user already belongs to any groups and provides a place to manage those memberships when records are available.
Before saving changes on this tab, administrators should confirm that the selected group membership is correct and that adding or removing the user from a group will not unintentionally affect access, email delivery, or policy behavior.
The Signature Management tab is used to manage mailbox-level email signatures for the selected Exchange Online mailbox. This tab allows administrators to add signature records, review existing signatures, define default signatures for new messages and replies, and create signature content using HTML and plain text bodies.
This tab is useful when signatures must be managed centrally instead of relying only on local Outlook signatures. Centralized signature management helps keep branding, contact details, disclaimers, and user-specific signature variables consistent across the organization.
The main Signature Management view displays the signatures currently associated with the mailbox. In the screenshot provided, the list is empty and shows No records…, which means no signatures are currently assigned in this view.
These columns help administrators confirm which signatures exist and whether any of them are assigned as default signatures for new messages or replies.
When administrators click Add Signature, MSPControl opens the signature creation form. This form is used to define the signature name and content that should be available for the mailbox.
Both the HTML and text versions should be maintained carefully. The HTML body controls the visual appearance of the signature, while the text body helps ensure the signature remains readable in plain-text scenarios.
The right side of the signature form lists available variables that can be inserted into the signature body. These variables allow MSPControl to dynamically replace placeholders with user-specific or organization-specific values.
Available variables shown in the screenshot include:
Variables are useful because one signature template can adapt to the selected mailbox user. For example, instead of manually typing each user’s name, phone number, job title, and email address, the signature can use variables that populate automatically from the user profile.
The Configure QR Code Fields button allows administrators to configure which fields should be included in the QR code used by the signature. This is related to the #QRCode# variable shown in the available variables list.
This is useful when the organization wants signatures to include a QR code containing contact or profile information. Administrators should make sure only appropriate and approved fields are included in the QR code, because recipients may be able to scan and access that information.
Before saving a signature, administrators should review both the HTML and text versions, confirm that variables are spelled correctly, and verify that the signature content matches the organization’s communication standards.
Self-hosted. Free license available. No credit card required.