VirtuBot Policies
The VirtuBot Policies section in MSPControl governs how intelligent automation and chatbot services integrate into IT service delivery. VirtuBot combines Processors for automated ticket analysis and planning, Chatbots for natural language interactions, and Agent Models for AI-driven decision-making. Together, these policies transform service desk operations, enabling proactive support, faster resolution times, and improved customer satisfaction.
Table of Contents
VirtuBot Policy
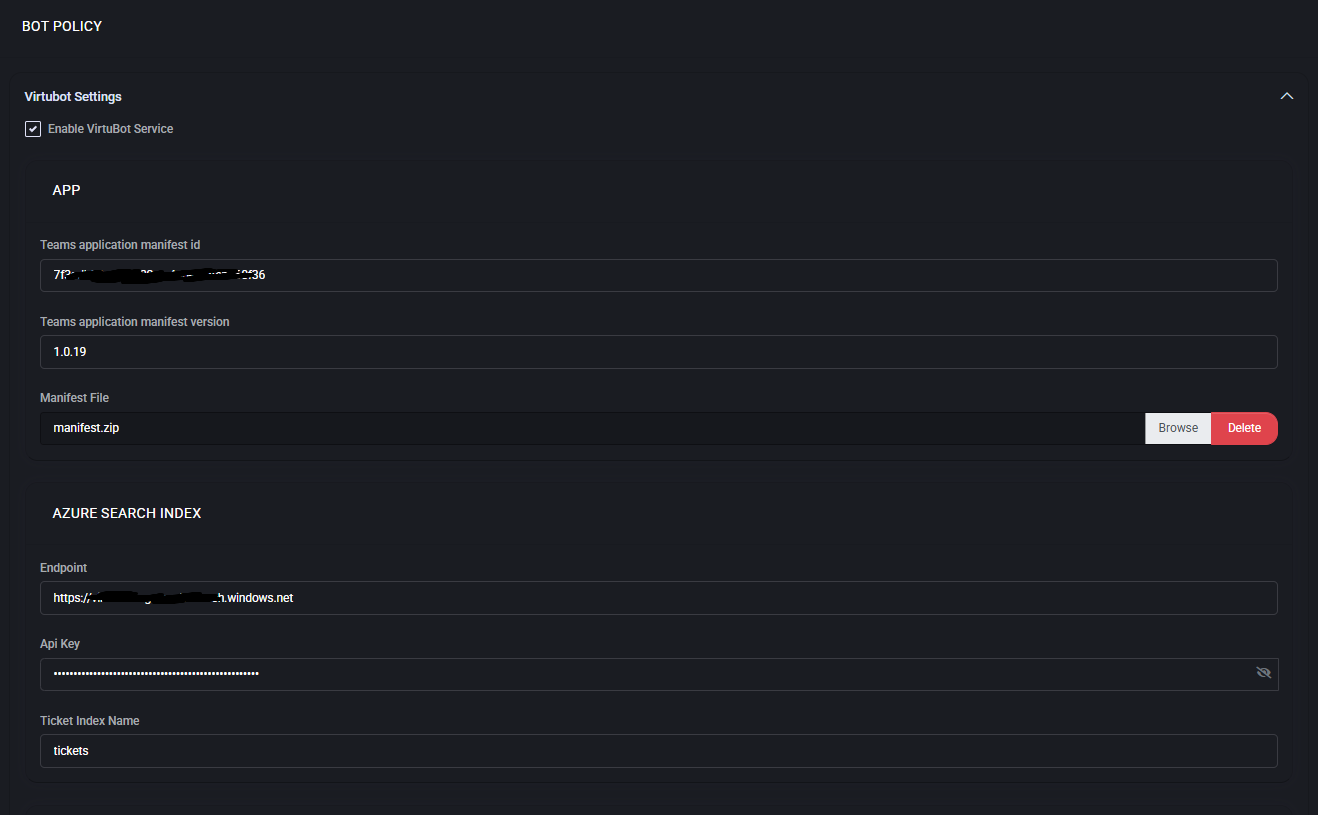
The VirtuBot Policy defines how VirtuBot integrates with Microsoft Teams, Azure services, and ticketing systems to provide intelligent automation and conversational support. It manages the configuration of the VirtuBot service, search indexes, service bus integration, history tracking, and ticket modifications.
Main Features
- VirtuBot Service
Enable or disable VirtuBot as the automation and chatbot service within MSPControl.
- Teams App Integration
Configure the Application Manifest ID, Manifest Version, and upload the Teams manifest.zip file for chatbot deployment in Microsoft Teams.
- Azure Search Index
Define Endpoint, API Key, and Ticket Index Name for ticket searches and knowledge retrieval.
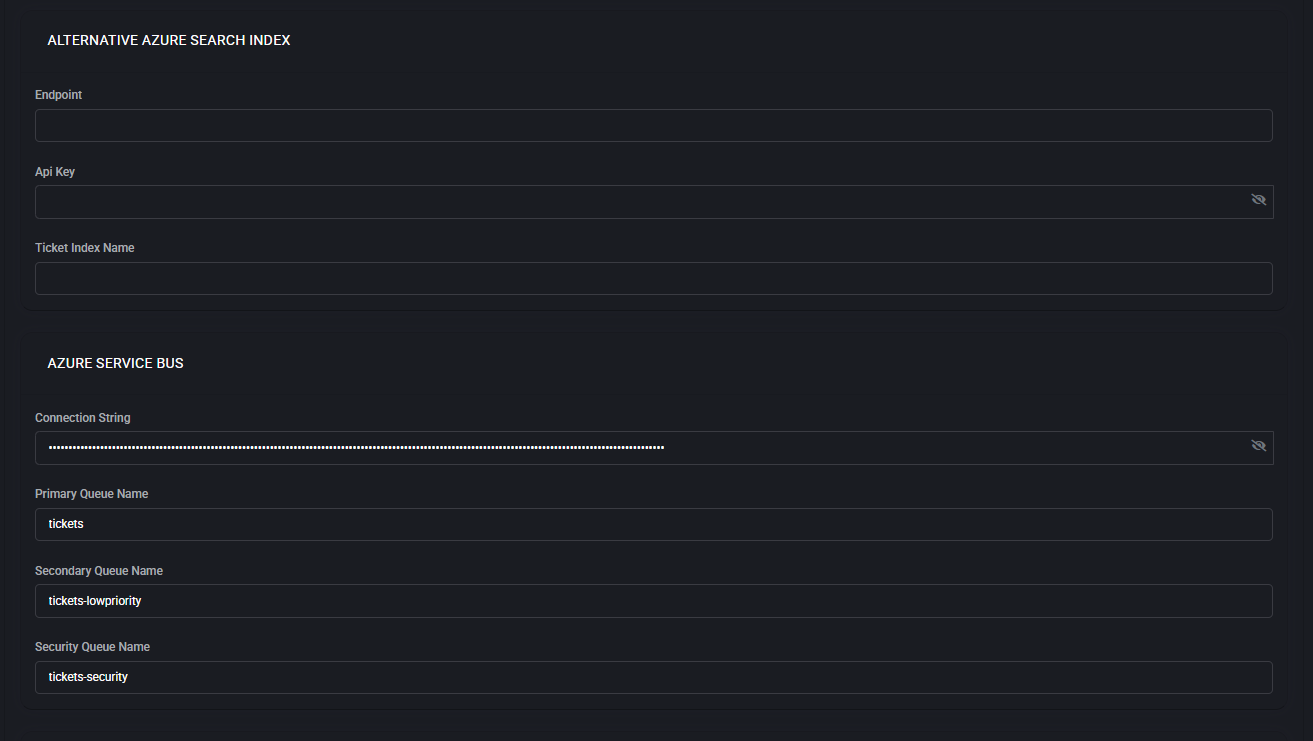
- Alternative Azure Search Index
Provides a backup index configuration for redundancy.
- Azure Service Bus
Configure Connection String, Primary Queue, Secondary Queue, and Security Queue for handling support ticket messages.
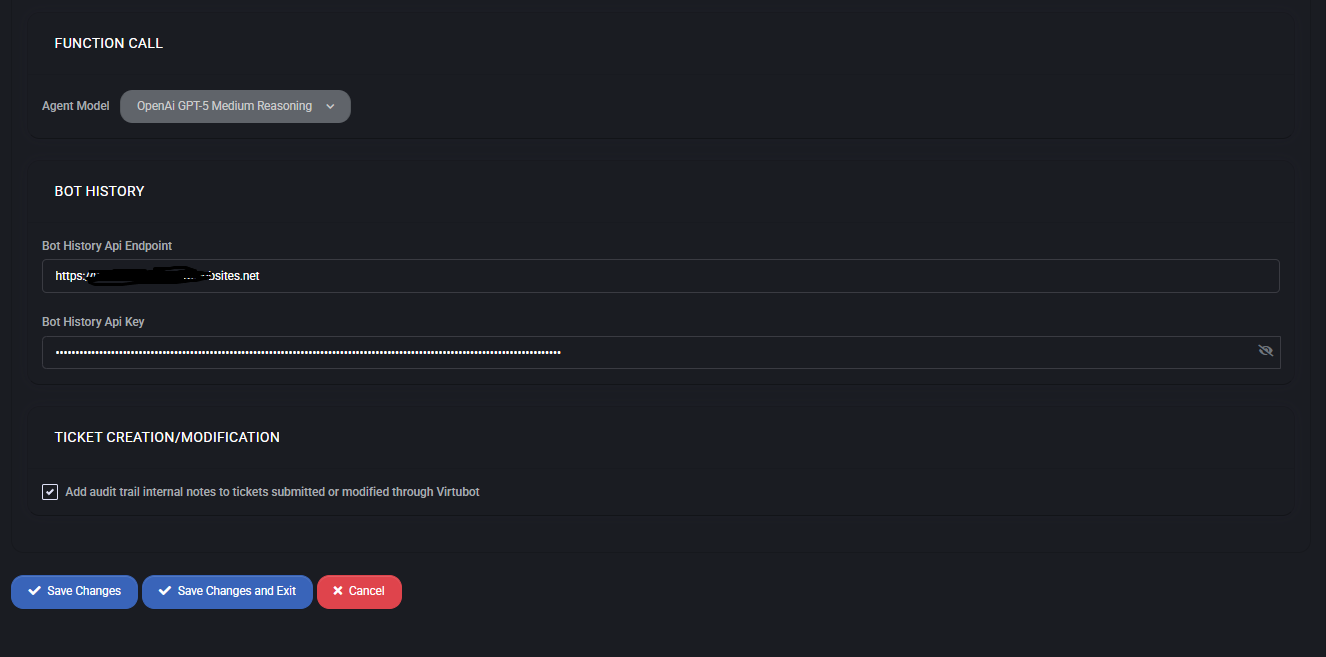
- Function Call
Select the Agent Model (e.g., OpenAI GPT-5 Medium Reasoning) for natural language and decision-making tasks.
- Bot History
Store conversation history with API Endpoint and API Key for audit and learning purposes.
- Ticket Creation/Modification
Enable audit trail notes to automatically append internal comments to tickets processed through VirtuBot.
Best Practices
- Always configure a backup Azure Search Index to ensure service continuity.
- Use Azure Service Bus queues to separate normal, low-priority, and security-sensitive tickets for streamlined routing.
- Enable Bot History logging to capture interactions for compliance and training purposes.
- Select AI models that balance reasoning quality with performance for your environment.
- Leverage audit trails to maintain transparency and accountability in ticket processing.
Service Tickets Policy
The Service Tickets Policy in MSPControl defines how helpdesk tickets are classified, prioritized, escalated, and managed throughout their lifecycle. By automating ticket handling, Virtubot ensures faster resolution, consistent service quality, and compliance with SLA requirements. This policy includes rules for ticket classification, prioritization, after-hours responses, security ticket handling, planning, sentiment analysis, quality assurance, and more.
Table of Contents
Ticket Classification
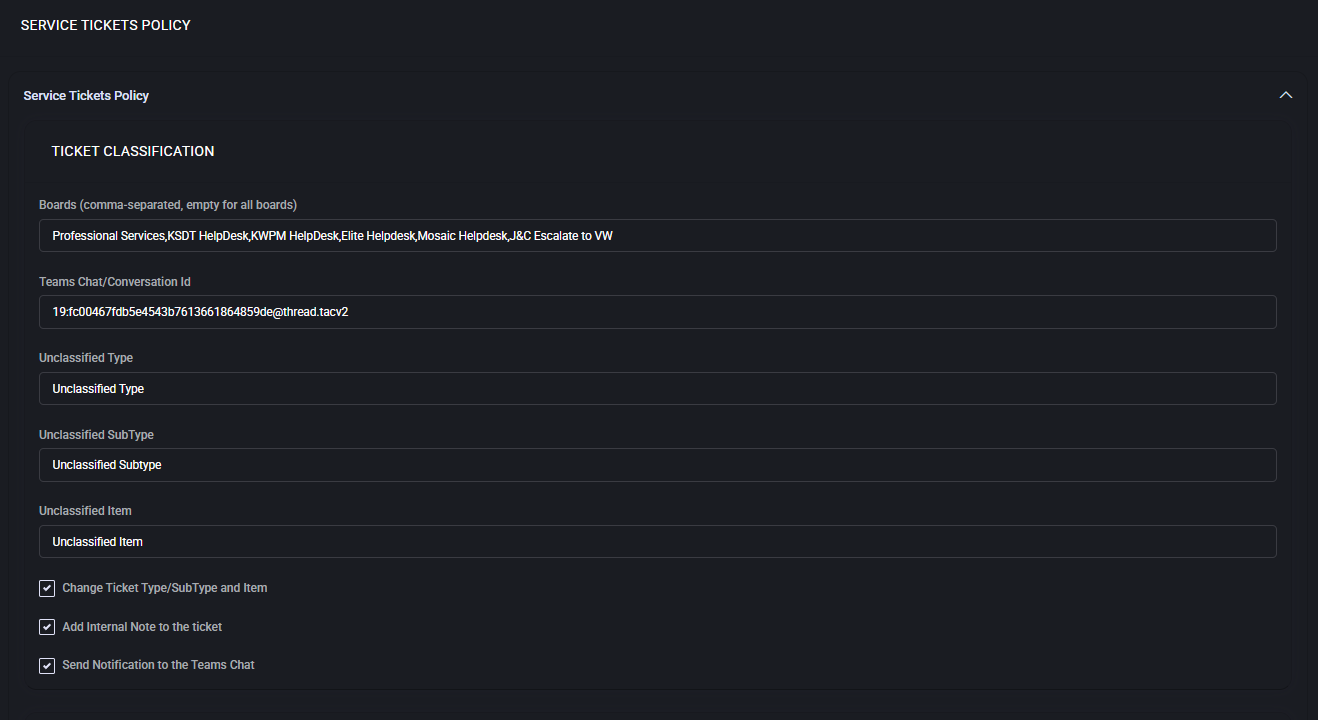
The Ticket Classification section defines how Virtubot classifies new or existing service tickets into a consistent Type → SubType → Item structure. It can also post the outcome to Microsoft Teams and leave an internal audit note.
How it works
Virtubot analyzes the ticket subject, body, and context and tries to map it to your service taxonomy. If a clear match is found, it can overwrite or fill missing fields. If no match is found, the fallback “Unclassified” values below are applied so tickets never remain uncategorized.
Fields & Options
- Boards (comma-separated, empty for all boards)
Limits classification to the listed boards. Leave empty to apply to every board.
- Teams Chat/Conversation Id
Microsoft Teams conversation ID (format like 19:...@thread.tacv2) where classification results can be posted.
- Unclassified Type
Fallback ticket Type used when Virtubot can’t determine a specific category.
- Unclassified SubType
Fallback SubType assigned with the Unclassified Type.
- Unclassified Item
Fallback Item (the most granular category) used with the Unclassified Type/SubType.
- Change Ticket Type/SubType and Item
When enabled, Virtubot is allowed to overwrite existing values. Turn this off to only fill empty fields.
- Add Internal Note to the ticket
Writes an audit note with the detected categories and whether a change was made.
- Send Notification to the Teams Chat
Posts a short message to the configured Teams conversation with the classification result.
Classification logic (at a glance)
- Check board scope. If the ticket’s board is in scope, continue.
- Attempt to map to a known Type → SubType → Item using the ticket title/description.
- If a confident match is found, write (or fill) the fields according to the “Change…” option.
- If no match is found, apply the Unclassified Type/SubType/Item.
- Optionally add an internal note and/or send a Teams notification.
Examples
- “Can’t sign in to Office 365, password expired”
Type = User Account, SubType = Password, Item = Reset O365/Entra password. If no rule matches, the ticket is set to your Unclassified values.
- “New printer install on 3rd floor”
Type = Hardware, SubType = Printer, Item = Install. Teams message is posted if enabled.
Best practices
- Keep “Unclassified” values meaningful (e.g., Type: Intake, SubType: Needs Review, Item: Triage) so nothing slips through.
- Enable “Change Ticket Type/SubType and Item” during rollout, then disable it later if you prefer Virtubot to only fill blanks.
- Use board scoping to pilot classification with a subset of teams/clients before expanding platform-wide.
- Provide a valid Teams conversation ID to surface misclassifications quickly and fine-tune rules.
- Periodically review tickets tagged with your Unclassified Type to add new mapping rules and reduce manual triage.
Ticket Prioritizing
The Ticket Prioritizing section defines how Virtubot automatically adjusts and enforces ticket priority based on business rules, urgency, and context. It ensures that high-impact or time-sensitive requests receive faster attention while routine work is managed efficiently.
How it works
Virtubot reviews each incoming or updated ticket, evaluates urgency, SLA terms, and detected signals, then sets or raises the priority. Notifications and audit notes can be generated for transparency. This reduces human error in prioritization and ensures SLA compliance.
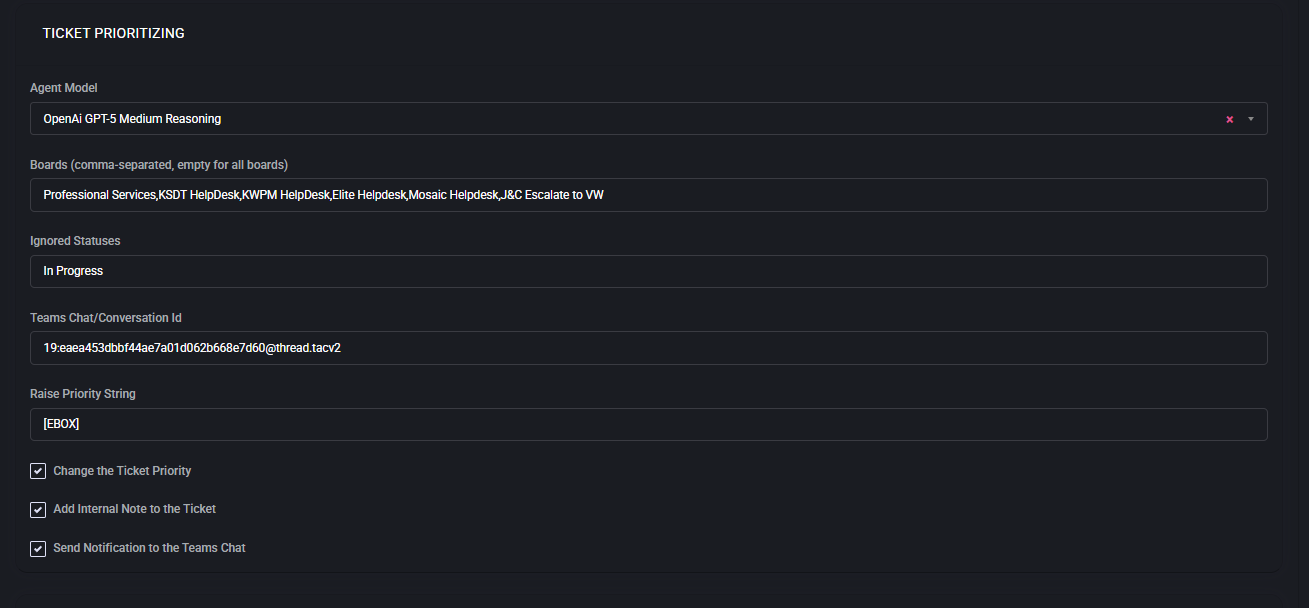
Fields & Options
- Agent Model
Defines which AI engine Virtubot uses for analyzing ticket context (e.g., OpenAI GPT-5 Medium Reasoning).
- Boards (comma-separated, empty for all boards)
Restricts prioritization rules to the listed boards. Leave empty to apply system-wide.
- Ignored Statuses
Ticket statuses (e.g., In Progress) that Virtubot should skip. Prevents reprioritization of already active work.
- Teams Chat/Conversation Id
Microsoft Teams conversation ID where priority changes are posted for awareness.
- Raise Priority String
A text tag (e.g., [EBOX]) Virtubot appends to tickets or notes when priority is escalated. Useful for filtering and reporting.
- Change the Ticket Priority
Allows Virtubot to directly overwrite the Priority field in the PSA/ticketing system.
- Add Internal Note to the Ticket
Writes an audit trail indicating why and how the ticket priority was changed.
- Send Notification to the Teams Chat
Sends a short message to the linked Teams channel whenever a priority change is applied.
Prioritization logic (at a glance)
- Check board scope and confirm ticket status is not in the ignored list.
- Analyze ticket metadata (SLA, subject, keywords, sentiment, client tier).
- Determine if escalation is required (e.g., SLA breach risk, emergency keywords).
- If escalation needed, update the priority field, append Raise Priority String, and log an internal note.
- Optionally send notification to Teams for visibility.
Examples
- “Server offline in datacenter”
Raised from Priority 3 (Medium) to Priority 1 (Emergency). Note logged, Teams alert sent with [EBOX].
- “Request for software installation next week”
Remains Priority 4 (Low). No escalation applied, ignored if status is already In Progress.
Best practices
- Define clear escalation triggers (e.g., downtime, data loss, VIP clients) to ensure consistent handling.
- Use the Ignored Statuses field to avoid unnecessary churn in tickets already being worked.
- Enable internal notes for every priority change to maintain a full audit trail.
- Leverage Raise Priority String consistently for easy reporting and filtering.
- Integrate with Teams to provide real-time visibility of escalations for NOC and service managers.
After Hours Response
The After Hours Response section defines how Virtubot processes tickets submitted outside of normal business hours. It ensures that urgent or high-priority issues receive immediate attention, while less critical tasks are deferred until the next working day.
How it works
Virtubot monitors ticket queues continuously, regardless of business hours. When a new ticket arrives outside the configured schedule, the system checks its priority level. Based on predefined rules, it either escalates the ticket for immediate handling or queues it for the next business window.
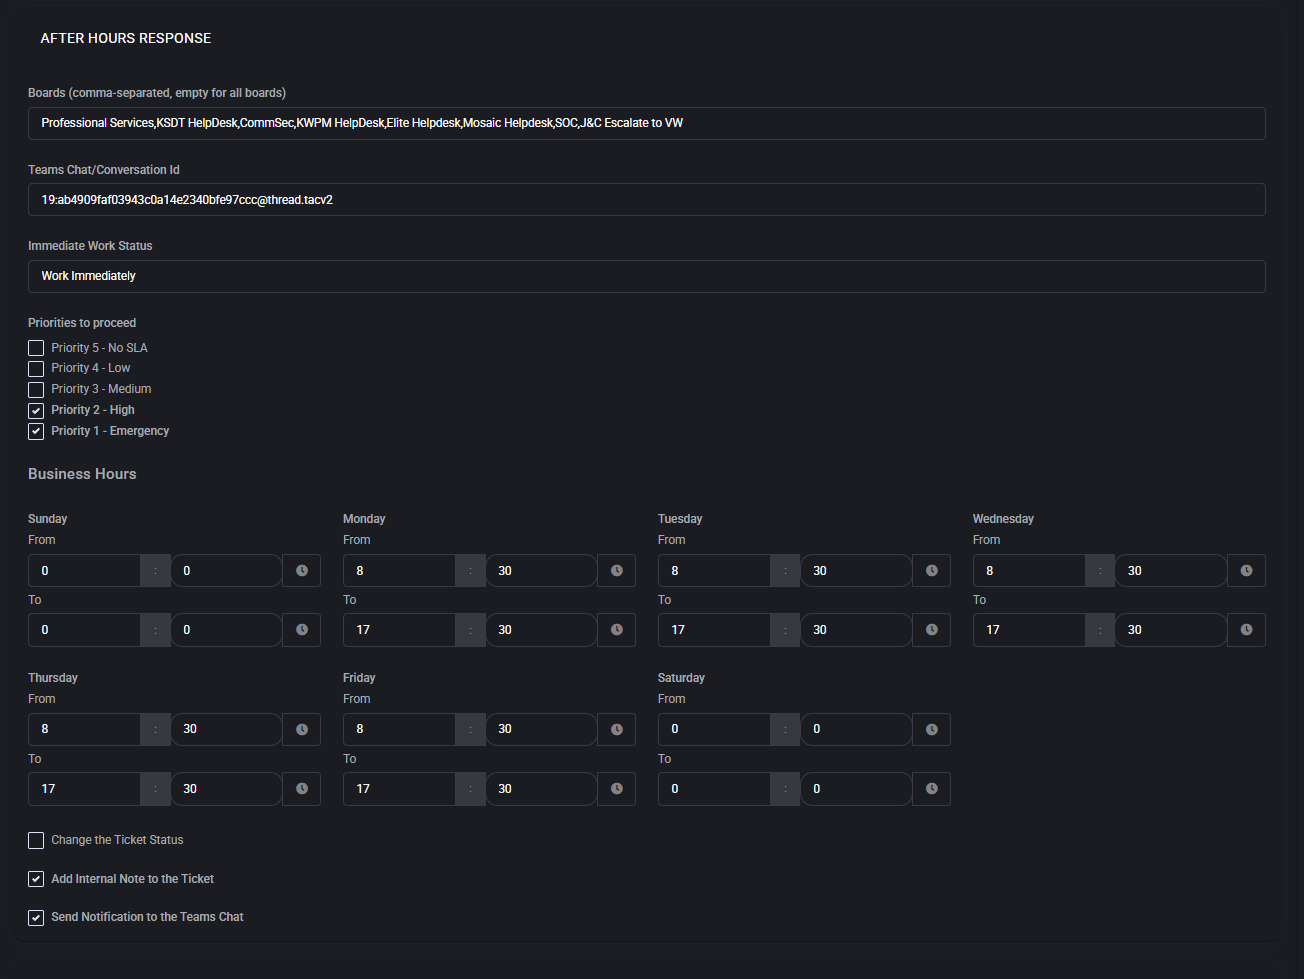
Fields & Options
- Boards (comma-separated, empty for all boards)
Restricts after-hours processing to specified boards. Leave empty to apply globally.
- Teams Chat/Conversation Id
Microsoft Teams channel ID where after-hours activity is reported.
- Immediate Work Status
The ticket status applied when after-hours work is triggered (e.g., Work Immediately).
- Priorities to Proceed
Checkboxes to select which ticket priorities should be processed outside of hours. For example:
– Priority 1 (Emergency)
– Priority 2 (High)
– Priority 3 (Medium)
– Priority 4 (Low)
– Priority 5 (No SLA)
- Business Hours
Defines working hours per day of the week. Tickets falling outside these hours are subject to after-hours rules. Hours can be customized per weekday.
- Change the Ticket Status
Option to automatically update the status when processing after-hours tickets.
- Add Internal Note to the Ticket
Adds an audit trail entry that records why the ticket was processed after hours.
- Send Notification to the Teams Chat
Sends alerts to the configured Teams channel for visibility of after-hours activities.
Operational flow
- A ticket is submitted outside of configured business hours.
- Virtubot checks the ticket’s priority level against the Priorities to Proceed list.
- If the ticket qualifies, Virtubot sets the Immediate Work Status and alerts the Teams channel.
- An internal note is logged to maintain a full audit trail.
- If the ticket does not meet priority thresholds, it is deferred until the next business window.
Examples
- Critical outage reported at 2 AM
Ticket marked as Priority 1 → escalated to Work Immediately, Teams alert sent, on-call technician engaged.
- Low-priority software request at 10 PM
Ticket deferred until business hours resume the following day. No after-hours intervention required.
Best practices
- Enable after-hours processing only for Priority 1–2 to balance service continuity and workload.
- Clearly define business hours to avoid false escalations around shift changes.
- Use Teams notifications to ensure on-call staff are alerted in real time.
- Maintain internal notes for compliance and post-incident reviews.
- Regularly review after-hours activity to optimize escalation rules and staffing levels.
After Hours Escalation
The After Hours Escalation section sends an alert to a designated Microsoft Teams channel if a ticket created outside business hours remains unattended for a defined number of minutes.
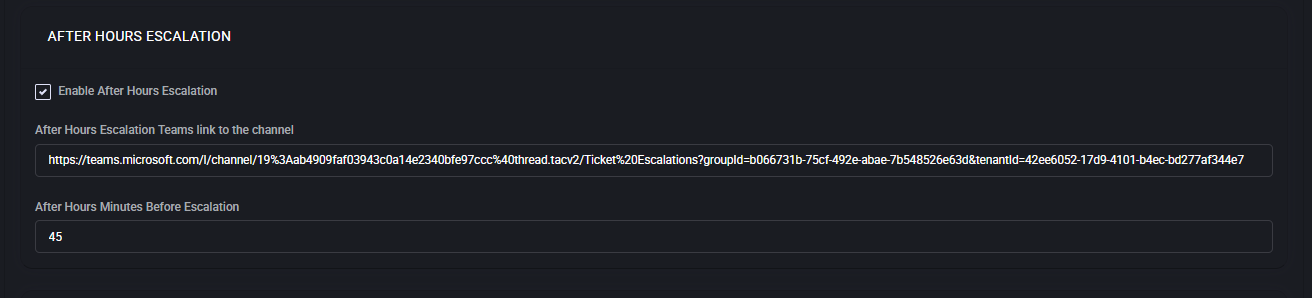
Fields & Options
- Enable After Hours Escalation
Turns the escalation workflow on. When enabled, tickets opened outside your business hours (as defined in After Hours Response) are monitored and escalated after the set delay.
- After Hours Escalation Teams link to the channel
Paste a Teams channel deep link (Teams ▸ Channel ▸ … ▸ Get link to channel). Virtubot posts escalation alerts to this channel with a link to the ticket and context for on-call personnel.
- After Hours Minutes Before Escalation
How long to wait (in minutes) after the ticket is created before sending the escalation alert. Example: 45 means alert the channel 45 minutes after creation if the ticket is still unattended.
Behavior
- A ticket is created outside defined business hours.
- Virtubot starts a timer using After Hours Minutes Before Escalation.
- If the ticket is still not acknowledged or actioned when the timer expires, Virtubot posts an escalation message to the configured Teams channel.
Best Practices
- Use a dedicated channel (e.g., #ticket-escalations) and enable mobile notifications for on-call staff.
- Start with 30–60 minutes to balance responsiveness and noise.
- Verify the link points to a channel (not a personal chat) and is accessible to on-call members.
- Test by temporarily setting the delay to a low value (e.g., 5 minutes) and creating a test ticket after hours.
Security Tickets
The Security Tickets section ensures that tickets related to security incidents are flagged, prioritized, and routed with heightened visibility. These tickets often involve data breaches, unauthorized access attempts, malware infections, or compliance-related events and must be escalated to the right teams without delay.
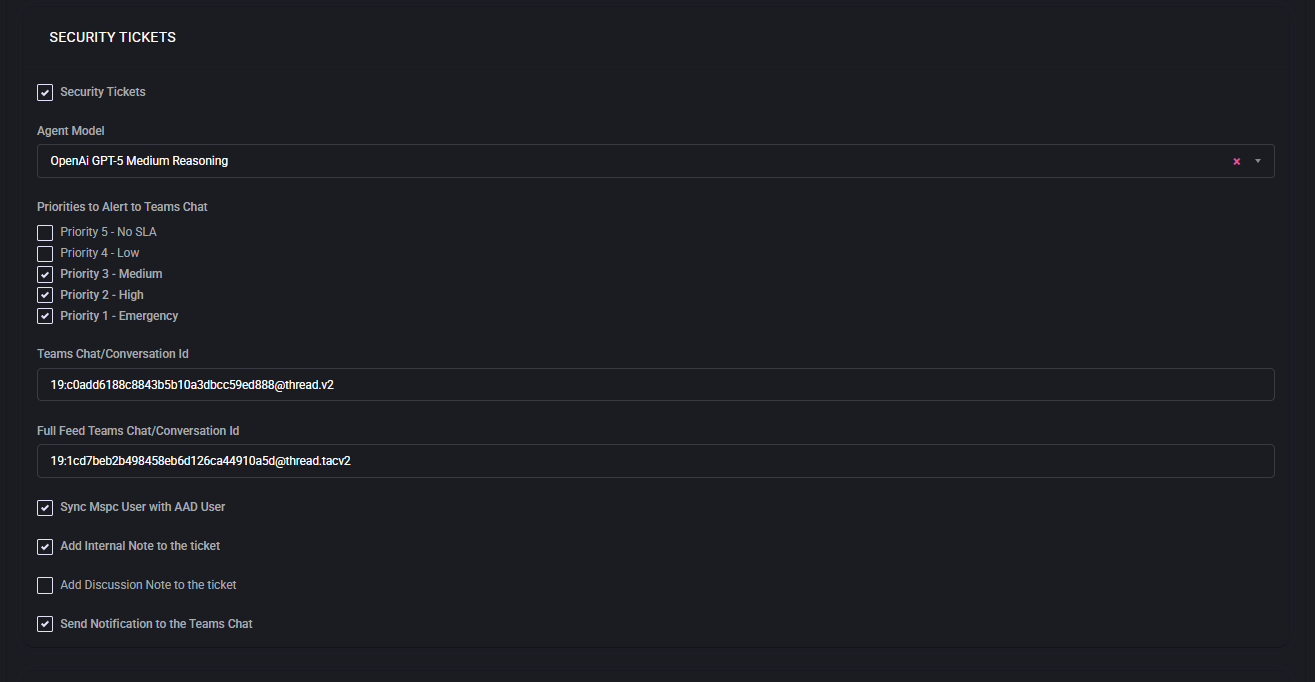
Fields & Options
- Enable Security Tickets
Activates dedicated handling of tickets marked as security-related.
- Agent Model
Defines the AI reasoning model used to analyze and classify security events.
Example: OpenAI GPT-5 Medium Reasoning.
- Priorities to Alert to Teams Chat
Select which ticket priorities (e.g., Medium, High, Emergency) will trigger alerts in Microsoft Teams channels. This ensures that only relevant incidents reach the security team.
- Teams Chat/Conversation ID
A Microsoft Teams channel ID used for sending targeted security alerts.
- Full Feed Teams Chat/Conversation ID
An optional second Teams channel ID where all security tickets are mirrored, creating a comprehensive feed for auditing and SOC visibility.
- Sync MSPC User with AAD User
Matches ticket requesters in MSPControl with their corresponding Azure AD accounts to strengthen identity context.
- Add Internal Note to the Ticket
Automatically appends system-generated notes to tickets for audit trails.
- Add Discussion Note to the Ticket
Inserts human-readable updates intended for collaboration between engineers.
- Send Notification to the Teams Chat
Sends a notification message into the configured Teams channel when a qualifying security ticket is detected.
Behavior
Virtubot monitors incoming tickets for security-related keywords, sources, or triggers. If a ticket matches defined conditions, it is marked as a Security Ticket. Alerts are sent to the selected Teams channels, with optional full-feed duplication for SOC monitoring. Linked Azure AD accounts are synchronized to give analysts full identity context when investigating the incident.
Best Practices
- Enable Emergency and High priorities for Teams alerts to minimize noise while ensuring visibility of critical events.
- Use the Full Feed channel for SOC staff who need a complete log of all incidents.
- Always enable Sync MSPC User with AAD User to ensure accurate correlation of incidents with user accounts.
- Configure audit-ready internal notes for compliance requirements (e.g., ISO27001, SOC 2).
- Test alerts regularly by creating simulated security incidents to confirm routing works as expected.
Security Tickets
The Security Tickets section ensures that tickets related to security incidents are flagged, prioritized, and routed with heightened visibility. These tickets often involve data breaches, unauthorized access attempts, malware infections, or compliance-related events and must be escalated to the right teams without delay.
Fields & Options
- Enable Security Tickets
Activates dedicated handling of tickets marked as security-related.
- Agent Model
Defines the AI reasoning model used to analyze and classify security events.
Example: OpenAI GPT-5 Medium Reasoning.
- Priorities to Alert to Teams Chat
Select which ticket priorities (e.g., Medium, High, Emergency) will trigger alerts in Microsoft Teams channels. This ensures that only relevant incidents reach the security team.
- Teams Chat/Conversation ID
A Microsoft Teams channel ID used for sending targeted security alerts.
- Full Feed Teams Chat/Conversation ID
An optional second Teams channel ID where all security tickets are mirrored, creating a comprehensive feed for auditing and SOC visibility.
- Sync MSPC User with AAD User
Matches ticket requesters in MSPControl with their corresponding Azure AD accounts to strengthen identity context.
- Add Internal Note to the Ticket
Automatically appends system-generated notes to tickets for audit trails.
- Add Discussion Note to the Ticket
Inserts human-readable updates intended for collaboration between engineers.
- Send Notification to the Teams Chat
Sends a notification message into the configured Teams channel when a qualifying security ticket is detected.
Behavior
Virtubot monitors incoming tickets for security-related keywords, sources, or triggers. If a ticket matches defined conditions, it is marked as a Security Ticket. Alerts are sent to the selected Teams channels, with optional full-feed duplication for SOC monitoring. Linked Azure AD accounts are synchronized to give analysts full identity context when investigating the incident.
Best Practices
- Enable Emergency and High priorities for Teams alerts to minimize noise while ensuring visibility of critical events.
- Use the Full Feed channel for SOC staff who need a complete log of all incidents.
- Always enable Sync MSPC User with AAD User to ensure accurate correlation of incidents with user accounts.
- Configure audit-ready internal notes for compliance requirements (e.g., ISO27001, SOC 2).
- Test alerts regularly by creating simulated security incidents to confirm routing works as expected.
Ticket Planner
The Ticket Planner automates the alignment of tickets with service plans, budgets, and templates, ensuring consistency and efficiency across multiple helpdesk boards. By leveraging AI-driven classification and Microsoft Teams integration, the system distributes tasks, applies budgets, and enforces templates to maintain a standardized approach to ticket handling.
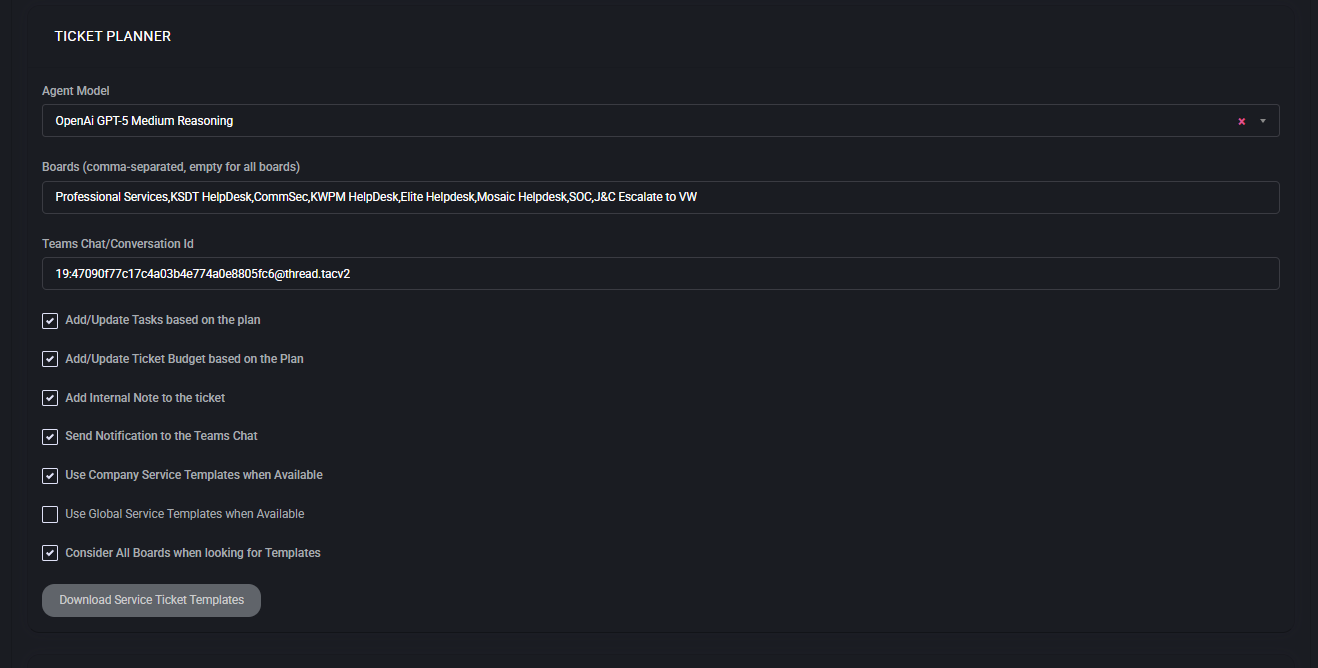
Fields & Options
- Agent Model
Defines the AI reasoning model responsible for analyzing and aligning tickets with defined plans.
Example: OpenAI GPT-5 Medium Reasoning.
- Boards (comma-separated, empty for all boards)
Specifies which boards the Ticket Planner applies to. If left empty, all boards are included.
Example: Professional Services, KSDT HelpDesk, SOC.
- Teams Chat/Conversation ID
The Microsoft Teams channel ID used for posting notifications and updates related to ticket planning.
- Add/Update Tasks based on the Plan
Automatically generates or updates ticket tasks according to the associated service plan.
- Add/Update Ticket Budget based on the Plan
Aligns ticket budget values with the defined service plan, ensuring correct cost tracking.
- Add Internal Note to the Ticket
Appends system-generated notes into the ticket for audit and traceability.
- Send Notification to the Teams Chat
Notifies the configured Teams channel whenever ticket planning actions are performed.
- Use Company Service Templates when Available
Applies company-level templates for consistent service delivery if available.
- Use Global Service Templates when Available
Applies global templates to maintain standardization across all boards and organizations.
- Consider All Boards when looking for Templates
Extends the search for templates across every board, not just the selected one.
- Download Service Ticket Templates
Exports the configured ticket templates as a reference for further adjustments or auditing.
Behavior
The Ticket Planner automatically synchronizes tasks and budgets with the defined service plan. It ensures tickets are enriched with internal notes and that relevant updates are shared with Microsoft Teams channels. Service templates—whether company-specific or global—are applied to standardize ticket handling across boards. When enabled, cross-board template searching guarantees that the best matching template is always applied, regardless of origin.
Best Practices
- Always specify boards explicitly unless all boards should be included.
- Enable both Add/Update Tasks and Add/Update Ticket Budget for maximum automation efficiency.
- Use Company Templates for internal consistency and Global Templates when standardization across organizations is required.
- Test Teams notifications with sample tickets to verify correct routing and visibility.
- Download templates periodically for review and compliance documentation.
Ticket Quality Assurance
The Ticket Quality Assurance (QA) module ensures that tickets meet organizational standards before closure. It validates completed work, verifies time entries, and enforces compliance with internal processes. Failed reviews are cycled back for correction, while passed reviews can be closed automatically or routed into additional review workflows if required.
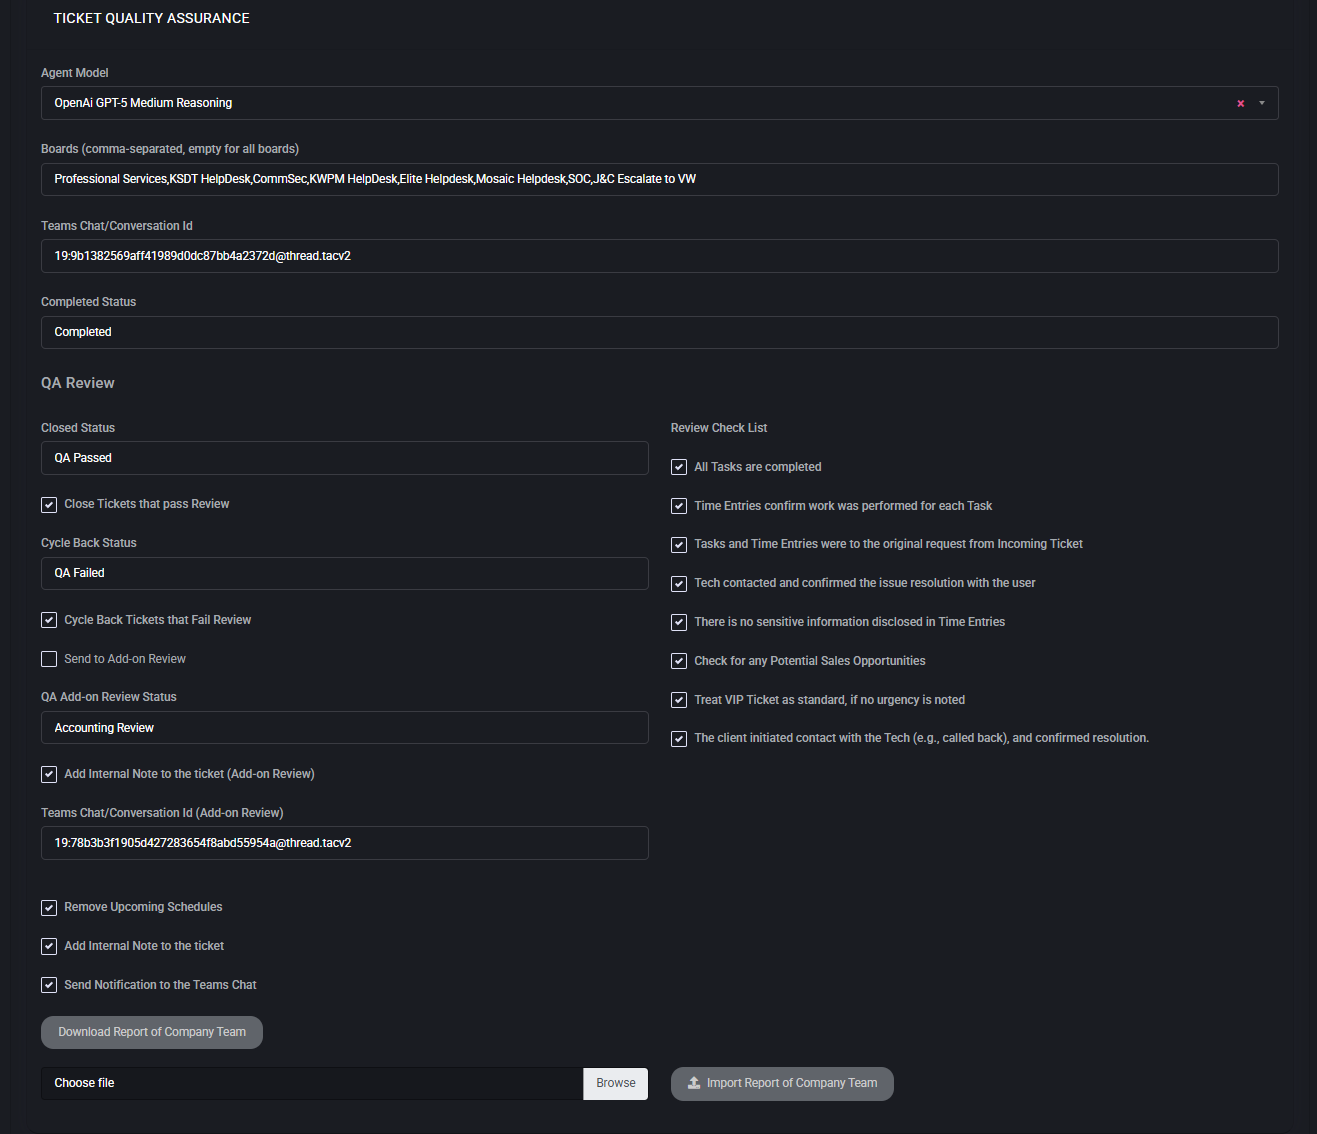
Fields & Options
- Agent Model
Defines the AI reasoning model used to evaluate tickets during QA review.
Example: OpenAI GPT-5 Medium Reasoning.
- Boards (comma-separated, empty for all boards)
Specifies which boards the QA process applies to. If empty, all boards are included.
- Teams Chat/Conversation ID
Microsoft Teams channel ID used for sending QA notifications and updates.
- Completed Status
The ticket status applied when QA review is successfully passed (e.g., “Completed”).
QA Review
- Closed Status
Defines the status to apply when a ticket passes QA (e.g., “QA Passed”).
- Close Tickets that pass Review
Automatically closes tickets once QA validation is completed.
- Cycle Back Status
Status applied when a ticket fails QA review (e.g., “QA Failed”).
- Cycle Back Tickets that Fail Review
Automatically routes failed tickets back for correction.
- Send to Add-on Review
Enables routing of tickets into an additional review step if required.
- QA Add-on Review Status
Defines the status for tickets sent into add-on review (e.g., “Accounting Review”).
- Add Internal Note to the ticket (Add-on Review)
Adds system notes documenting add-on review steps.
- Teams Chat/Conversation ID (Add-on Review)
Microsoft Teams channel ID for notifications specific to add-on reviews.
Review Checklist
- All tasks are completed.
- Time entries confirm that work was performed for each task.
- Tasks and time entries match the original request from the incoming ticket.
- Technician contacted and confirmed resolution with the user.
- No sensitive information is disclosed in time entries.
- Check for any potential sales opportunities.
- Treat VIP tickets as standard if no urgency is noted.
- Client initiated contact with the technician (e.g., callback) and confirmed resolution.
Additional Settings
- Remove Upcoming Schedules
Clears scheduled tasks if the ticket is closed after QA.
- Add Internal Note to the Ticket
Appends automated notes summarizing QA review results.
- Send Notification to the Teams Chat
Sends QA results and status updates into Microsoft Teams channels.
- Download Report of Company Team
Exports a QA review report for audit or management review.
- Import Report of Company Team
Imports external QA reports for consolidation and compliance tracking.
Best Practices
- Define clear pass/fail statuses to prevent tickets from being stuck in review loops.
- Use Add-on Reviews (e.g., Accounting Review) for specialized checks beyond technical QA.
- Enable automated notes to maintain a full audit trail of review actions.
- Leverage Teams notifications to ensure visibility of failed or cycled-back tickets.
- Regularly update the Review Checklist to align with business and compliance requirements.
Ticket Sales
The Ticket Sales module turns qualified support requests into sales opportunities. It watches tickets across selected boards, flags upsell/cross-sell signals, and—when enabled—creates or updates opportunities in your PSA (e.g., ConnectWise). Notifications and internal notes keep engineers and sales aligned while preserving an audit trail.
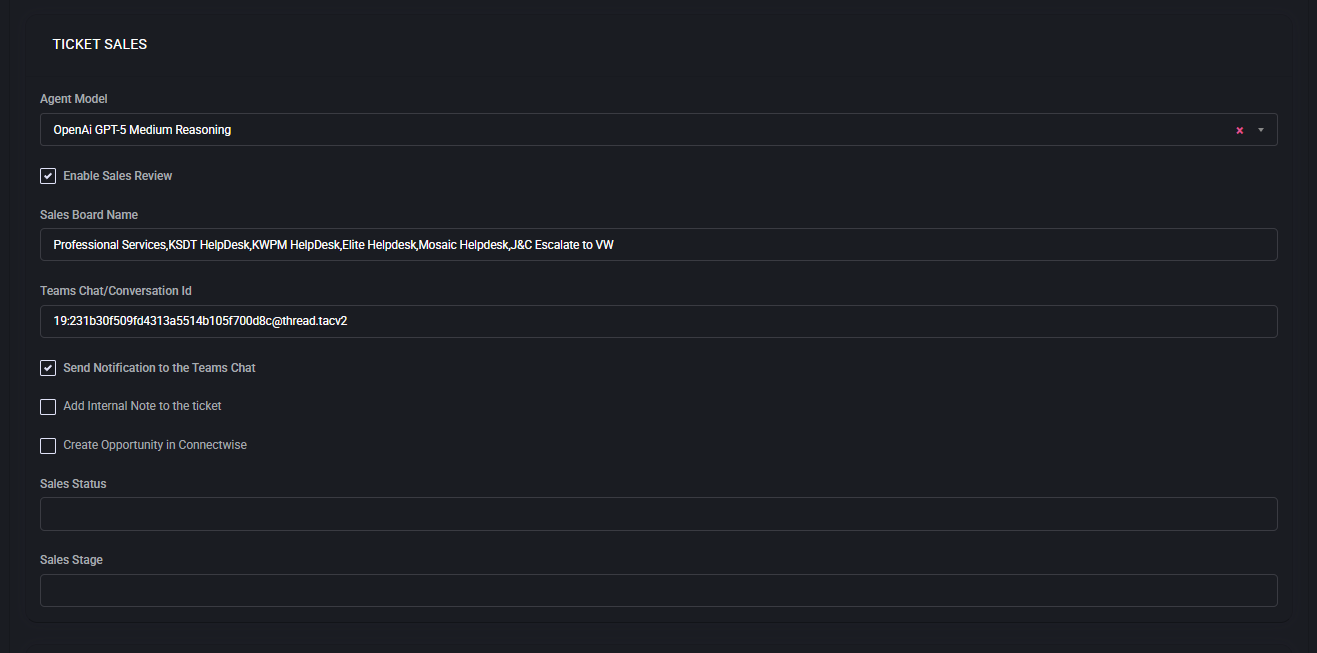
Fields & Options
- Agent Model
AI reasoning model that evaluates tickets for sales potential (renewals, add-ons, projects). Choose a model strong in summarization and intent detection (e.g., “OpenAI GPT-5 Medium Reasoning”).
- Enable Sales Review
Turns on human-in-the-loop review. Tickets the AI marks as “sales-worthy” are routed to the Sales board for validation before any PSA opportunity is created.
- Sales Board Name
Comma-separated list of boards where Sales Review items should appear. Leave blank to allow all boards. Use this to keep pre-sales work separate from technical queues.
- Teams Chat/Conversation Id
Microsoft Teams channel used to notify account managers about new sales candidates and state changes. Paste a @thread.tacv2 conversation ID.
- Send Notification to the Teams Chat
Posts a succinct summary (client, intent, suggested product/service, expected value if available) when a ticket enters Sales Review or an opportunity is updated.
- Add Internal Note to the ticket
Writes a system note explaining why the ticket was flagged (signals detected, plan mismatch, expired warranty, capacity limits). Helps auditors and engineers understand the recommendation.
- Create Opportunity in ConnectWise
If enabled, the system creates/updates an Opportunity tied to the Company/Contact from the ticket. Mapping uses Sales Status/Stage below.
- Sales Status
Opportunity status to apply when creating/updating in the PSA (e.g., “New”, “Qualified”). Pick the status your sales pipeline expects for newly qualified leads.
- Sales Stage
Pipeline stage for the created/updated opportunity (e.g., “Qualification”, “Discovery”). Align this with revenue forecasting rules to avoid pipeline noise.
Behavior
When a ticket matches sales criteria (e.g., capacity shortfall, recurring incidents suggesting a project, end-of-life hardware, license overage), the AI assigns it to Sales Review on the configured board and, if enabled, notifies the specified Teams channel. If Create Opportunity in ConnectWise is enabled, MSPControl creates or updates an opportunity using the ticket’s Company/Contact, sets Sales Status and Sales Stage, and links back to the originating ticket. Internal notes document the reasoning and any extracted details (SKU hints, seat counts, term, budget signals). Sales can accept, modify, or dismiss the suggestion without affecting the original technical workflow.
Best Practices
- Start with Enable Sales Review on and Create Opportunity off to calibrate signal quality, then turn on auto-creation.
- Scope Sales Board Name to a dedicated board to avoid cluttering engineering queues.
- Standardize Sales Status/Sales Stage mappings with your PSA admin to keep forecasts accurate.
- Keep Teams notifications concise (problem → recommended offer → next step) to increase sales response rates.
- Use internal notes to capture qualification evidence (usage metrics, failure frequency, EOL dates) for later audits.
Scheduling Group Processor
The Scheduling Group Processor automates handling of scheduling groups, ensuring that tasks, resources, and ticket assignments respect pre-defined scheduling rules. It leverages AI-based reasoning to interpret workload patterns, availability, and operational constraints, reducing manual coordination effort and ensuring timely service delivery.

Fields & Options
- Enable Scheduling Group Processor
Activates automated processing for scheduling groups. Once enabled, the system evaluates incoming tickets and tasks against scheduling rules to assign the appropriate group or technician automatically.
- Agent Model
Defines the AI reasoning model used to interpret scheduling rules and workload context.
Example: OpenAI GPT-5 Medium Reasoning.
Behavior
When active, the processor reviews incoming tasks and tickets, identifies the relevant scheduling group, and applies assignment logic accordingly. This ensures even workload distribution, compliance with shift or department rules, and faster task routing. The AI model can also learn from historical patterns, improving future scheduling accuracy.
Best Practices
- Enable the processor only after defining clear scheduling groups and assignment rules in your system.
- Use a reasoning-capable AI model (e.g., GPT-5 Medium) for better contextual understanding of workloads.
- Test with a small subset of tickets before rolling out globally to avoid misassignments.
- Regularly review scheduling outcomes to fine-tune group definitions and AI parameters.
- Combine with Teams notifications (if available in your setup) for transparency on automated assignments.
Ticket Sentiment
The Ticket Sentiment module analyzes the tone and emotional context of ticket communications to provide better insight into customer satisfaction and urgency. By applying sentiment analysis across boards, teams can proactively identify frustrated or dissatisfied clients and prioritize their cases for faster resolution.
Fields & Options
- Boards (comma-separated, empty for all boards)
Defines which boards are monitored for sentiment analysis. If left empty, sentiment evaluation applies to all boards.
Example: Professional Services, KSDT HelpDesk, CommSec, SOC.
Behavior
Each incoming ticket message is scanned for sentiment indicators such as positive, neutral, or negative tone. The system then tags the ticket with the detected sentiment level. Negative or urgent sentiment can be escalated, while positive sentiment may feed into customer satisfaction metrics. This information helps engineers and managers adjust their response approach and prioritize client interactions effectively.
Best Practices
- Apply sentiment analysis to client-facing boards where communication tone strongly impacts customer satisfaction.
- Review negative sentiment alerts regularly to prevent churn and improve client retention.
- Use sentiment data in performance reviews and customer experience KPIs.
- Combine with escalation policies to automatically raise priority for highly negative or urgent tickets.
- Keep sentiment evaluation enabled across multiple boards for a holistic view of customer mood trends.
Ticket Summary Rewrite
The Ticket Summary Rewrite module standardizes and improves the clarity of ticket summaries. By leveraging AI-driven rewriting, it ensures that ticket subjects are concise, accurate, and aligned with organizational naming conventions. This improves searchability, reporting, and collaboration across boards.

Fields & Options
- Boards (comma-separated, empty for all boards)
Defines which boards the rewrite process applies to. If left empty, all boards are included.
Example: Professional Services, HelpDesk, SOC.
- Enable Ticket Summary Rewrite
Activates the summary rewriting process for tickets in the defined boards.
- Teams Chat/Conversation Id
Specifies the Microsoft Teams channel ID where notifications of summary rewrites are posted.
- Keep “TAG” at the start of the summary if exists
Preserves any existing tags at the beginning of the ticket summary while rewriting the remaining text.
- Add Internal Note to the ticket
Appends an internal system note explaining when and how the summary was rewritten.
- Change The Ticket Summary
Directly updates the ticket summary with the rewritten version.
- Send Notification to the Teams Chat
Posts a notification to the configured Teams channel whenever a ticket summary is modified.
Behavior
When enabled, the system reviews ticket subjects, rewrites them for clarity and consistency, and updates the ticket record. If a summary contains a recognized tag (e.g., project code or SLA marker), it is preserved at the beginning. Internal notes provide an audit trail of changes, while Teams notifications ensure visibility of updates for stakeholders.
Best Practices
- Enable rewriting across high-volume boards to improve readability and reduce ambiguity in reports.
- Preserve tags to maintain traceability with project or SLA identifiers.
- Use Teams notifications selectively to avoid notification fatigue.
- Periodically review rewritten summaries to confirm that AI-driven changes align with organizational standards.
- Keep internal notes enabled for compliance and historical tracking of ticket modifications.
Ticket Duplicate Detection
Ticket Duplicate Detection prevents duplicate workload, consolidates related requests, and identifies wider customer outages. The module monitors new and updated tickets on a target board, merges same-contact duplicates, and can build parent–child structures for incident swarms. Optional Teams notifications and internal notes provide full visibility and audit trails.
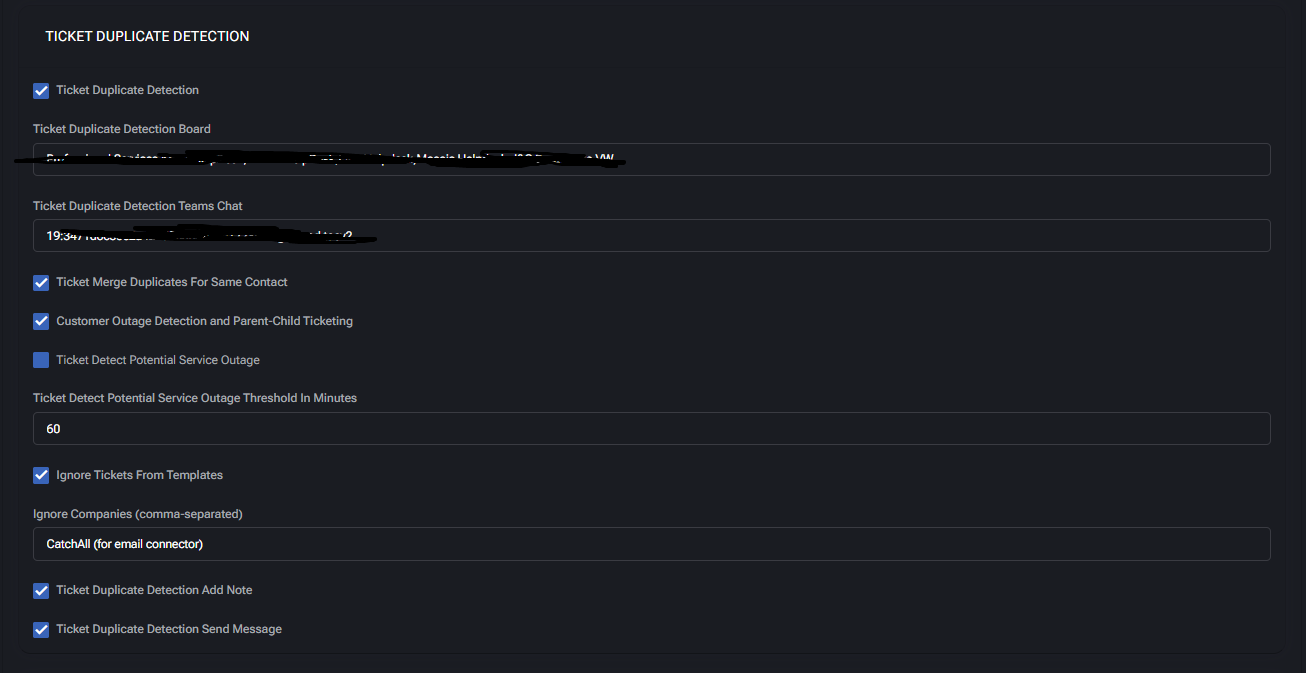
Fields & Options
- Ticket Duplicate Detection
Enables the duplicate/outage logic for the selected board.
- Ticket Duplicate Detection Board
Board where detection runs. Use this to scope processing to a specific queue.
- Ticket Duplicate Detection Teams Chat
Microsoft Teams conversation ID to receive detection/merge notifications.
- Ticket Merge Duplicates For Same Contact
Automatically merges new tickets from the same contact when content is substantially similar.
- Customer Outage Detection and Parent-Child Ticketing
Detects multi-user/customer-wide incidents and links related tickets under a parent outage ticket.
- Ticket Detect Potential Service Outage
(Optional) Predicts outages from anomaly signals before volume spikes. When disabled, only explicit swarms are processed.
- Ticket Detect Potential Service Outage Threshold In Minutes
Time window for clustering tickets into an outage (e.g., 60).
- Ignore Tickets From Templates
Skips tickets created by templates to avoid false positives.
- Ignore Companies (comma-separated)
List of companies to exclude from detection (e.g., CatchAll (for email connector)).
- Ticket Duplicate Detection Add Note
Adds an internal note describing the duplicate/outage action taken.
- Ticket Duplicate Detection Send Message
Sends a summary message to the configured Teams channel for visibility.
Behavior
On ticket creation/update, the engine compares subject, body, requester, and recent ticket history within the configured board. If a same-contact duplicate is detected, it merges or links the ticket and posts an internal note. When multiple tickets across a company match within the threshold window, a parent outage ticket is created (or updated), and related tickets are attached as children. If Teams integration is set, concise notifications (action, parent link, impacted count) are posted. Ignored templates/companies are excluded from all checks.
Best Practices
- Keep the threshold window aligned with your SLA response times (e.g., 30–90 minutes).
- Enable Ignore Tickets From Templates to reduce noise from auto-generated work items.
- Start with one high-volume board; validate merges before enabling across all queues.
- Use Teams messages sparingly—post only merge/outage summaries to avoid alert fatigue.
- Regularly review ignored companies and template rules as integrations evolve.
Ticket Service Board Selector
The Ticket Service Board Selector automates routing of tickets to the appropriate service board based on ticket status or origin. This ensures tickets created via email connectors or other inputs are automatically reassigned to the correct board without manual intervention. It helps reduce misrouted tickets, accelerates response times, and improves workflow consistency.

Fields & Options
- Enable Ticket Service Board Selector
Activates the automated reassignment of tickets to the correct service board.
- Process the Following Statuses
List of statuses that trigger the reassignment process.
Example: New, New (email connector).
- Enable Board Update
Allows the system to update the board assignment of a ticket once matching criteria are found.
- Teams Chat/Conversation Id
Microsoft Teams conversation ID where notifications about board reassignments are posted.
- Add Internal Note to the Ticket
Appends an internal note describing the reassignment action for audit visibility.
- Send Notification to the Teams Chat
Sends a notification to the configured Teams channel whenever a ticket is reassigned.
Behavior
When enabled, the module monitors tickets with the defined statuses. If a ticket matches (e.g., created via email connector with “New” status), it is automatically moved to the designated service board. The system records the change in an internal note and posts a summary to the specified Teams channel if configured. This ensures tickets quickly reach the correct operational team for handling.
Best Practices
- Define statuses carefully to avoid reassigning tickets prematurely or unnecessarily.
- Enable Add Internal Note for full visibility of reassignment history.
- Use Teams notifications for support leads to monitor automated board changes.
- Test with one or two statuses (e.g., “New”) before rolling out across multiple categories.
- Review board assignments periodically to confirm rules still align with evolving workflows.
Section_StaleTicket
The Stale Ticket Handling feature monitors tickets that have not been updated for a defined period of time. It helps prevent tickets from being forgotten in the workflow by automatically identifying and escalating items considered “stale.” Notifications can be sent both to Microsoft Teams channels and directly to assignees, ensuring accountability and faster resolution.
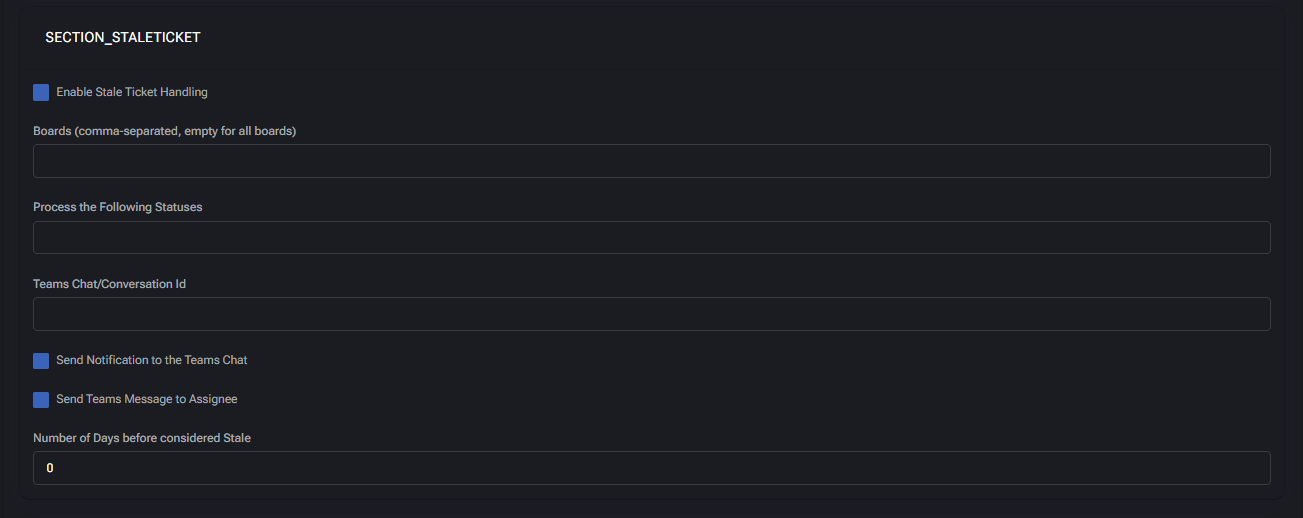
Fields & Options
- Enable Stale Ticket Handling
Activates stale ticket monitoring for the specified boards and statuses.
- Boards (comma-separated, empty for all boards)
Defines the boards where stale detection is applied. If left empty, all boards are included.
- Process the Following Statuses
Limits stale detection to tickets with these statuses (e.g., “In Progress”, “Waiting for Client”).
- Teams Chat/Conversation Id
Microsoft Teams channel ID where stale ticket alerts will be posted.
- Send Notification to the Teams Chat
Sends an alert into the configured Teams channel when a ticket becomes stale.
- Send Teams Message to Assignee
Directly notifies the assigned technician in Teams to prompt follow-up action.
- Number of Days before considered Stale
Defines the threshold (in days) for when a ticket is flagged as stale. Example: 7.
Behavior
When enabled, the system reviews tickets daily and checks the last update timestamp against the defined threshold. Tickets meeting the stale criteria are flagged and logged. If configured, notifications are sent to Teams channels for visibility and directly to assignees for action. This reduces the risk of client dissatisfaction caused by tickets left unresolved or without communication.
Best Practices
- Set thresholds according to SLA policies (e.g., 3–5 days for normal tickets, 1 day for urgent tickets).
- Use Teams notifications for team-wide visibility and direct messages for stronger accountability.
- Apply stale detection selectively to avoid false positives on long-term project tickets.
- Combine with escalation workflows to automatically reassign or increase ticket priority if left stale.
- Regularly review stale ticket logs to refine thresholds and improve customer satisfaction metrics.
Ticket Auto Messages
The Ticket Auto Messages module automatically handles tickets generated by system notifications, auto-replies, or other automated sources. It prevents clutter in service boards by detecting these tickets, documenting them with internal notes, and optionally closing them without manual effort. Notifications in Microsoft Teams provide visibility of auto-closed or auto-processed items.
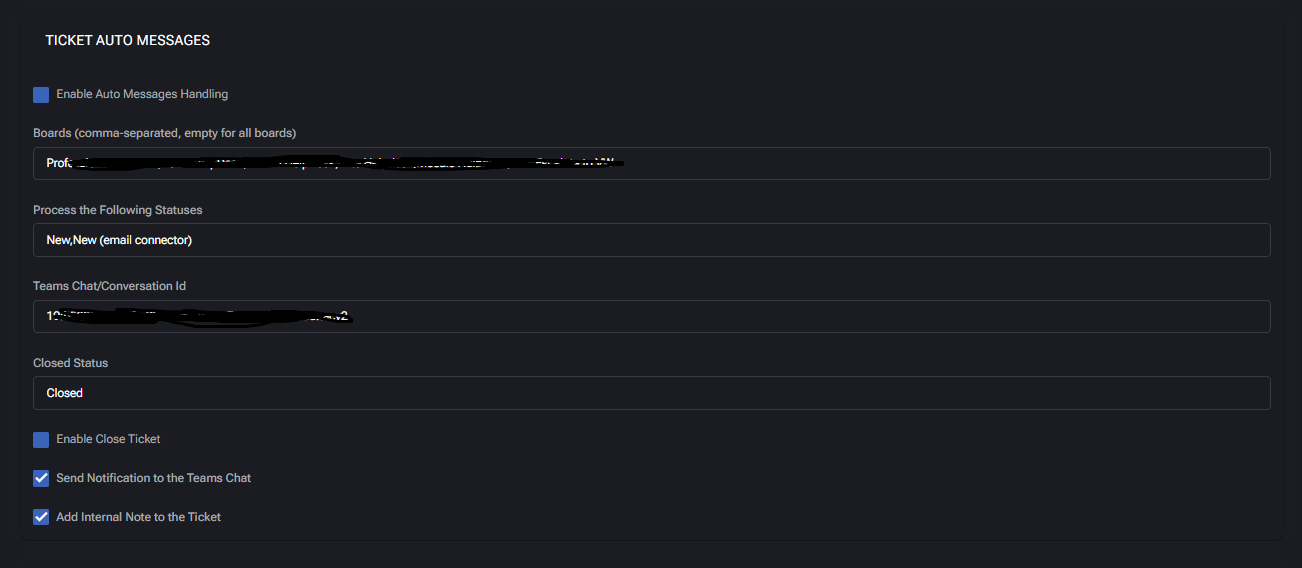
Fields & Options
- Enable Auto Messages Handling
Activates detection and processing of automated or system-generated tickets.
- Boards (comma-separated, empty for all boards)
Limits processing to specified boards. Leave empty to apply across all boards.
- Process the Following Statuses
Specifies which ticket statuses are eligible for auto-message handling.
Example: New, New (email connector).
- Teams Chat/Conversation Id
Microsoft Teams channel ID where notifications about handled auto-messages are sent.
- Closed Status
Status to apply when an auto-message ticket is closed automatically (e.g., “Closed”).
- Enable Close Ticket
Automatically closes tickets identified as auto-messages instead of leaving them in queues.
- Send Notification to the Teams Chat
Posts a summary notification to Teams whenever an auto-message ticket is processed.
- Add Internal Note to the Ticket
Appends an internal note documenting that the ticket was flagged and processed as an auto-message.
Behavior
When enabled, the system reviews incoming tickets and identifies those generated by automated sources (e.g., email connectors, system auto-replies). If a match is found, the ticket is documented with an internal note, optionally closed using the defined Closed Status, and a notification is sent to Microsoft Teams. This prevents unnecessary manual triage of non-actionable items.
Best Practices
- Enable this feature on boards with heavy email connector traffic to reduce noise.
- Always configure a clear Closed Status to distinguish auto-closed messages from manually resolved tickets.
- Keep internal notes enabled for auditing and compliance tracking.
- Use Teams notifications to give visibility to service leads without overwhelming frontline engineers.
- Review processed auto-messages periodically to refine detection rules and avoid false positives.
Ticket Auto Responders
The Ticket Auto Responders module handles automated email replies such as “Out of Office” or system-generated acknowledgements. It detects these responses, documents them within the ticket, and prevents them from cluttering service boards. This ensures that only actionable tickets remain visible for technicians while maintaining an audit trail of automated replies.

Fields & Options
- Enable Ticket Auto Responders
Activates the detection and handling of automated email responses.
- Boards (comma-separated, empty for all boards)
Restricts detection to specified boards. Leave empty to apply across all boards.
- Process the Following Statuses
Defines which statuses are eligible for auto-responder detection.
Example: New, New (email connector).
- Teams Chat/Conversation Id
Microsoft Teams channel ID where notifications about auto-responder handling are sent.
- Closed Status
Specifies the ticket status to apply if an auto-responder ticket is automatically closed (e.g., “Closed”).
- Send Notification to the Teams Chat
Posts notifications in Teams whenever a ticket is flagged or closed due to auto-responder detection.
- Add Internal Note to the Ticket
Appends an internal note documenting that the ticket was processed as an auto-responder.
Behavior
When enabled, the system scans new tickets for patterns that match automated replies (e.g., “Out of Office,” “Delivery Failure,” “Autoresponder”). Tickets identified as such are either closed immediately with the configured Closed Status or documented with notes for audit purposes. Notifications can be sent to Teams for visibility, ensuring service leads understand why certain tickets were closed without technician intervention.
Best Practices
- Enable this feature on boards with high email traffic to prevent noise from automated replies.
- Keep internal notes enabled to maintain compliance and traceability of automatically closed tickets.
- Use Teams notifications for transparency, but avoid over-alerting by limiting to board leads or SOC channels.
- Regularly review detected auto-responder tickets to refine detection accuracy and minimize false positives.
- Ensure Closed Status is configured distinctly from technician-closed tickets for accurate reporting.
Catch All
The Catch All module handles tickets created through a general catch-all mailbox or connector. It ensures that these tickets are automatically matched to the appropriate customer domain whenever possible, while excluding specific companies from processing. This prevents generic or misdirected tickets from being lost and provides full visibility through Teams notifications and internal notes.
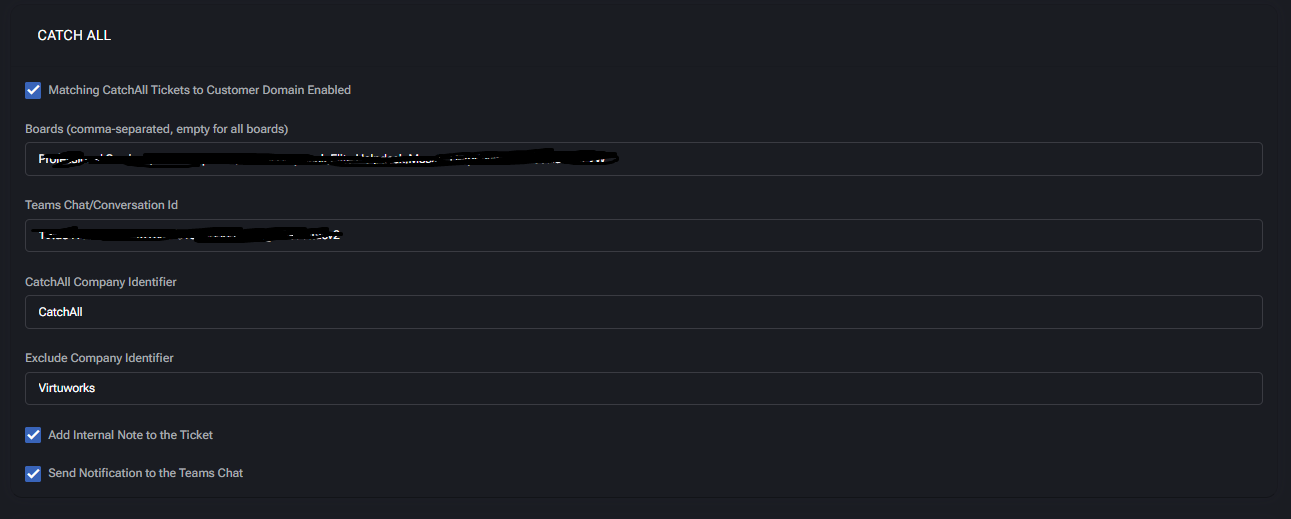
Fields & Options
- Matching CatchAll Tickets to Customer Domain Enabled
Activates domain-matching for tickets created via the catch-all connector.
- Boards (comma-separated, empty for all boards)
Defines which boards process catch-all tickets. Leave empty to apply to all boards.
Example: Professional Services, HelpDesk, SOC.
- Teams Chat/Conversation Id
Microsoft Teams channel ID where catch-all ticket notifications are posted.
- CatchAll Company Identifier
Label applied to tickets created from the catch-all source (e.g., CatchAll).
- Exclude Company Identifier
Company identifiers that should be excluded from catch-all processing (e.g., Virtuworks).
- Add Internal Note to the Ticket
Appends a system note documenting that the ticket was identified as catch-all.
- Send Notification to the Teams Chat
Posts a Teams message whenever a ticket is processed through the catch-all connector.
Behavior
When a ticket is created via the catch-all connector, the system attempts to match it to a known customer domain. If matched, the ticket is reassigned to the appropriate customer; if unmatched, it retains the CatchAll Company Identifier. Excluded companies are ignored by this process. Notifications are sent to Teams, and internal notes are added for traceability.
Best Practices
- Enable this feature to ensure tickets from generic mailboxes are not overlooked.
- Use CatchAll Company Identifier consistently for auditing and filtering.
- Configure Exclude Company Identifier for internal or system-level accounts to reduce noise.
- Keep Teams notifications enabled for visibility into unclassified ticket sources.
- Maintain internal notes to provide an audit trail of all catch-all processing actions.
Errors
The Errors module provides visibility into system or automation errors encountered during ticket processing. It ensures that any failed automation step, misconfiguration, or unexpected condition is captured and reported to administrators via Microsoft Teams. This prevents silent failures and helps teams react quickly to issues that may impact ticket handling or workflows.

Fields & Options
- Teams Chat/Conversation Id
Specifies the Microsoft Teams channel where error notifications will be delivered.
- Send Notification to the Teams Chat
Enables posting of error details to the configured Teams channel, ensuring visibility for administrators and support leads.
Behavior
When enabled, the system captures errors that occur during automated processing (e.g., ticket routing, duplicate detection, integrations). These errors are logged internally and, if configured, sent to the Teams channel for immediate visibility. This allows administrators to quickly investigate, correct misconfigurations, or escalate issues before they affect service delivery.
Best Practices
- Always configure a dedicated Teams channel for error notifications to keep them separate from normal ticket updates.
- Monitor error notifications regularly to identify recurring issues or misconfigurations.
- Use logged error data during audits or troubleshooting sessions to validate system reliability.
- Review and update automation rules if specific errors appear frequently.
- Keep Teams notifications enabled to ensure errors are not missed by administrators.
Agent Models Policy
The Agent Models Policy defines which AI models are available within VirtuBot, their roles, and how they are applied across different automation scenarios. Administrators can configure completion and embedding models, set defaults, and register model endpoints with API credentials. This policy ensures flexibility in selecting the right AI engine for reasoning, text generation, or vector operations.
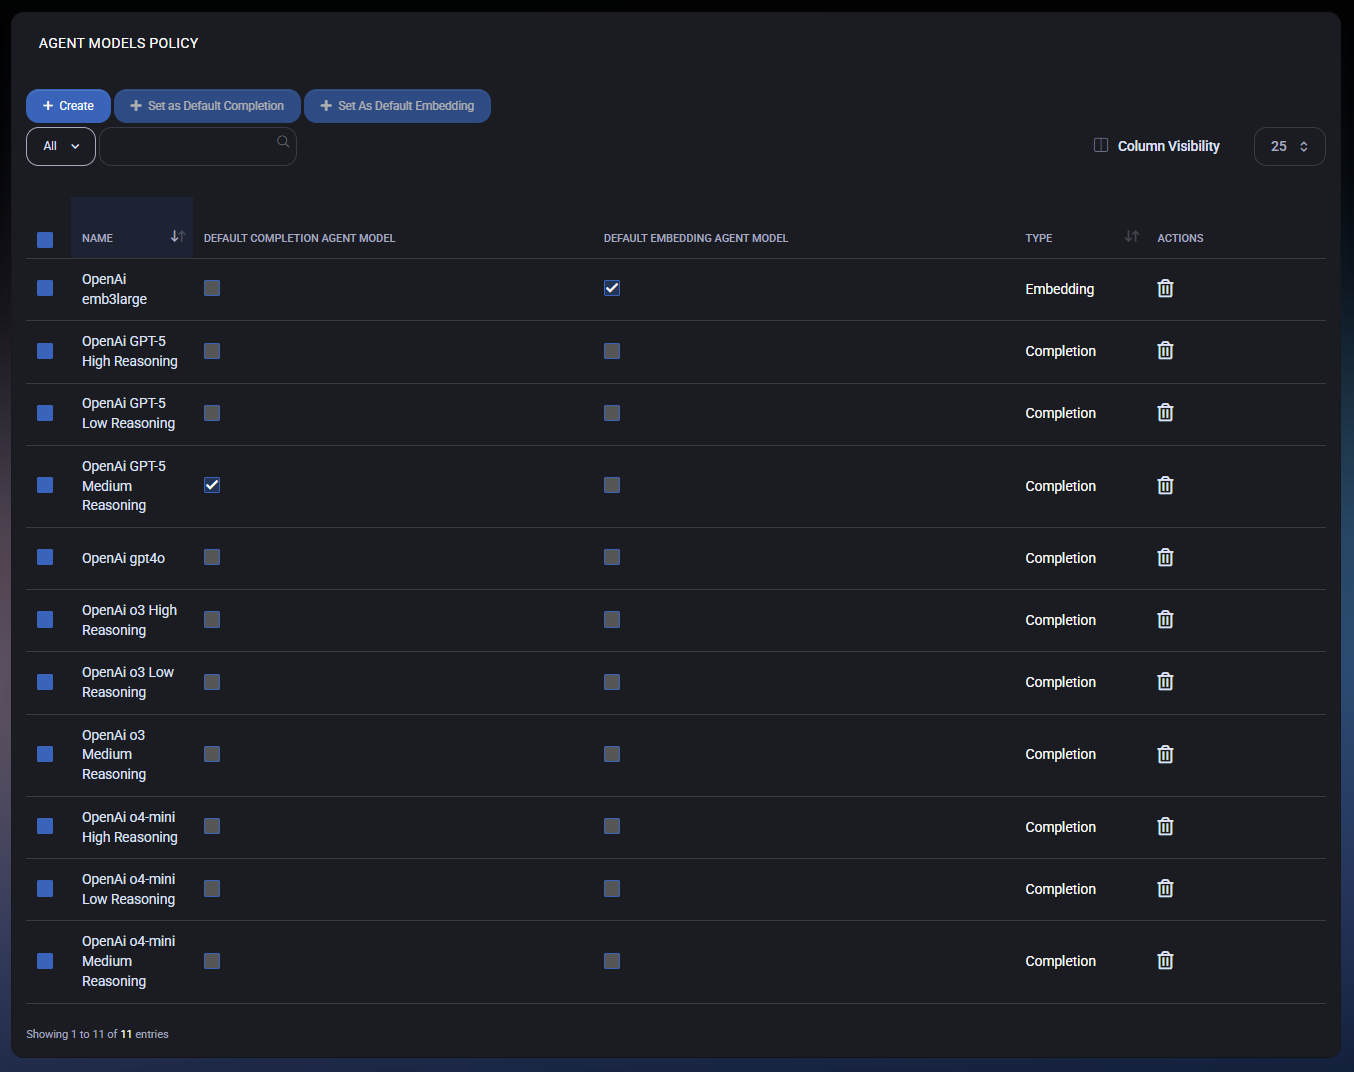
Agent Models List
The main overview page displays all configured agent models along with their type and default assignments:
- Name – The identifier of the AI model (e.g., OpenAI GPT-5 Medium Reasoning).
- Default Completion Agent Model – Marks a model as the default for text completion tasks.
- Default Embedding Agent Model – Marks a model as the default for embedding/vectorization tasks.
- Type – Indicates whether the model is used for Completion or Embedding.
- Actions – Provides the option to delete a model from the list.
Administrators can also use toolbar actions to:
- Create – Register a new agent model.
- Set as Default Completion – Assign the selected model as the system-wide default for completion.
- Set as Default Embedding – Assign the selected model as the system-wide default for embedding.
Agent Model Settings

When creating or editing an agent model, the following configuration options are available:
- Name – Unique name of the agent model for display and selection.
- Description – Optional description providing context for the model’s purpose.
- Type – Defines whether the model is a Completion or Embedding model.
- Reasoning Model – Marks the model as suitable for structured reasoning tasks (available for certain completion models).
- Endpoints – API connection details for the model:
- API URL – Endpoint address where requests are sent.
- Deployment Name – Identifier for the specific deployment of the model.
- API Key – Authentication key used to access the endpoint.
Administrators can add multiple endpoints for load balancing or fallback purposes. Each endpoint is listed with checkboxes for management and deletion.
Actions
- Save Changes – Saves the current model configuration.
- Save Changes and Exit – Saves the configuration and returns to the models list.
- Cancel – Discards changes without saving.
- Delete Selected – Removes one or more endpoints from the model.
Best Practices
- Use Completion models for reasoning, text summarization, rewriting, and automation workflows.
- Use Embedding models for semantic search, knowledge base indexing, and similarity detection.
- Configure both a default completion and embedding model to ensure fallback behavior.
- For high-reliability environments, register multiple endpoints and test failover regularly.
- Secure API keys and limit access to administrators to prevent unauthorized use.
