Device Details
The Device Details page in MSPControl provides a comprehensive breakdown of every Windows machine managed through the Autopilot agent. This advanced view allows administrators to analyze system state, performance, security posture, installed hardware/software, and compliance metrics for a specific device.
Devices only appear in this section once the Autopilot agent has been successfully installed. You can view the full list of enrolled devices from the Devices overview screen.
This screen opens when clicking any device name from the main list.
Device Details – Table of Contents
General Tab
The General tab contains more than 20 sub-sections, each focused on a different aspect of the device.
General Overview
This top section provides a consolidated snapshot of device identity, agent status, security posture, installed software modules, and geolocation. It is divided into three main panels: current users & charts, device state & metrics, and a live map showing approximate location.
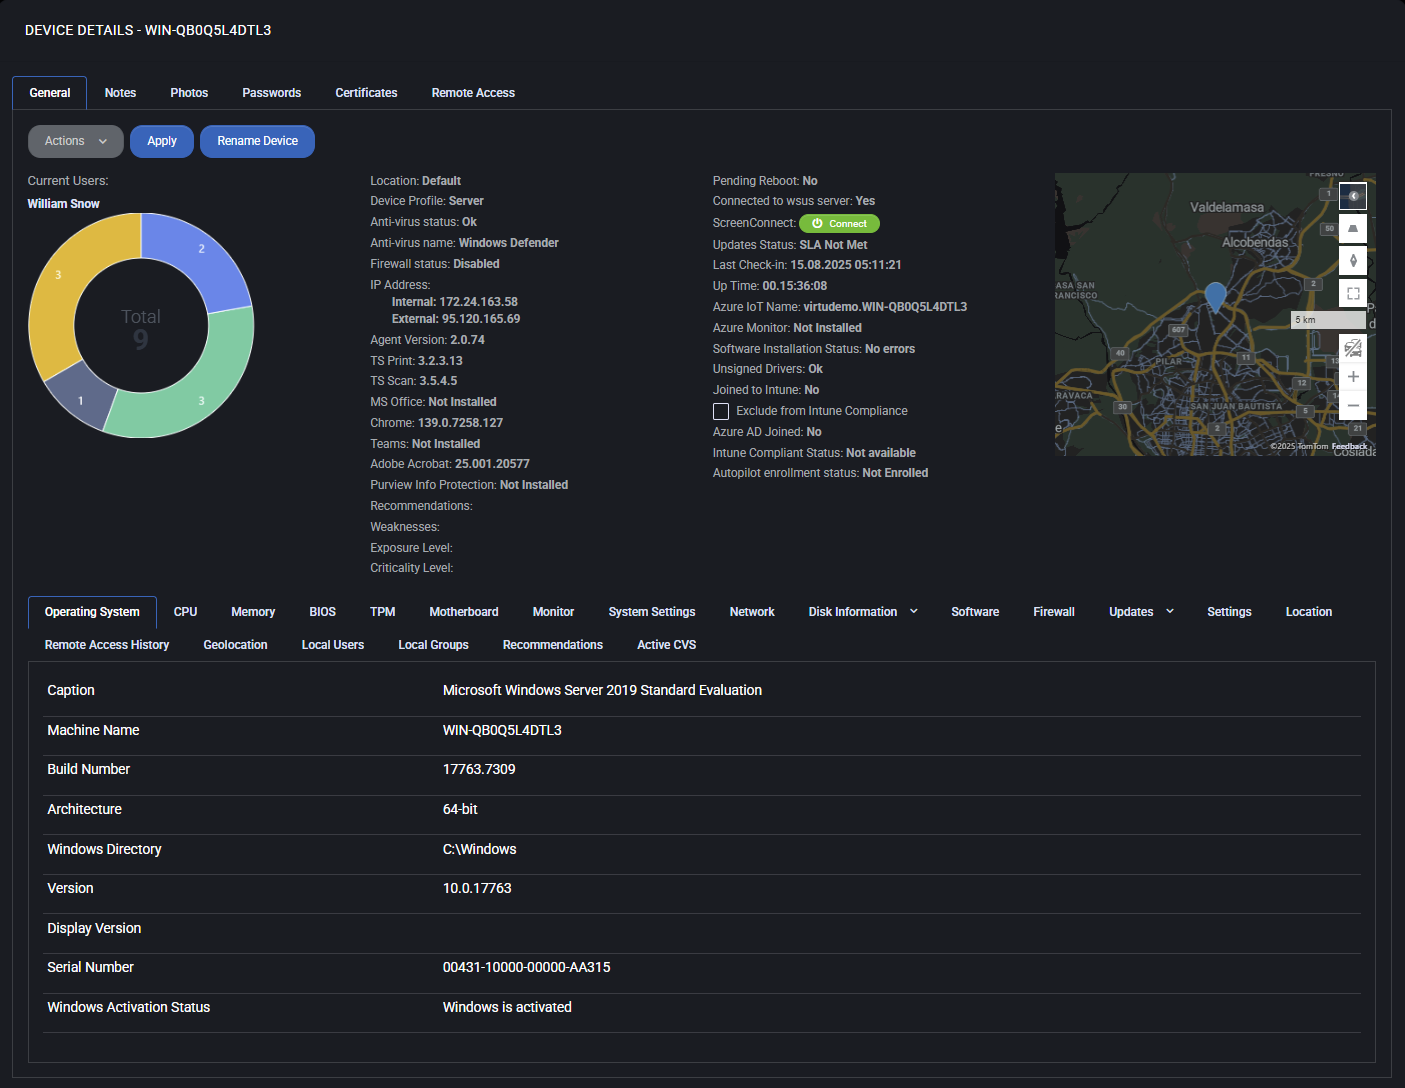
Current Users
Displays the primary user logged into the device. Clicking the name will show all devices used by this user.
User Distribution Chart
A donut chart showing how many users have logged into the device. The total number is in the center, with segments color-coded by user count. Hovering may reveal names or quantities.
Actions Menu
Use this dropdown to perform remote operations on the selected device:
- Repair Settings
Reapplies key MSPControl configuration and communication settings on the device.
- Reboot Device
Initiates an immediate restart of the machine.
- Delete Device
Removes the device record from MSPControl. Does not uninstall the agent.
- Install Updates
Pushes available Windows Updates to install on the device.
- Update Agent
Installs the latest version of the Autopilot agent if an update is available.
- Unmap Cloud Folders
Removes previously mapped cloud folders (e.g., OneDrive, SharePoint).
- Remap Cloud Folders
Re-applies folder mapping for supported cloud storage providers.
- Reinstall ScreenConnect Client
Reinstalls the remote access client used for on-demand connections via the Connect button.
- Send Logs
Triggers the upload of diagnostic logs to the MSPControl server.
- Reset PIP Settings
Resets internal telemetry or privacy improvement configurations.
- Set Template
Assigns or reassigns the configuration template applied to this device (e.g., Workstation, Enterprise).
- Set Location
Updates the logical location assigned to the device for reporting and filtering.
- Add Remote Access Users
Grants remote access permissions to selected users.
- Remove Remote Access Users
Revokes previously granted remote access rights.
- Run Windows Disk Cleanup
Launches built-in Windows cleanup for temp files, caches, and logs.
- Run Winget Updates
Initiates software updates via the Windows Package Manager (winget) on supported apps.
Device Information
- Location
Logical or assigned location in the MSPControl hierarchy (e.g., Default, Office-A).
- Device Profile
Indicates whether the system is configured as a Server or Workstation.
- Anti-virus status
Health check for antivirus software (e.g., OK or outdated).
- Anti-virus name
Specifies which AV product is running (e.g., Windows Defender).
- Firewall status
Indicates if the Windows Firewall is enabled, disabled, or misconfigured.
- IP Address
Shows both internal (LAN) and external (public) IP addresses of the device.
- Agent Version
Version number of the installed MSPControl Autopilot agent.
- TS Print / TS Scan
Indicates versions of remote print and scan components, if installed.
- MS Office
Shows if Microsoft Office is installed (and version, if applicable).
- Chrome
Current version of Google Chrome browser, if installed.
- Teams
Presence of Microsoft Teams (installed or not).
- Adobe Acrobat
Installed version of Adobe Acrobat, if available.
- Purview Info Protection
Indicates if Microsoft Purview Information Protection is installed.
- Recommendations / Weaknesses / Exposure / Criticality
Custom security assessments populated from policy or CVE scanners (may be empty).
Health and Compliance
- Pending Reboot
States whether a reboot is required (e.g., after updates).
- Connected to WSUS Server
Confirms whether the device receives updates via Windows Server Update Services.
- ScreenConnect
Shows whether remote access client is connected and operational.
- Updates Status
Indicates if the SLA for updates is met or breached (e.g., “SLA Not Met”).
- Last Check-In
Timestamp of the last contact with the MSPControl server.
- Uptime
Time since last system reboot in HH:MM:SS format.
- Azure IoT Name
If configured, this field shows the Azure-assigned IoT device name.
- Azure Monitor
Indicates if Azure Monitor integration is active.
- Software Installation Status
Verifies if recent installations completed without error.
- Unsigned Drivers
Reports the presence of any non-digitally-signed drivers.
- Joined to Intune
Whether the device is managed via Microsoft Intune.
- Exclude from Intune Compliance
Checkbox to omit device from Intune policy checks.
- Azure AD Joined
Status of Azure Active Directory registration.
- Intune Compliant Status
Shows whether device meets Intune compliance rules.
- Autopilot Enrollment Status
Indicates whether the device is enrolled in Windows Autopilot.
Geolocation Map
Displays the physical location of the device based on external IP or assigned location settings. Uses TomTom Maps API. You can zoom in/out and change view layers. The marker shows the device’s approximate city-level presence.
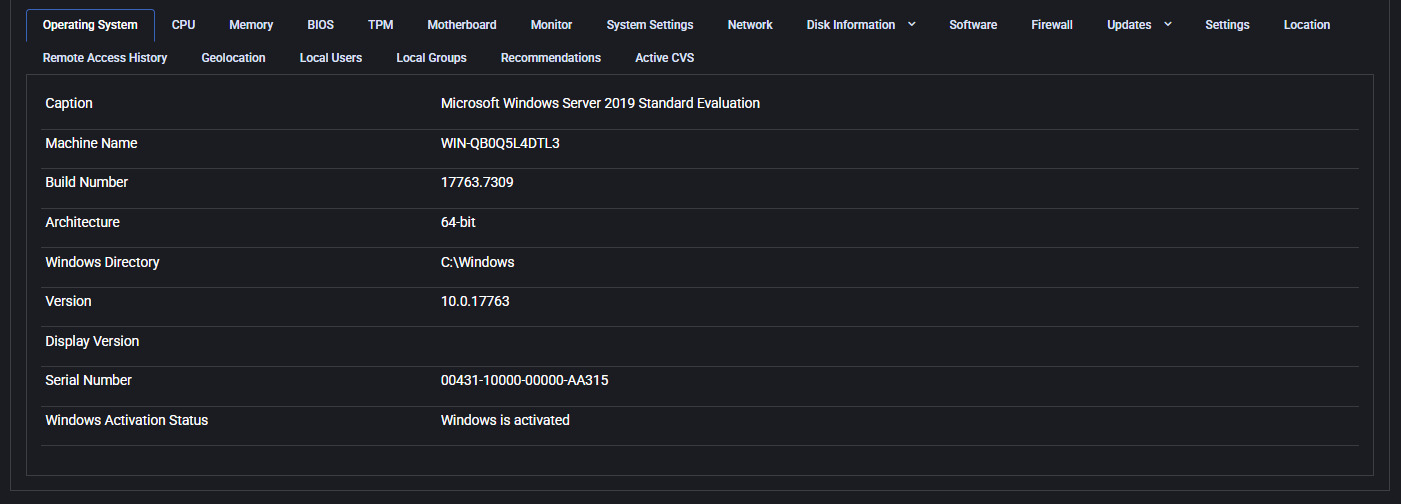
Operating System
This tab displays the current operating system details for the selected device. It includes:
- Caption: Full OS name, such as “Microsoft Windows Server 2019 Standard Evaluation”
- Machine Name: Hostname of the device
- Build Number: Specific OS build version
- Architecture: Indicates 32-bit or 64-bit system
- Windows Directory: Default system path (typically C:\Windows)
- Version: Windows version number
- Display Version: Optional UI version, may be blank
- Serial Number: System serial identifier
- Windows Activation Status: Shows if Windows is activated
This tab is useful for confirming the OS setup and checking license compliance.
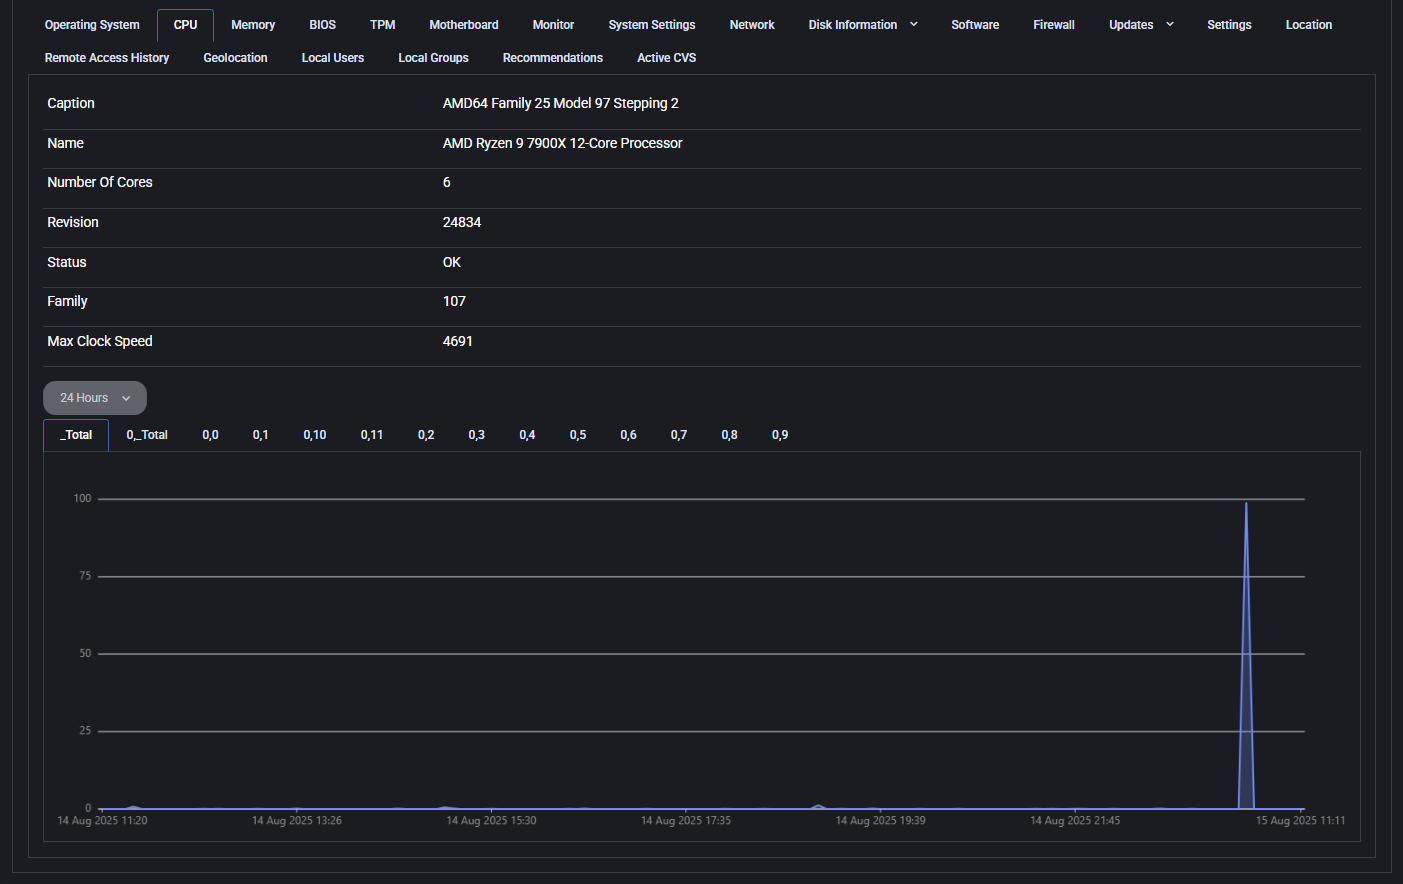
CPU
This section displays real-time and static data about the device’s processor. Key details include:
- Caption: Processor architecture family
- Name: Full processor model, such as “AMD Ryzen 9 7900X”
- Number of Cores: Logical cores available
- Revision: Hardware revision code
- Status: Health of the CPU (e.g., OK)
- Family: Internal architecture family number
- Max Clock Speed: Reported maximum CPU frequency
Below the static info, a live CPU usage graph tracks load over time. Data can be filtered by time range and specific core views using the dropdowns.
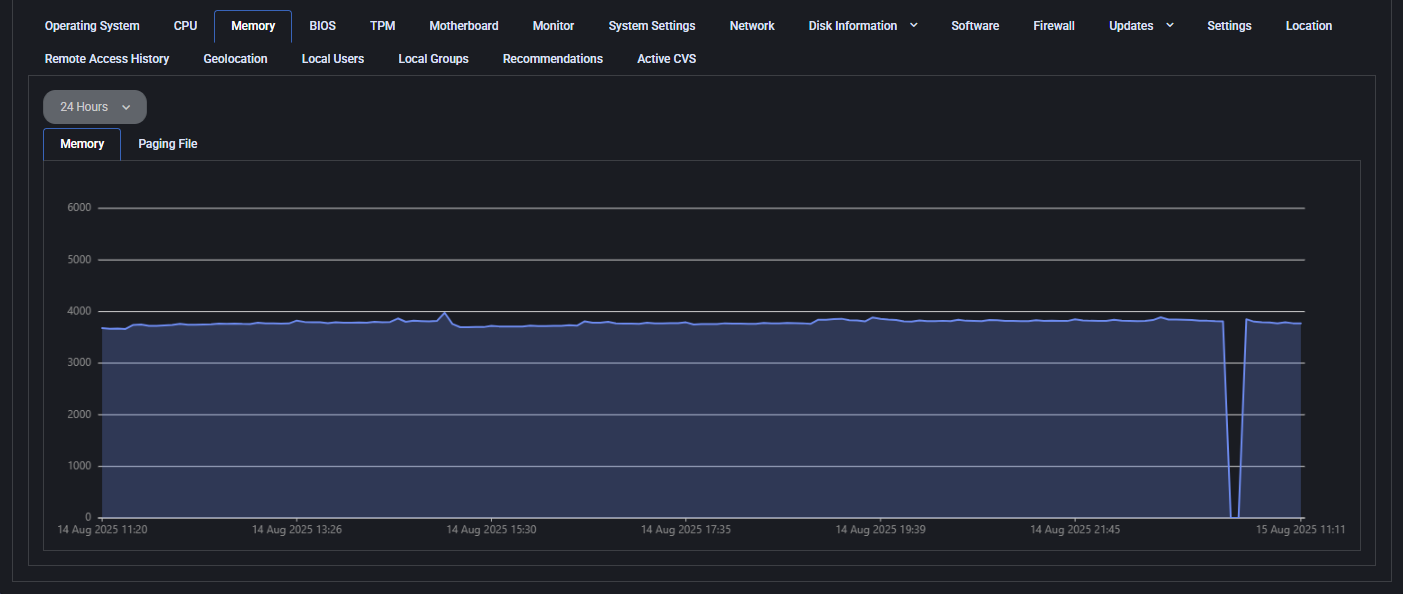
Memory
The memory tab visualizes real-time RAM usage and page file allocation. It offers two views:
- Memory: Current RAM consumption with a graph that spans 24 hours by default
- Paging File: (When applicable) Graph of virtual memory usage on disk
This data helps administrators analyze system load, detect memory leaks, or confirm optimal memory provisioning. You can switch between tabs and adjust the graph period for deeper analysis.
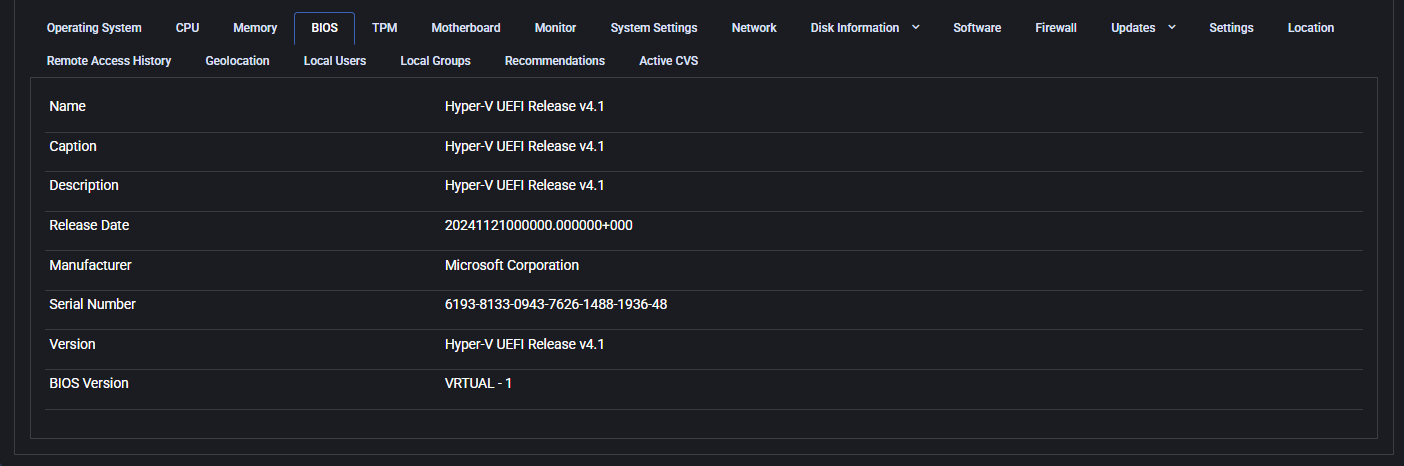
BIOS
The BIOS tab shows firmware details that are essential for system initialization and hardware communication. This includes information like the BIOS name, release version, manufacturer, and serial number. These details are often required for asset tracking, security audits, and ensuring compatibility with newer software or firmware updates.
In the example shown, the system is using a Hyper-V UEFI release from Microsoft Corporation, indicating the device is likely a virtual machine.
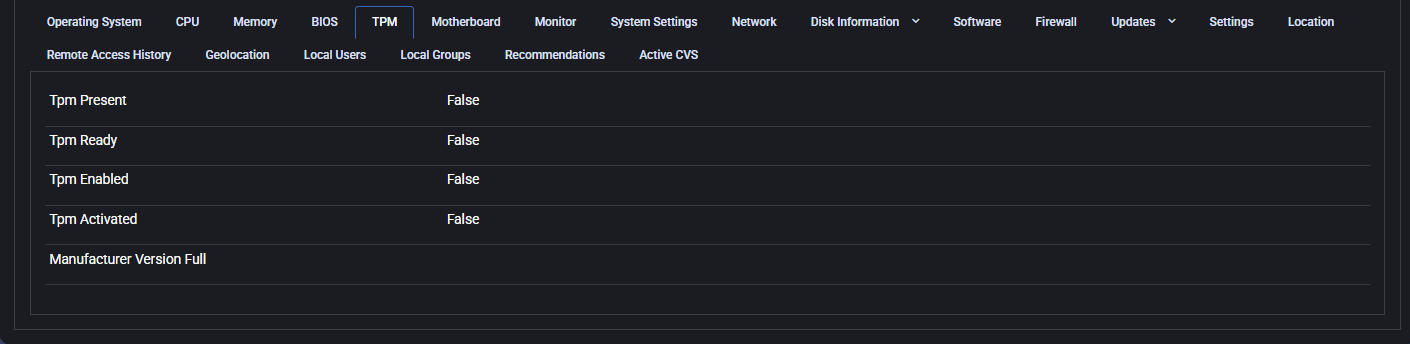
TPM
The TPM (Trusted Platform Module) tab reveals whether the hardware security module is available and enabled on the device. TPM is commonly used to enhance security by enabling encryption and secure boot functionality.
In this case, all TPM-related values are set to False, meaning TPM is not present or not activated on the device. This can be relevant when evaluating security posture or ensuring compliance with modern OS requirements (e.g., Windows 11).
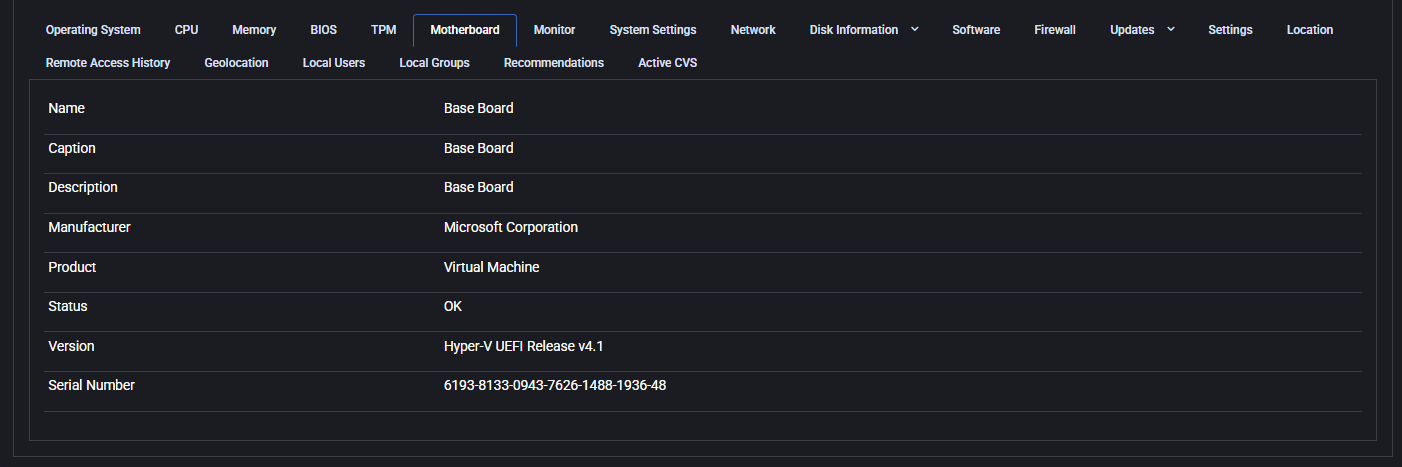
Motherboard
The Motherboard tab displays key specifications of the device’s baseboard, including manufacturer, product ID, status, version, and serial number. This information is critical for identifying hardware components, managing inventory, and verifying system configurations.
In virtualized environments, these values typically show generic descriptors (e.g., “Base Board”, “Virtual Machine”, or Hyper-V identifiers), which can help administrators differentiate virtual machines from physical devices.
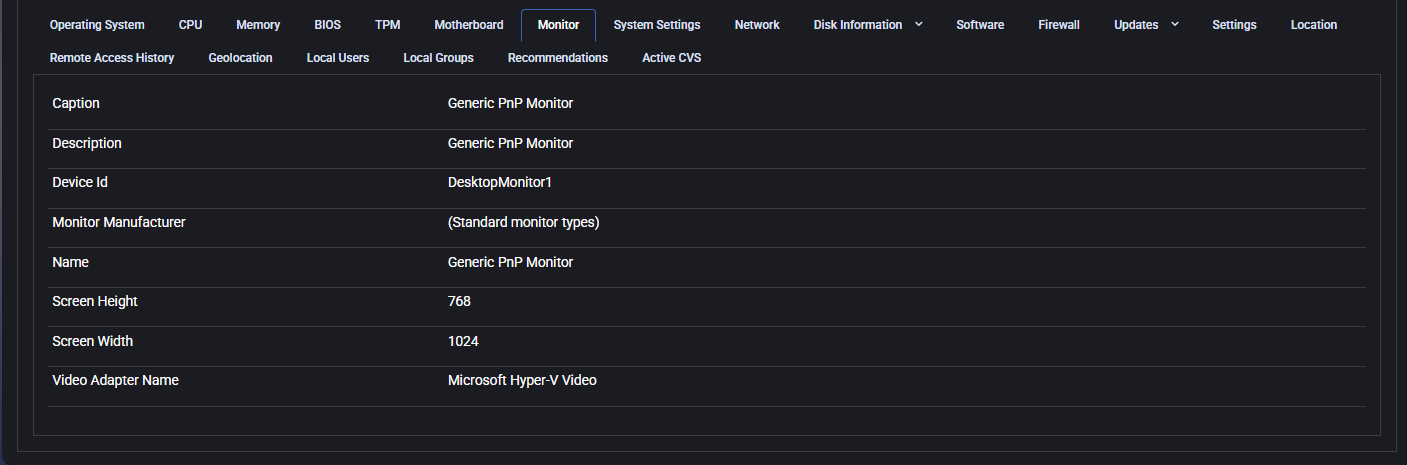
Monitor
This section provides detailed information about the display hardware connected to the device. It includes key parameters that help identify the display type, resolution, and associated video adapter.
- Caption / Description / Name: Typically displays the monitor type (e.g., Generic PnP Monitor).
- Device Id: Internal identifier for the monitor (e.g., DesktopMonitor1).
- Monitor Manufacturer: Vendor of the monitor, if detected.
- Screen Width / Height: The display resolution in pixels.
- Video Adapter Name: The graphics hardware or virtual adapter used to render display output.
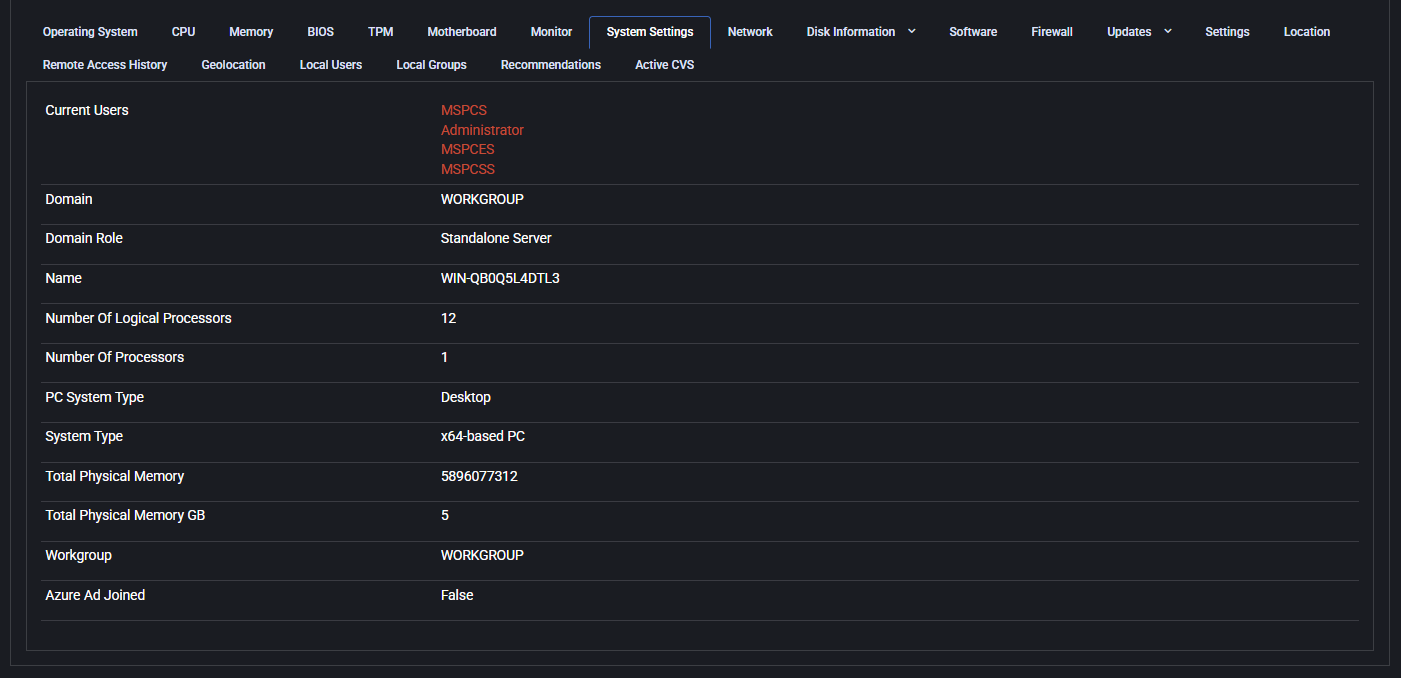
System Settings
This tab outlines core configuration of the device’s logical and physical architecture, including current user sessions, domain configuration, and processor/memory setup.
- Current Users: Displays currently logged-in accounts.
- Domain / Domain Role: Shows whether the device is part of a domain and its role (e.g., Standalone Server).
- Name: Device hostname.
- Number Of Logical Processors / Number Of Processors: Indicates the CPU topology.
- PC System Type / System Type: Indicates whether the system is desktop/laptop and its architecture (x64, x86).
- Total Physical Memory (bytes and GB): Memory capacity in two formats.
- Workgroup / Azure AD Joined: Shows workgroup name and whether the device is joined to Azure AD.
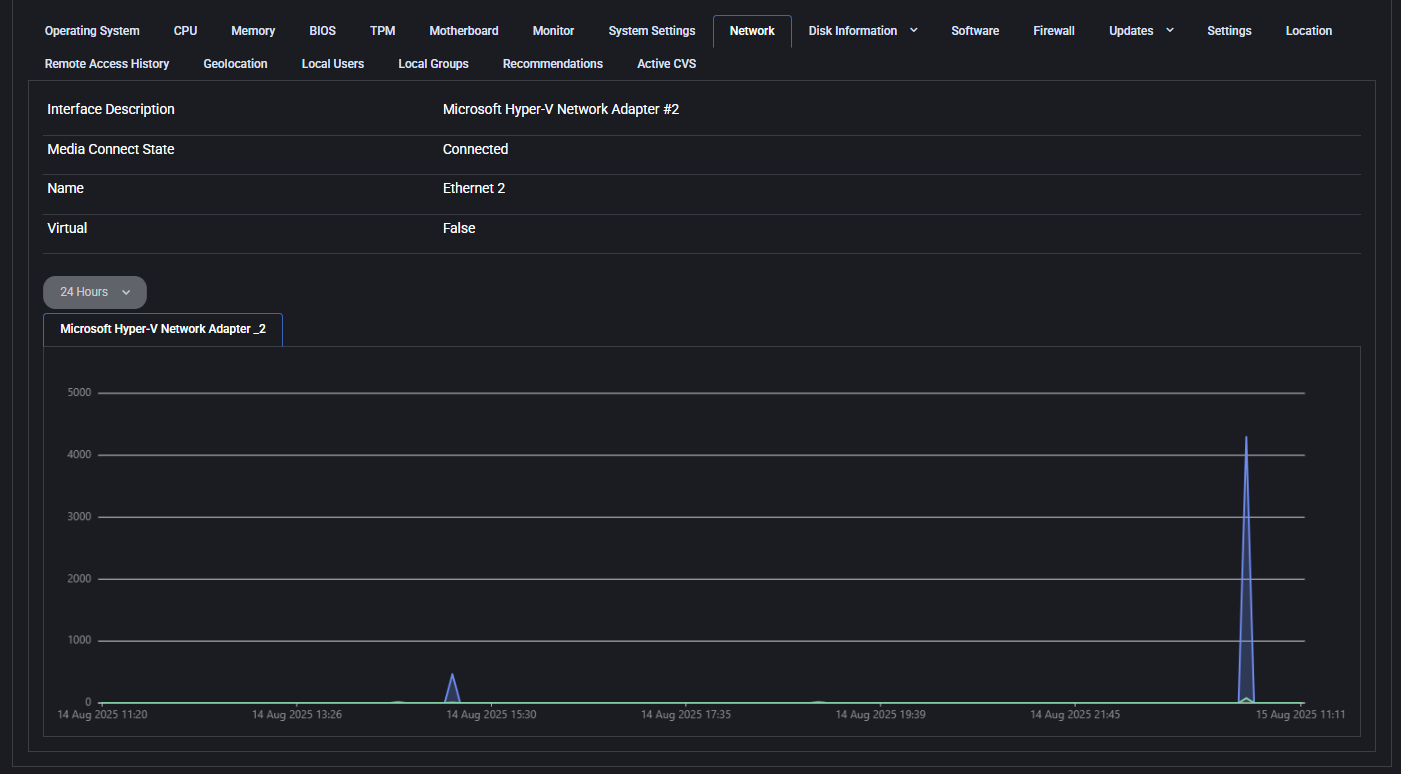
Network
This tab provides real-time and static data about the device’s network interface and traffic. Useful for diagnosing connectivity and interface status.
- Interface Description: Name of the network adapter (e.g., Microsoft Hyper-V Network Adapter).
- Media Connect State: Connection status (e.g., Connected).
- Name: Adapter alias (e.g., Ethernet 2).
- Virtual: Indicates if the adapter is virtual or physical.
Below the interface info, a dynamic graph shows inbound/outbound network activity over time. The dropdown lets you switch between different adapters or time ranges (e.g., 24 Hours).
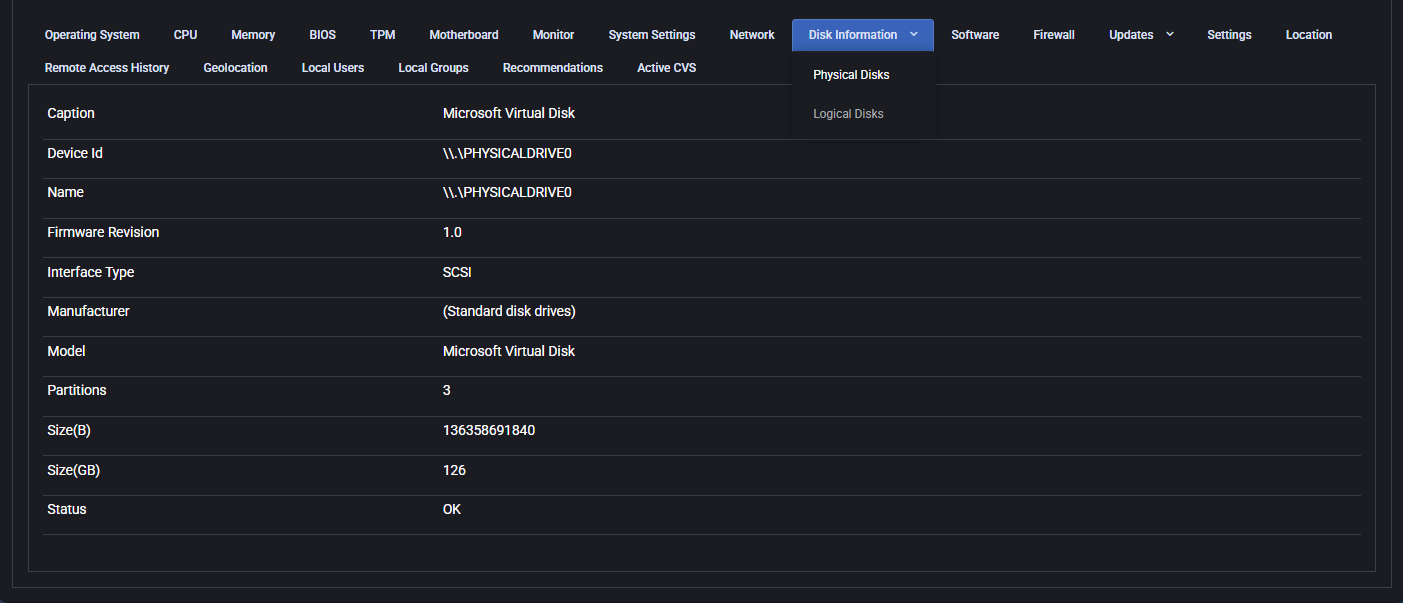
Disk Information
This tab provides detailed information about both physical and logical disks present on the device. Useful for assessing storage capacity, health, and configuration.
Physical Disks
- Caption: Descriptive label of the physical disk (e.g., Microsoft Virtual Disk).
- Device Id: Physical device identifier (e.g., \\.\PHYSICALDRIVE0).
- Name: Name assigned to the device by the system.
- Firmware Revision: Firmware version of the disk.
- Interface Type: Interface used (e.g., SCSI, SATA).
- Manufacturer: Disk manufacturer information, if available.
- Model: Model name of the disk.
- Partitions: Number of partitions on the disk.
- Size (B / GB): Total size in bytes and gigabytes.
- Status: Operational status (e.g., OK).
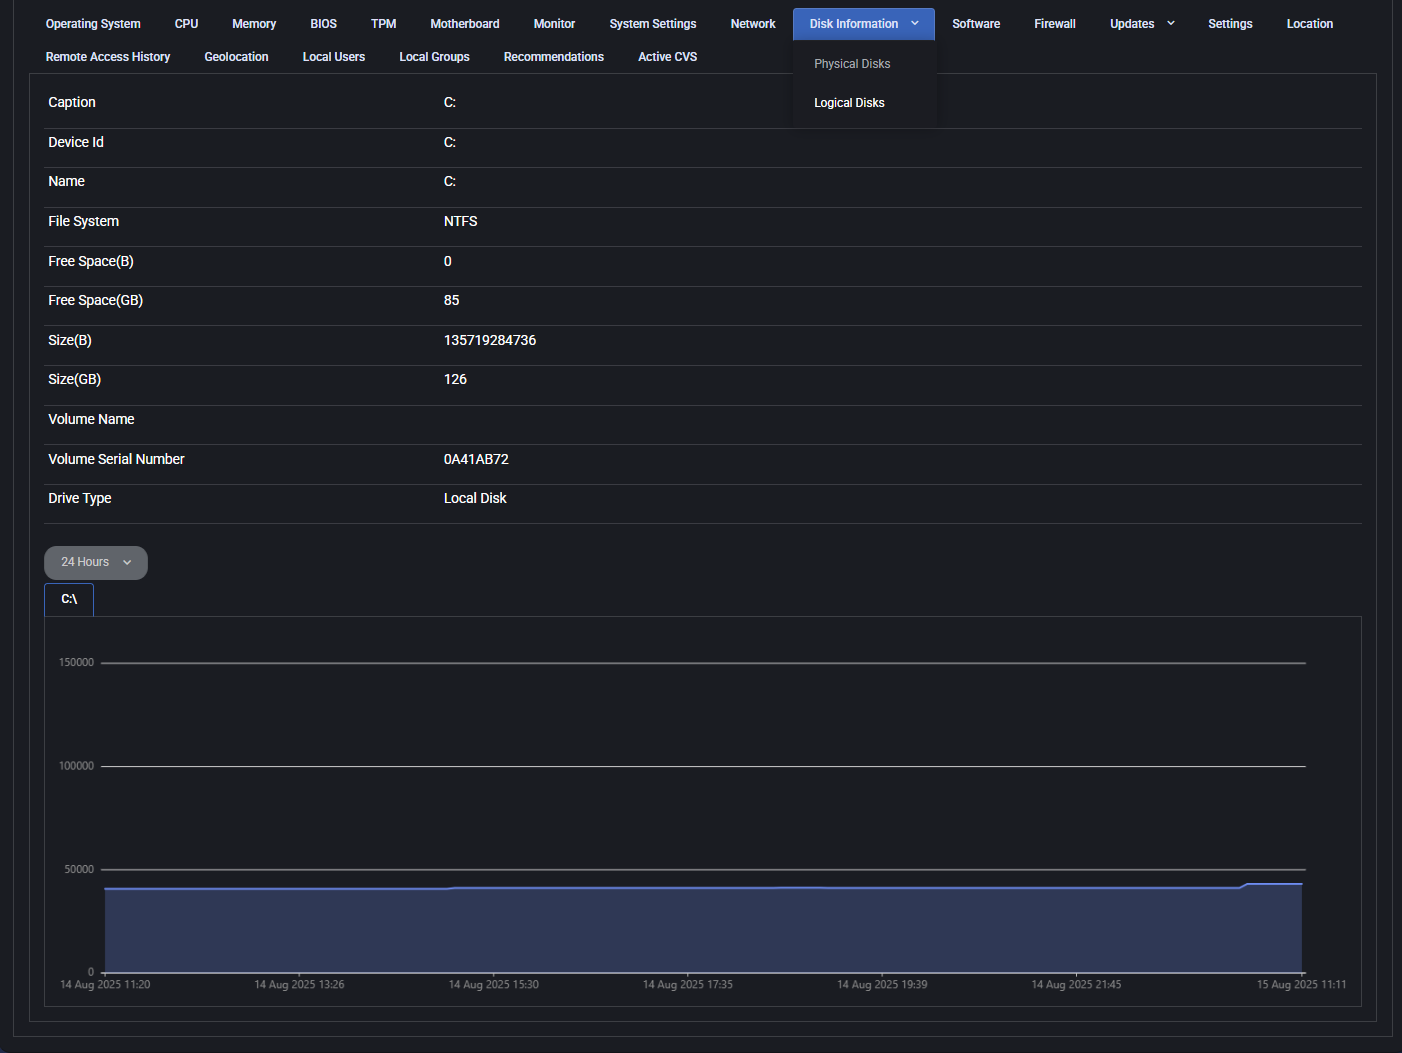
Logical Disks
- Caption: Volume letter (e.g., C:).
- Device Id / Name: System identifier and volume name.
- File System: File system type (e.g., NTFS).
- Free Space (B / GB): Available space in bytes and gigabytes.
- Size (B / GB): Total volume size in bytes and gigabytes.
- Volume Name: Optional name of the volume, if defined.
- Volume Serial Number: Unique identifier of the volume.
- Drive Type: Type of disk (e.g., Local Disk).
- Graph: Historical chart of free space usage over time.
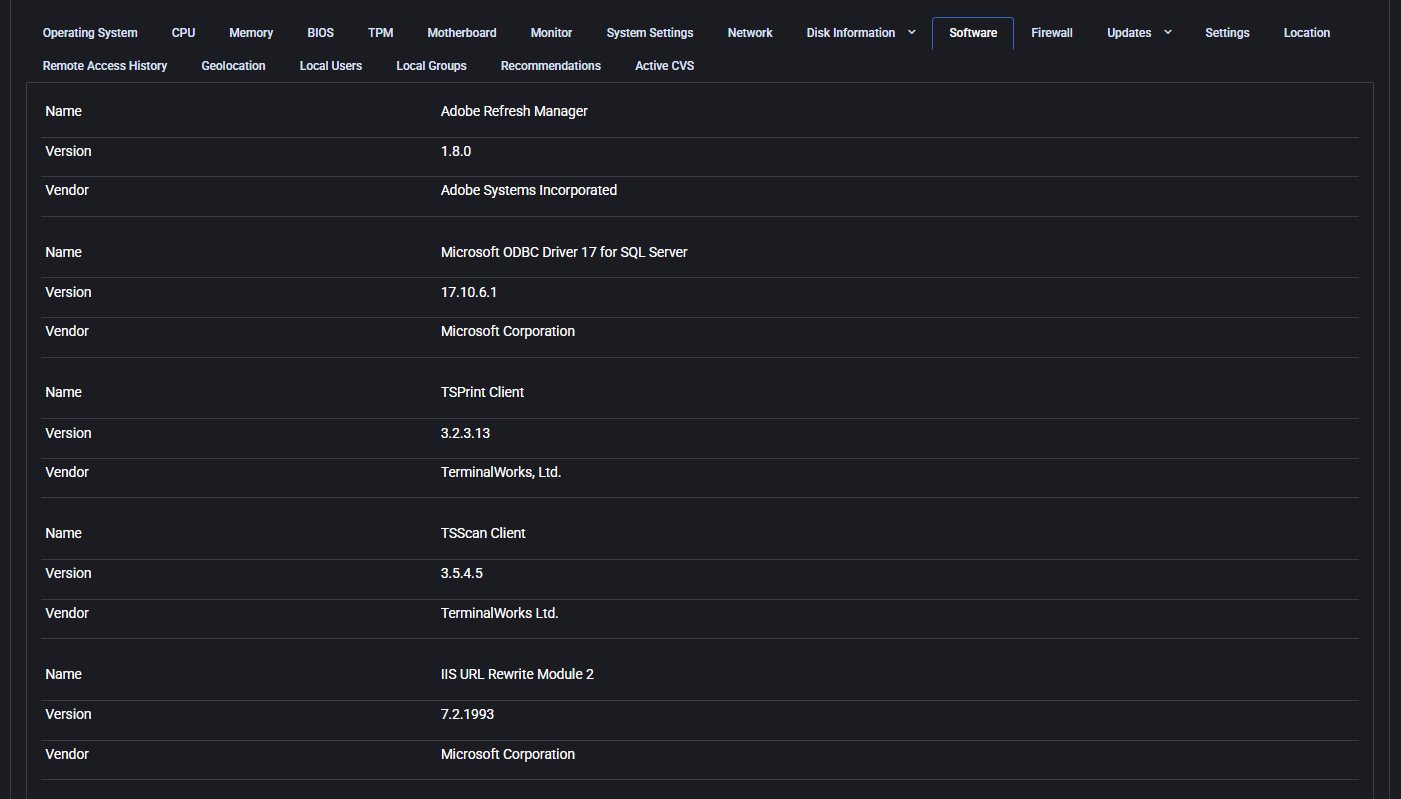
Software
This tab lists all installed applications and system components on the device. Useful for software audits, license compliance, and security reviews.
- Name: Name of the installed software.
- Version: Exact version number.
- Vendor: Software publisher or manufacturer.
Firewall
This tab displays the current firewall status across different network profiles: Domain, Private, and Public. It’s useful for determining whether the device is protected under each network context.
- Domain Networks: Indicates if the domain firewall profile is active (e.g., when joined to an AD domain).
- Private Networks: Displays firewall status for trusted networks like home or work environments.
- Public Networks: Shows firewall status for untrusted networks such as public Wi-Fi.

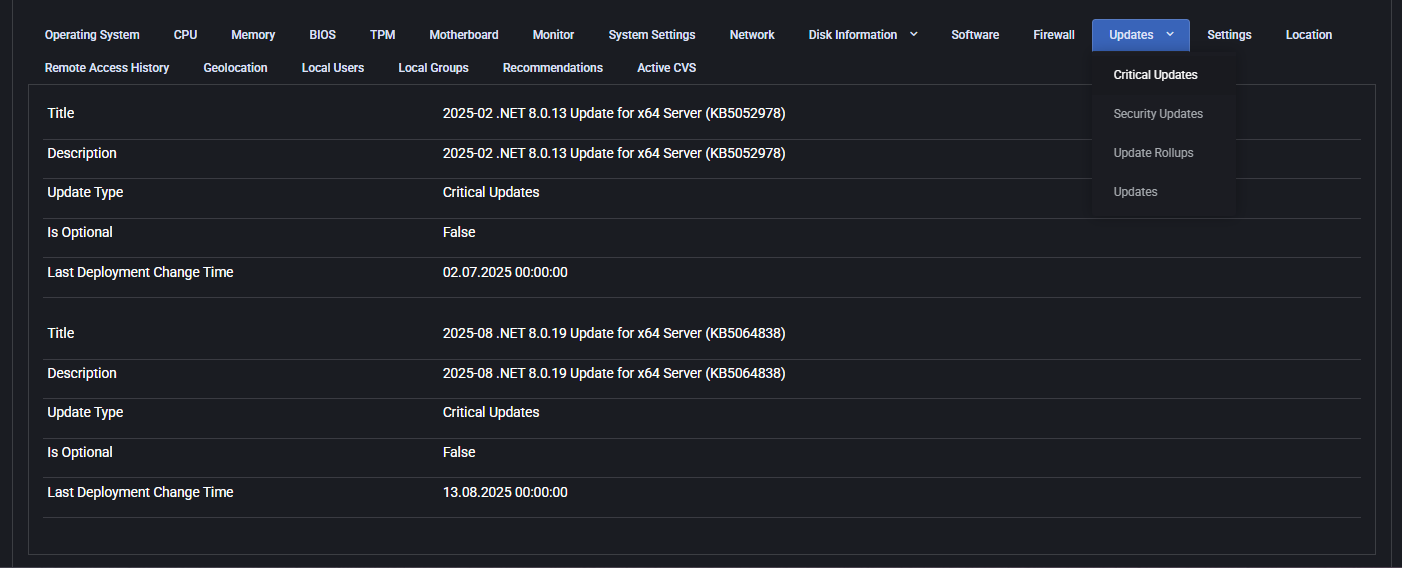
Updates
This tab provides a detailed breakdown of all updates installed or pending on the device. It is grouped by update types available in the dropdown menu: Critical Updates, Security Updates, Update Rollups, and General Updates. Each section displays detailed metadata for each installed update, helping system administrators monitor patch compliance and deployment timelines.
The following fields are shown for each update entry:
- Title: Official name of the update, including the release date and Knowledge Base (KB) reference (e.g., “2025-02 .NET 8.0.13 Update for x64 Server (KB5052978)”).
- Description: Full summary of the update purpose. It may include resolution details, security improvements, or bug fixes. For security patches, the description often refers to Microsoft’s online knowledge base articles for further details.
- Update Type: One of the following categories:
- Critical Updates: High-priority patches for system stability, usually issued in response to major bugs or performance regressions.
- Security Updates: Fixes for known vulnerabilities. These are crucial for maintaining secure infrastructure and preventing exploits.
- Update Rollups: Bundled packages that combine multiple updates into one deployment. Useful for applying cumulative improvements.
- Updates: General-purpose updates, including feature improvements and compatibility enhancements.
- Is Optional: Boolean value (“True” or “False”) indicating whether the update was optional during installation.
- Last Deployment Change Time: Date and time when the update was applied or modified on the system (e.g., “13.08.2025 00:00:00”).
Updates are displayed in reverse chronological order, allowing administrators to quickly identify the latest patch activity and verify deployment across multiple update types. The tab supports filtering by update category through the top menu selector, helping narrow focus during investigations or audit reviews.
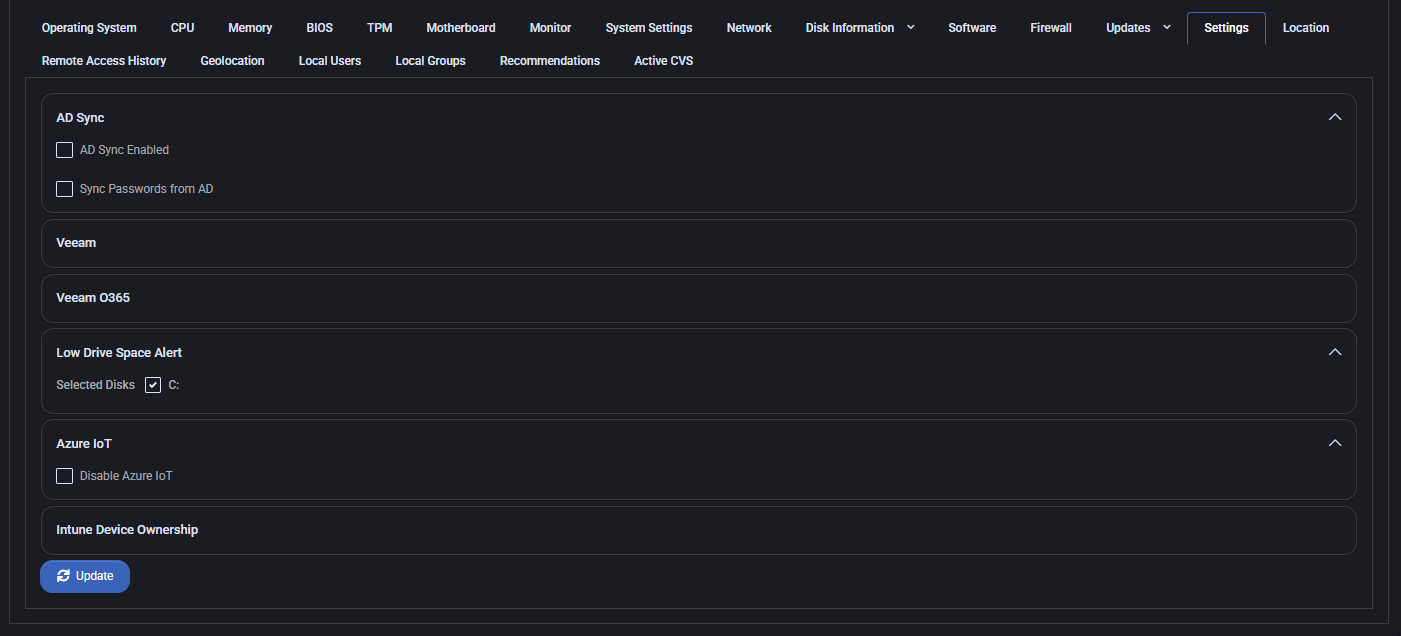
Settings
This tab shows various policy and integration flags configured for the device.
- AD Sync: Toggle options for enabling AD synchronization and password sync from Active Directory.
- Veeam: Displays whether Veeam integration is configured.
- Veeam O365: Displays whether Veeam for Office 365 integration is configured.
- Low Drive Space Alert: Shows selected drives (e.g., C:) for low-space monitoring.
- Azure IoT: Option to disable Azure IoT integration.
- Intune Device Ownership: Indicates if the device is marked as owned in Intune.
Changes made in this tab require confirmation via the Update button.
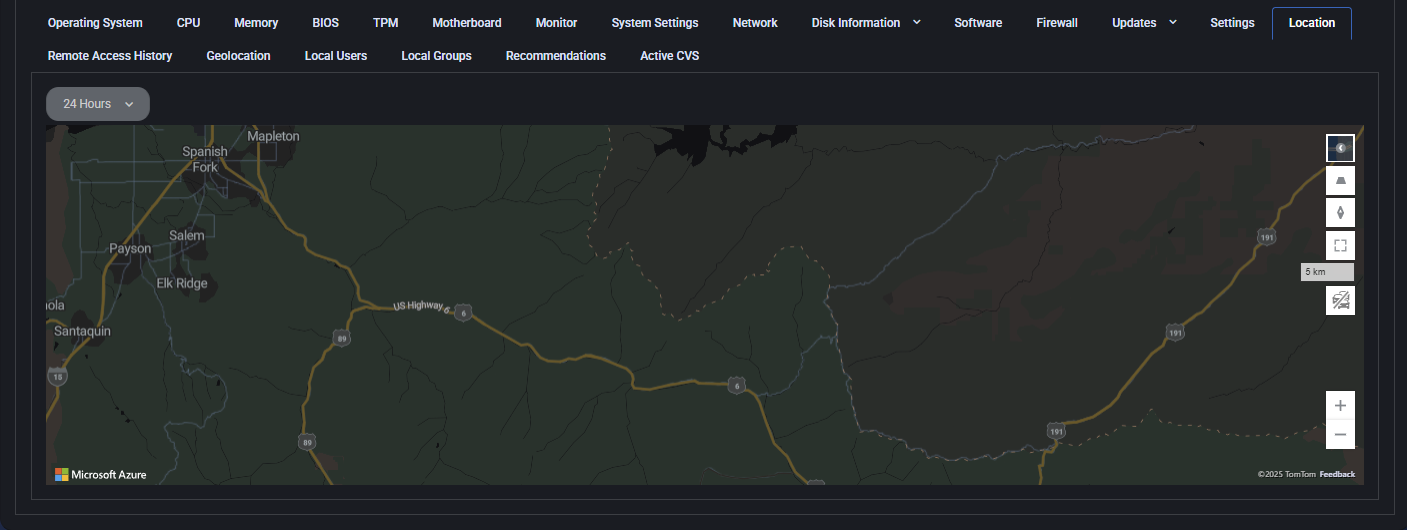
Location
This tab provides a geolocation view of the device using Microsoft Azure and TomTom map services.
- Time Filter: Selectable range for location data (e.g., 24 Hours).
- Map View: Interactive map showing last known coordinates of the device.
- Controls: Includes zoom, layer toggles, and view adjustment tools.
Remote Access History
Displays a chronological timeline of remote sessions for the device.
- Timestamp: Exact time of connection/disconnection events.
- Status: Whether a guest was connected or disconnected.
- Role: Indicates the connecting user type (e.g., Guest).
This tab helps in auditing and tracing external access attempts.

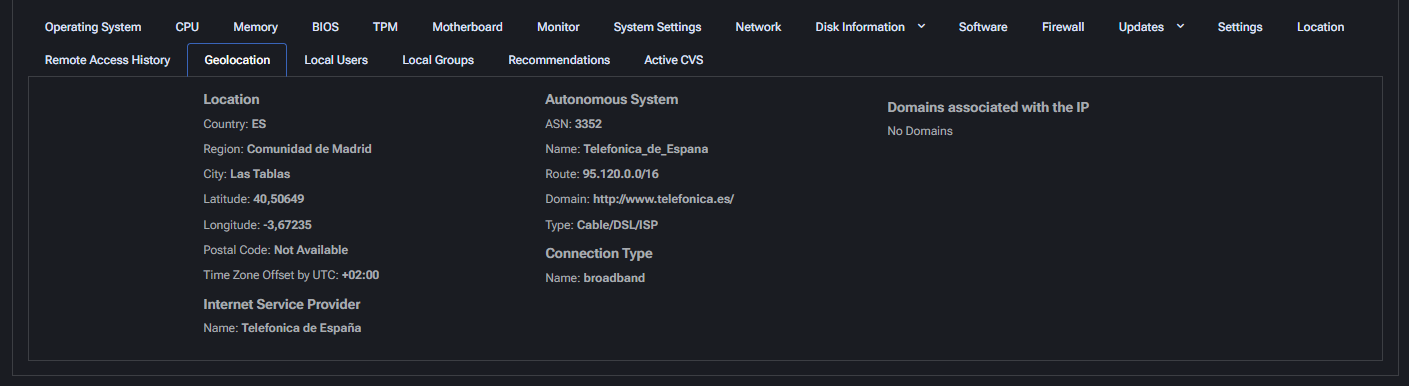
Geolocation
This tab provides geolocation data based on the device’s public IP address. The information helps identify the network origin and location of the endpoint.
- Country / Region / City: Displays the geolocated position based on IP. Useful for verifying remote device origin.
- Latitude / Longitude: Geographic coordinates of the detected IP address.
- Postal Code: Often unavailable due to IP-level granularity.
- Time Zone Offset: Useful for understanding local time context of the device.
Internet Service Provider
- Name: ISP assigned to the IP (e.g., Telefónica de España).
Autonomous System
- ASN: Autonomous System Number used for IP routing.
- Name / Route / Domain: Detailed technical routing info about the IP block.
- Type: Network type (e.g., Cable/DSL/ISP).
Connection Type: General description of how the device is connected (e.g., broadband).
Domains associated with the IP: Shows resolved domains, if any.
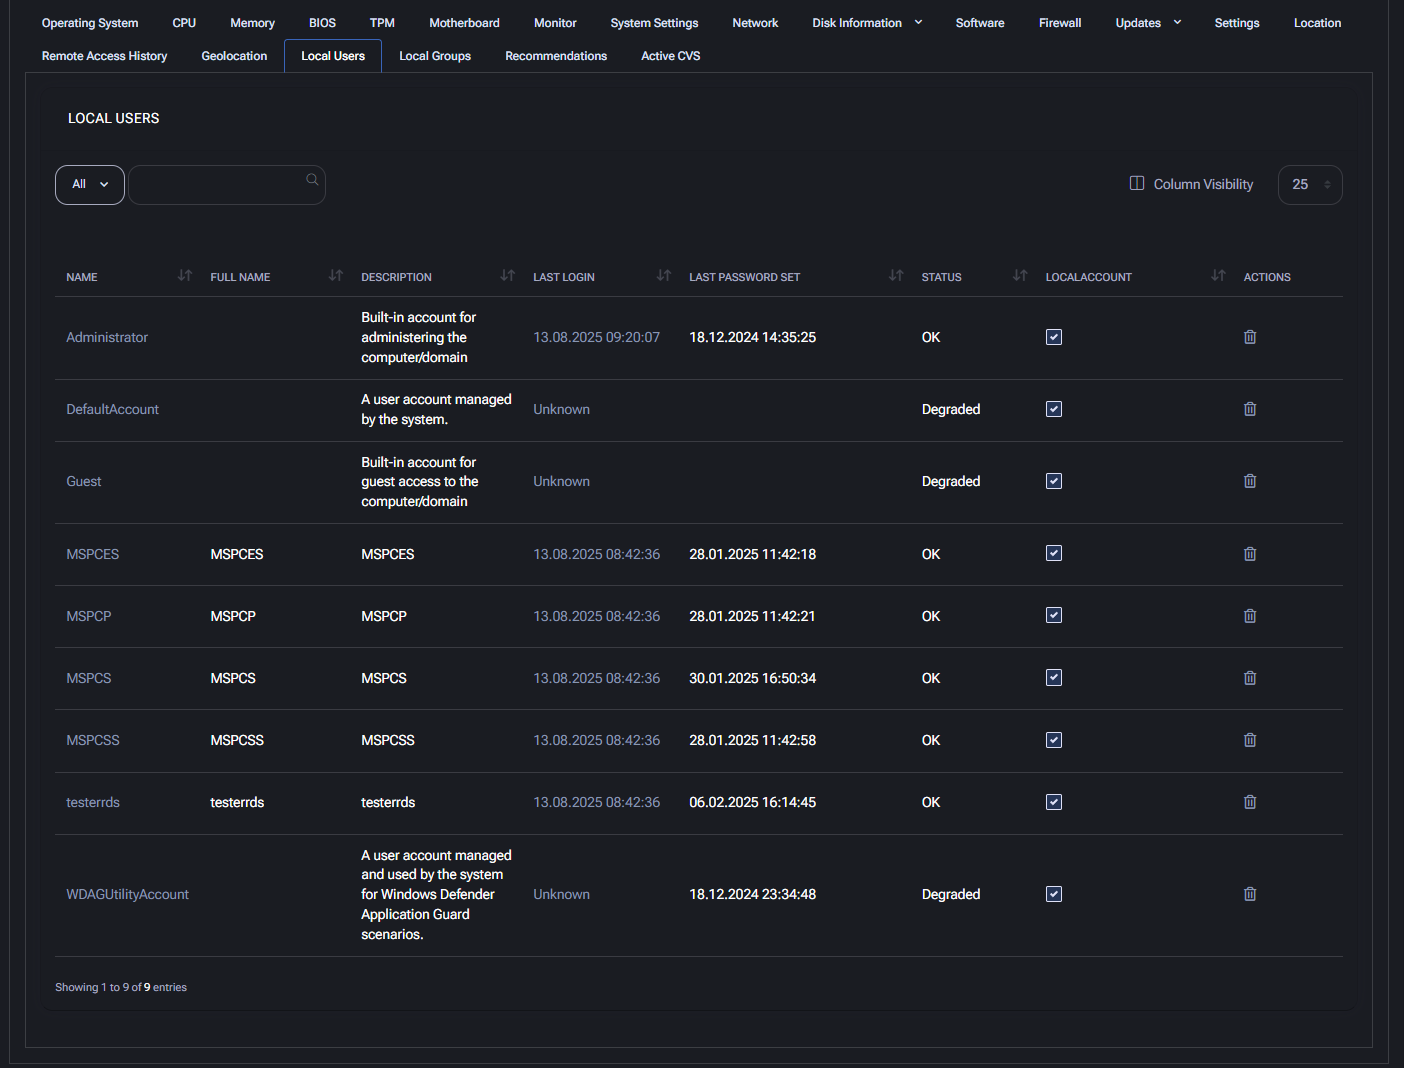
Local Users
This section lists all local user accounts on the device, their status, and login data. It is vital for auditing and user access management.
- Name: System username.
- Full Name: Display or user-friendly name, if set.
- Description: Purpose or type of user account (e.g., built-in accounts, test users).
- Last Login: Date and time of last user session.
- Last Password Set: When the password was last updated.
- Status: Account health (OK / Degraded).
- Local Account: Indicates if the account is local.
- Actions: Allows deletion or management of user entries.
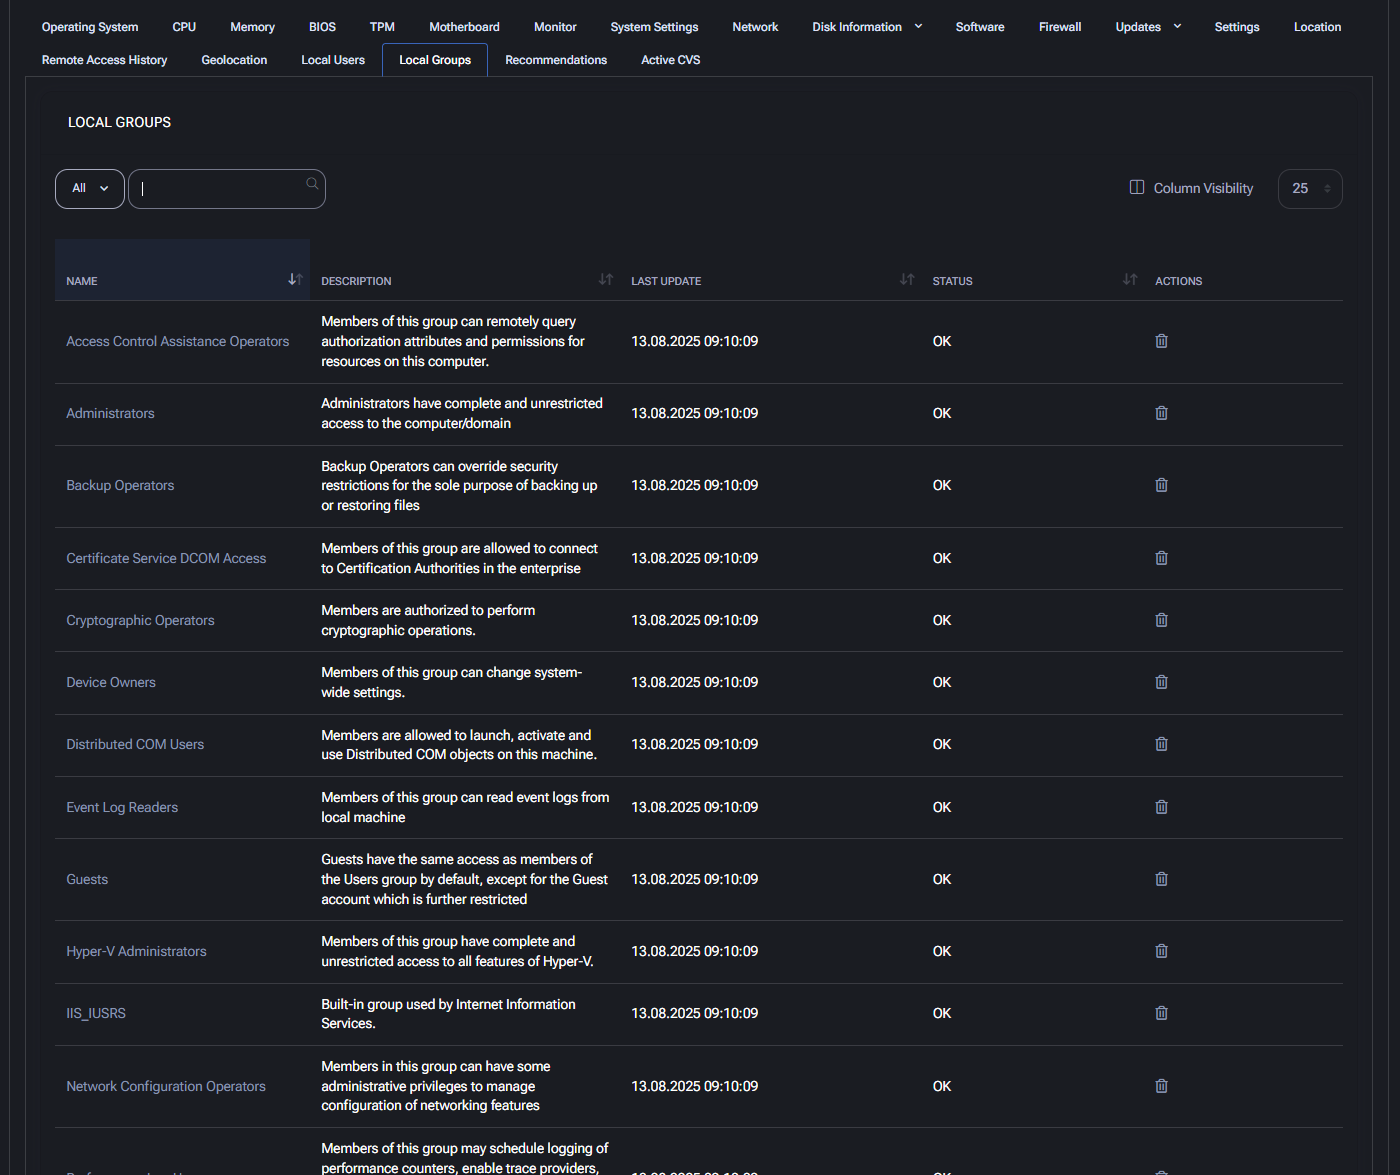
Local Groups
This tab displays all local security groups on the device and their associated permissions. It is useful for auditing access rights and ensuring proper role segmentation.
- Name: The name of the local group (e.g., Administrators, Backup Operators, Hyper-V Administrators).
- Description: Explains the purpose and privileges of each group. For example, “Members of this group can change system-wide settings.”
- Last Update: Shows the timestamp when the group data was last refreshed or synced (e.g., 13.08.2025 09:10:09).
- Status: Indicates the health of the group configuration, typically marked as OK.
- Actions: An icon is available to remove or manage the group.
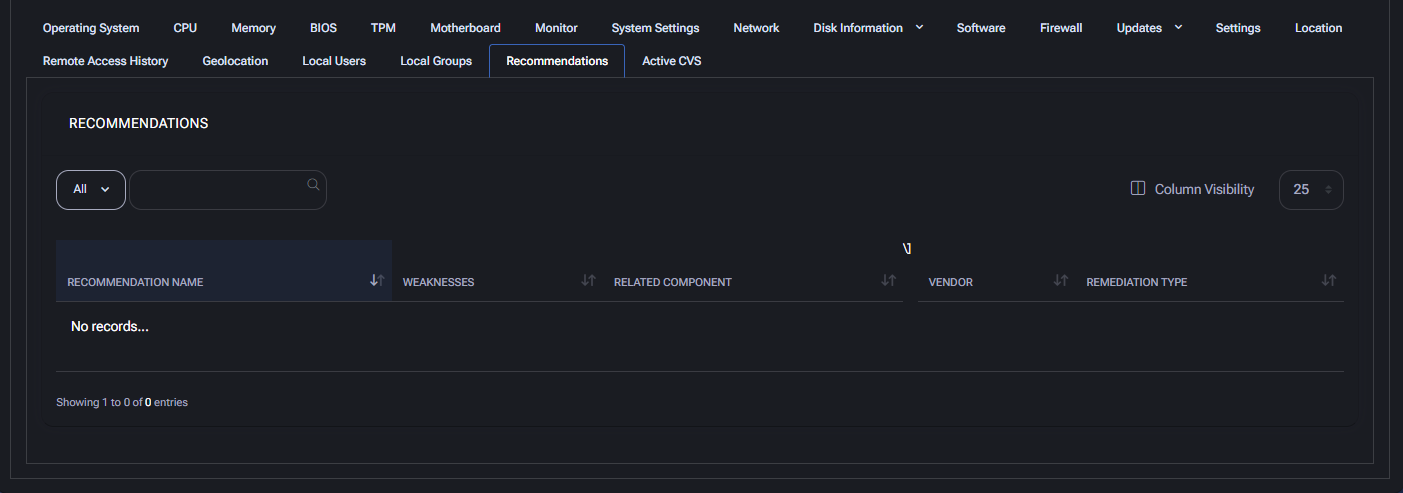
Recommendations
This section provides suggested improvements for device configuration, security posture, or performance optimization. It is automatically populated based on system analysis and external data sources.
In this case, the grid shows No records, meaning there are currently no recommendations available for this device.
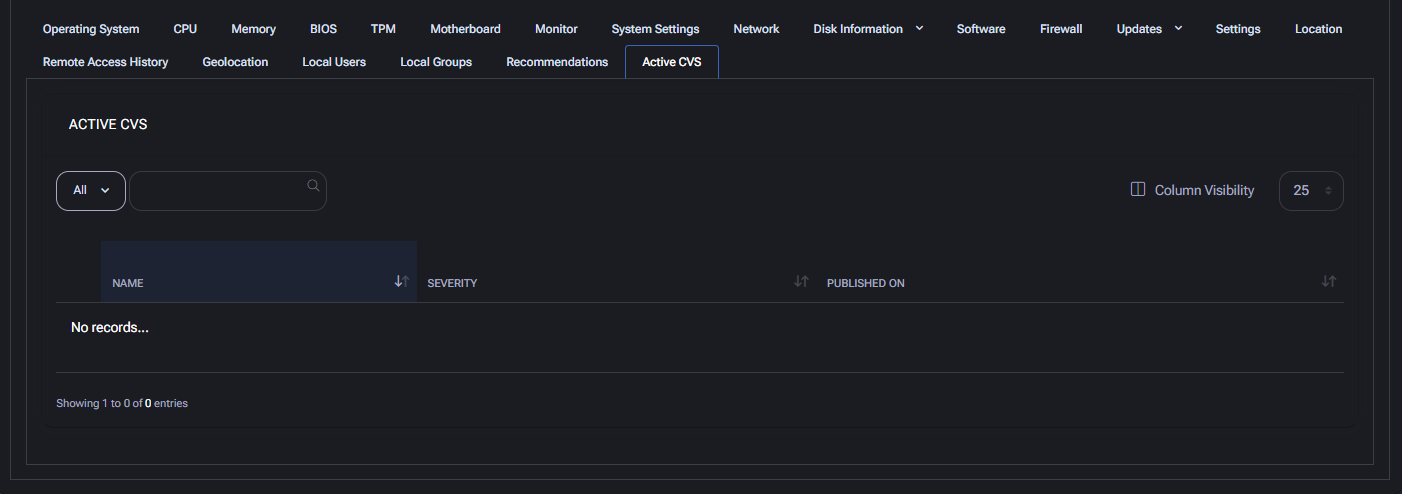
Active CVEs
This tab lists Common Vulnerabilities and Exposures (CVEs) actively detected on the device, based on installed software, system configuration, or recent vulnerability disclosures.
Currently, the section displays No records, indicating that no known CVEs are affecting this device at the moment.
- Name: CVE identifier (e.g., CVE-2025-14567).
- Severity: Risk classification (e.g., Critical, High, Medium).
- Published On: Disclosure date of the vulnerability.
Best Practices
To effectively monitor and manage endpoint devices using the General tab, follow these best practices across all sections:
- Regular Health Reviews: Periodically check tabs such as CPU, Memory, Disk Information, and Updates to assess hardware performance and system reliability.
- Track Configuration Changes: Monitor BIOS, TPM, Motherboard, and System Settings for signs of unauthorized modifications or anomalies.
- Audit Access & Identity: Use Local Users and Local Groups to verify user privileges, detect unused or suspicious accounts, and maintain least-privilege access.
- Ensure Software Compliance: Review installed software under the Software tab and cross-check with organizational policies to detect unwanted or outdated programs.
- Investigate Network Issues: Analyze the Network tab to diagnose adapter-level problems, verify connection status, and confirm expected IP configurations.
- Geolocate Devices: Check the Geolocation tab to detect off-site access or physical location mismatches, which may indicate security concerns.
- Patch Proactively: Use the Updates tab to verify update history, confirm installation status, and reduce attack surfaces through timely patching.
- Prioritize Remediation: Rely on the Recommendations and Active CVEs tabs to guide remediation efforts based on actionable intelligence and known threats.
- Establish Baselines: Export data from each section regularly to establish device baselines and detect behavioral drift over time.
- Enable Alerts: Set up alerting rules for critical parameters (e.g., CPU usage, low memory, missing updates) to enable proactive incident response.
Notes
The Notes tab allows administrators to create and manage password-related notes associated with the selected device. These notes may include sensitive configuration details, user credentials, or asset-specific instructions.
Each note can be enriched with tags to associate it with users, locations, devices, and other assets. Notes can also be marked as requiring authorization for access, adding an extra layer of protection.

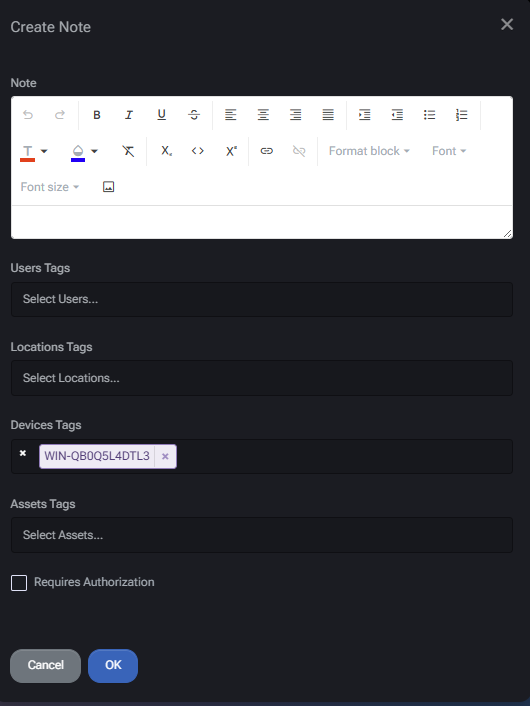
Add Note
To create a note:
- Click the Add Note button.
- Enter the content of the note using the rich text editor.
- Optionally assign:
- User Tags – Link the note to specific users.
- Location Tags – Tie the note to physical or logical locations.
- Device Tags – The current device is prefilled automatically.
- Asset Tags – Select related assets to link the note with.
- If needed, enable Requires Authorization to restrict access.
- Click OK to save the note.
Best Practices
- Use clear and concise language in notes to avoid ambiguity.
- Apply appropriate tags to ensure easy filtering and contextual relevance.
- Enable “Requires Authorization” for any note containing credentials or sensitive configuration data.
- Avoid duplicating information already available in the Certificates, Passwords, or Remote Access sections.
- Regularly review and update notes to ensure accuracy.
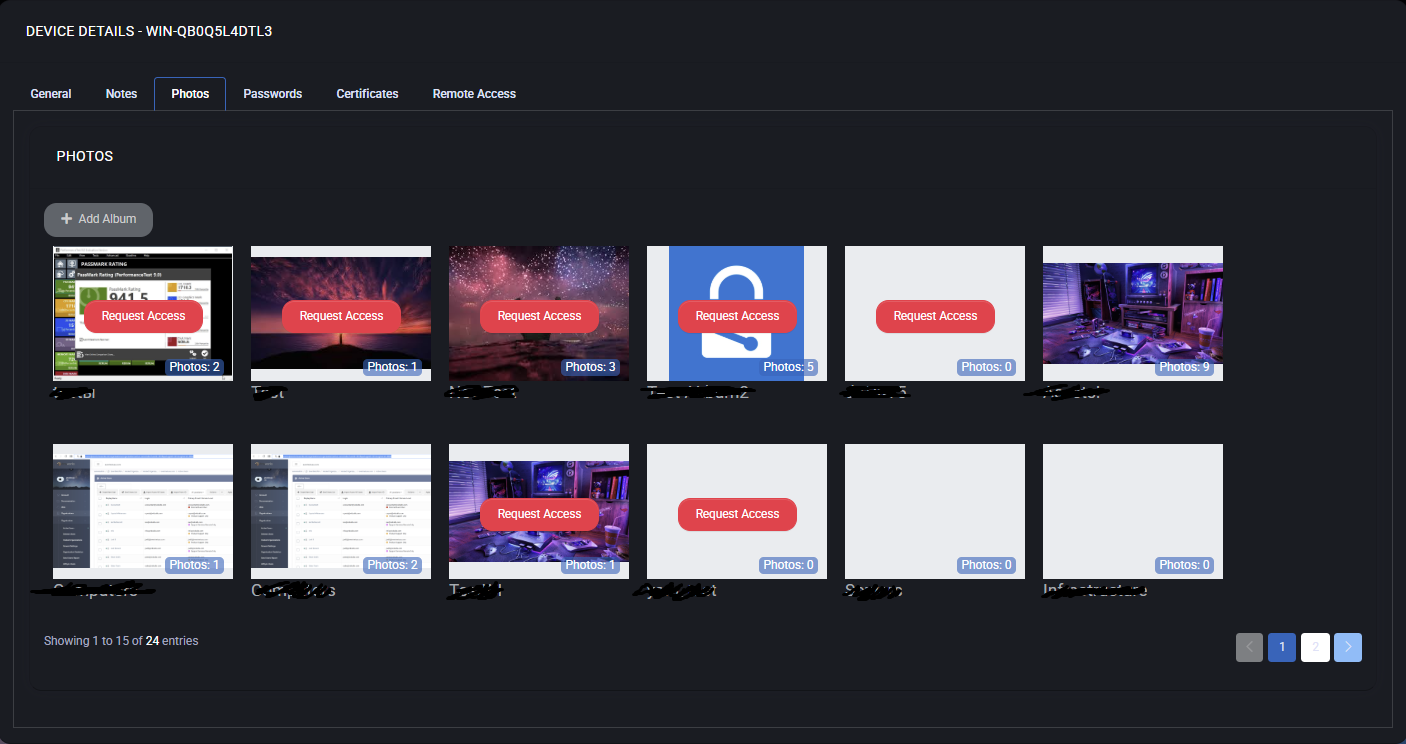
Photos
The Photos tab in the Device Details section allows users to view and manage photo albums associated with the device. Each album can contain one or more screenshots or images and can be access-controlled individually.
Each photo album entry displays:
- Album preview thumbnail
- Number of photos it contains
- Album name (partially masked if sensitive)
- A red Request Access button if authorization is required
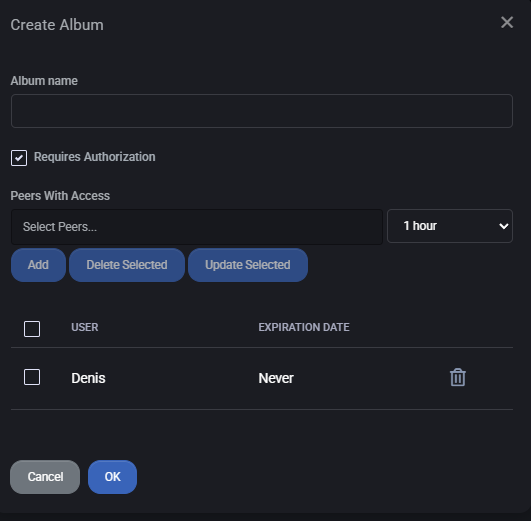
Create Album
Clicking Add Album opens the album creation dialog. The following fields and options are available:
- Album name: A required text field to name the album.
- Requires Authorization: If checked, access to the album must be requested and granted.
- Peers With Access: You can select users (peers) who should have access to this album and specify access duration from a dropdown list (e.g., 1 hour).
- Access Management:
- Add: Grants access to selected users.
- Delete Selected: Removes selected users from the access list.
- Update Selected: Updates the access expiration for selected users.
Existing access records show the username and expiration date. You can remove any user by clicking the trash icon next to their entry.
Best Practices
- Always set meaningful and descriptive names for albums to simplify future searches.
- Use access control for sensitive screenshots and ensure expiration times are set appropriately.
- Regularly audit who has access to each album and revoke outdated permissions.
- Use tags or consistent naming conventions to group albums by device type, purpose, or location.
- Limit album access to only those who require it to reduce risk exposure.
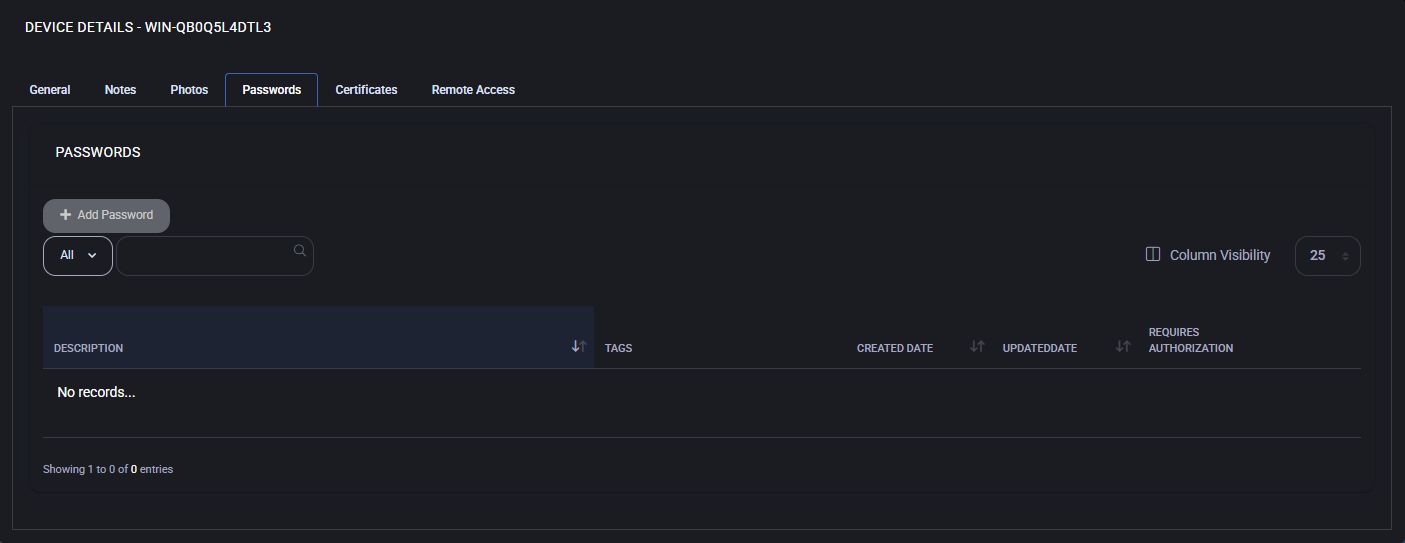
Passwords
On the Passwords tab, you can securely store and manage sensitive credential information linked to the selected device. This includes traditional passwords as well as optional MFA secrets. Each password entry can be associated with specific users, locations, assets, and devices using tag-based categorization, ensuring secure and granular access control.
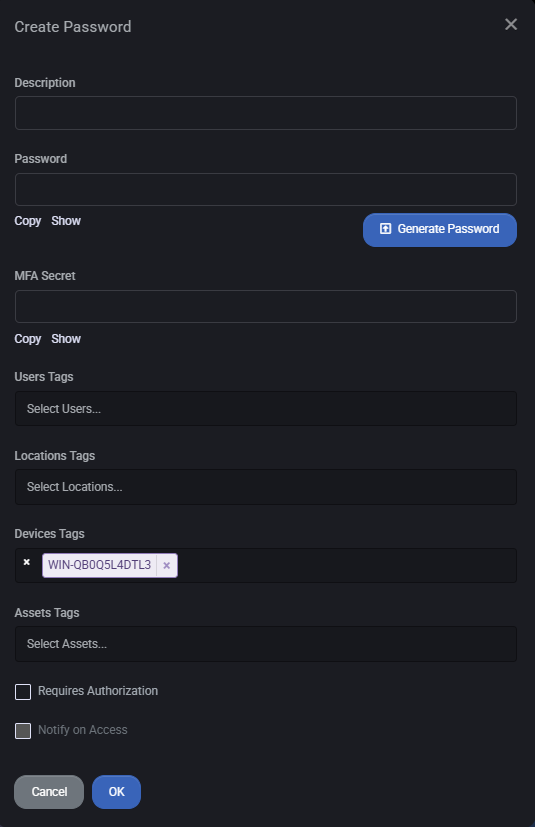
Add Password
To add a new password entry:
- Click Add Password.
- Enter a Description to label the credential.
- Manually enter a password or click Generate Password to create a strong, random one.
- Optionally provide an MFA Secret for two-factor authentication setups.
- Assign User Tags, Location Tags, Device Tags, or Asset Tags as necessary.
- If required, check Requires Authorization to restrict access or Notify on Access to track password usage events.
- Click OK to save.
Password List and Management
The password list displays existing credentials (if any) with sortable columns including:
- Description
- Tags
- Created Date
- Updated Date
- Requires Authorization
Use filters to quickly locate specific records. Visibility of columns can be customized via the Column Visibility control. If no records exist, the table will indicate this.
Best Practices
- Use the built-in password generator to avoid weak or reused credentials.
- Always assign descriptive names to passwords for clarity and future reference.
- Enable Requires Authorization for all high-privilege or sensitive credentials to limit exposure.
- Use tag associations (Users, Locations, Assets) to control visibility and streamline password management across distributed environments.
- Regularly review and rotate stored credentials, especially those with critical access.
- Enable Notify on Access for audit tracking when dealing with shared or critical credentials.
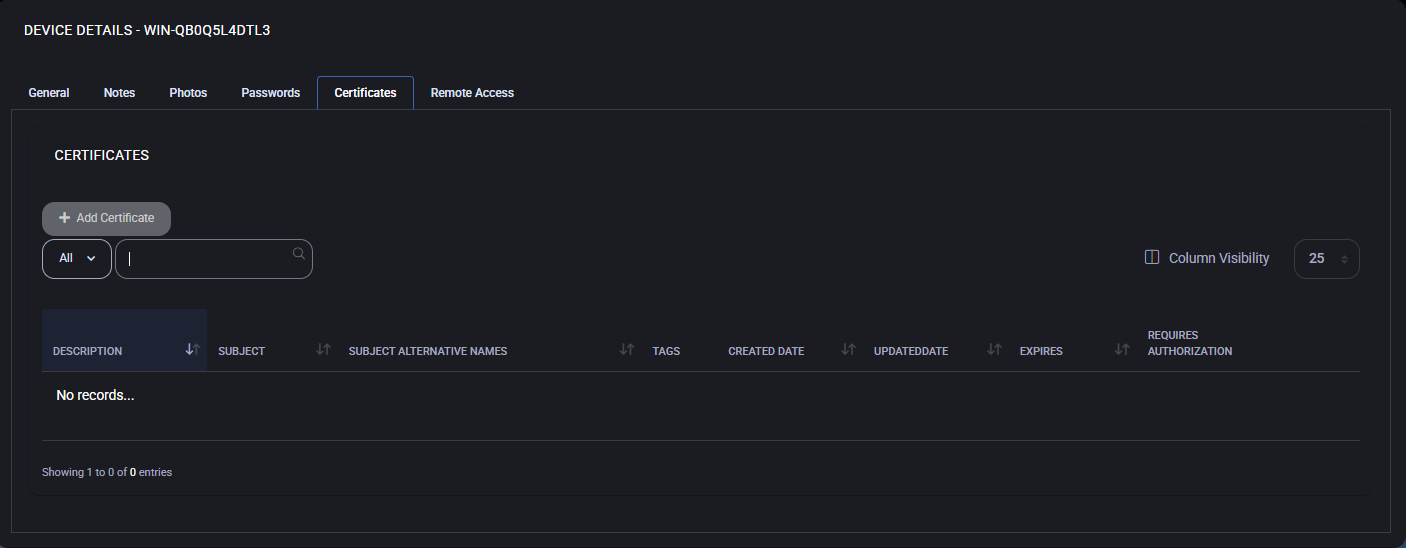
Certificates
The Certificates tab allows you to securely store and manage SSL/TLS certificates associated with the selected device. Each certificate can be tagged and optionally protected by authorization.
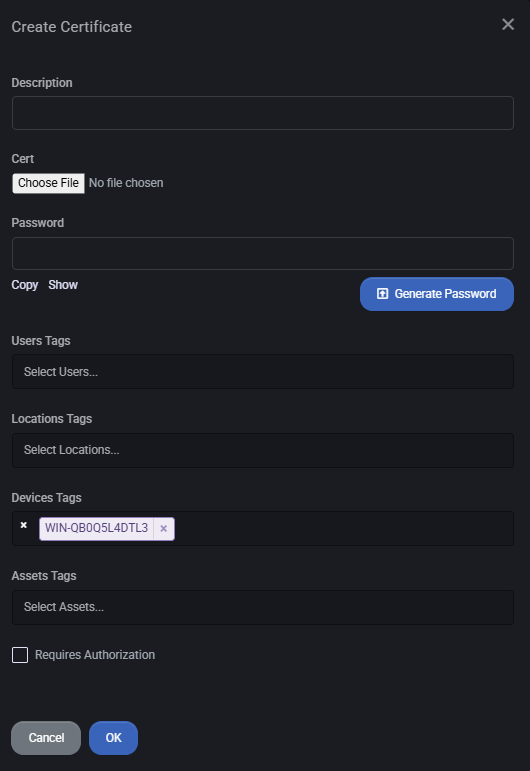
Add Certificate
- Click the Add Certificate button.
- Enter a Description to identify the certificate (e.g., “Exchange TLS Cert”).
- Upload the certificate file using the Cert field.
- If the certificate is password-protected (e.g., .pfx), enter the password in the Password field.
- Use the tag fields to associate the certificate with specific users, devices, locations, or assets.
- Enable Requires Authorization if approval is needed before accessing the certificate.
- Click OK to save the certificate.
Certificate Table Columns
The table includes the following columns:
- Description – Display name of the certificate.
- Subject – Common Name (CN) listed in the certificate.
- Subject Alternative Names – Additional domains or IPs the certificate is valid for.
- Tags – Labels used to control access or filter assets.
- Created Date – When the record was created in the system.
- Updated Date – When it was last modified.
- Expires – Certificate expiration date.
- Requires Authorization – Whether user approval is required for viewing/downloading.
Best Practices
- Use clear and descriptive names for all certificates.
- Always fill in the Password field for .pfx or similar certificate formats.
- Tag certificates with relevant device, location, and user tags to simplify access control.
- Enable Requires Authorization for any certificate used in production or external-facing systems.
- Regularly check expiration dates and renew certificates in advance to avoid service disruption.
- Limit certificate visibility only to users who require it – avoid global access where not needed.
Remote Access
The Remote Access tab is used to assign users who are permitted to connect to the selected device remotely. This feature is essential for managing support access and ensuring that only authorized personnel can initiate remote sessions.
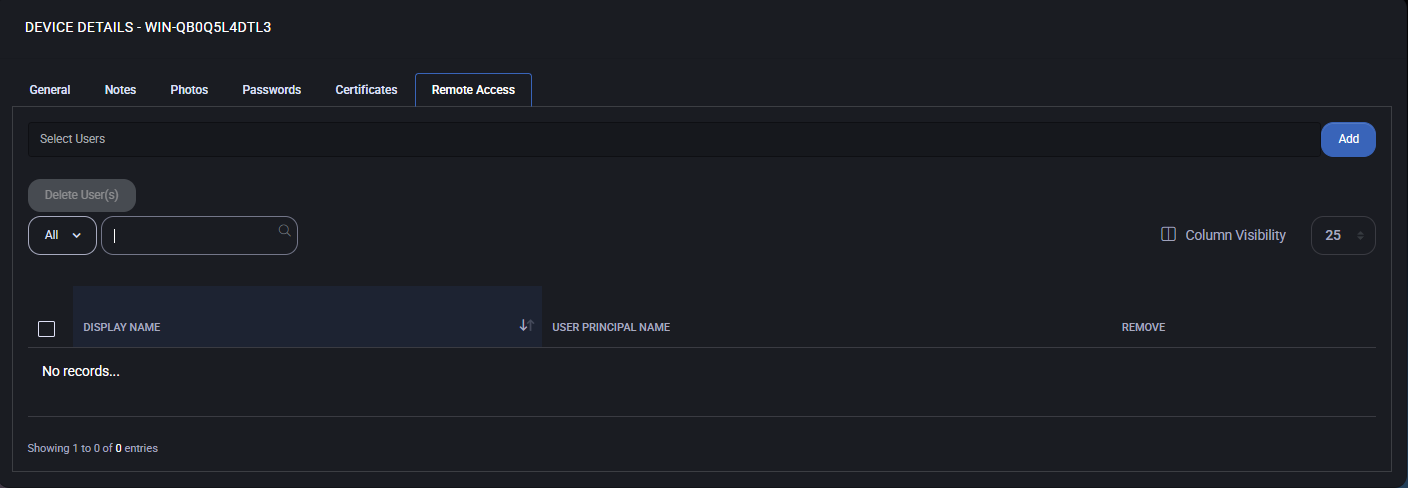
Assign Users for Remote Access
- Use the Select Users dropdown to choose one or more users who should be granted remote access to the device.
- Click the Add button to assign the selected users.
Once assigned, the users will appear in the table below with the following information:
- Display Name – The name of the user as shown in the system.
- User Principal Name – The user’s login identity (usually an email address or UPN).
- Remove – Option to revoke remote access for a user.
Best Practices
- Grant remote access only to trusted support or administrative personnel.
- Review assigned users regularly and remove access for inactive or external users.
- Use role-based access control (RBAC) where available to manage permissions at scale.
- Ensure remote sessions are logged and monitored for audit purposes.
