Notes
The Notes page provides a centralized place to store and manage operational notes for your organization. Notes can be used for handover details, maintenance history, customer context, configuration remarks, or any internal information that benefits from a searchable, tag-based, and permission-aware record.
Notes support:
- Rich-text editing for readable and structured content.
- Tag scoping (Assets, Users, Locations, Devices) to keep notes discoverable in the right context.
- Authorization controls for sensitive notes.
- Peer access management with optional expiration to safely share a note with specific users.
Table of Contents
Notes Overview
The Notes page is designed for fast creation and controlled sharing of internal records. Notes can be filtered by tag context and secured using authorization rules, ensuring that sensitive operational content is not exposed to users who do not need it.
The toolbar at the top of the Notes page is used to create notes, filter results by scope, and run bulk actions.
Primary Actions
- Create Note – Opens the note creation dialog where you can write the note, assign tags, set authorization, and manage peer access.
- Actions – Opens the bulk actions dropdown (authorization updates, peer access actions, tagging, deletion).
- Apply – Executes the selected bulk action for all checked notes. This is typically disabled until both:
- at least one note is selected in the table, and
- a valid action is selected from Actions.
Scope Filters
Scope filters limit what appears in the Notes list, based on which operational context the note is associated with:
- Select Assets – Filters notes by associated asset tags.
- Select Users – Filters notes by associated user tags.
- Select Locations – Filters notes by associated location tags.
- Select Devices – Filters notes by associated device tags.
Search and View Filter
- View Filter (for example, All) – Switches between available views if configured.
- Search – Searches through notes to quickly find entries by keyword or partial match.
Table Controls
- Column Visibility – Shows/hides columns in the Notes list depending on what metadata is relevant to you.
- Page Size (for example, 25) – Controls how many entries are shown per page.
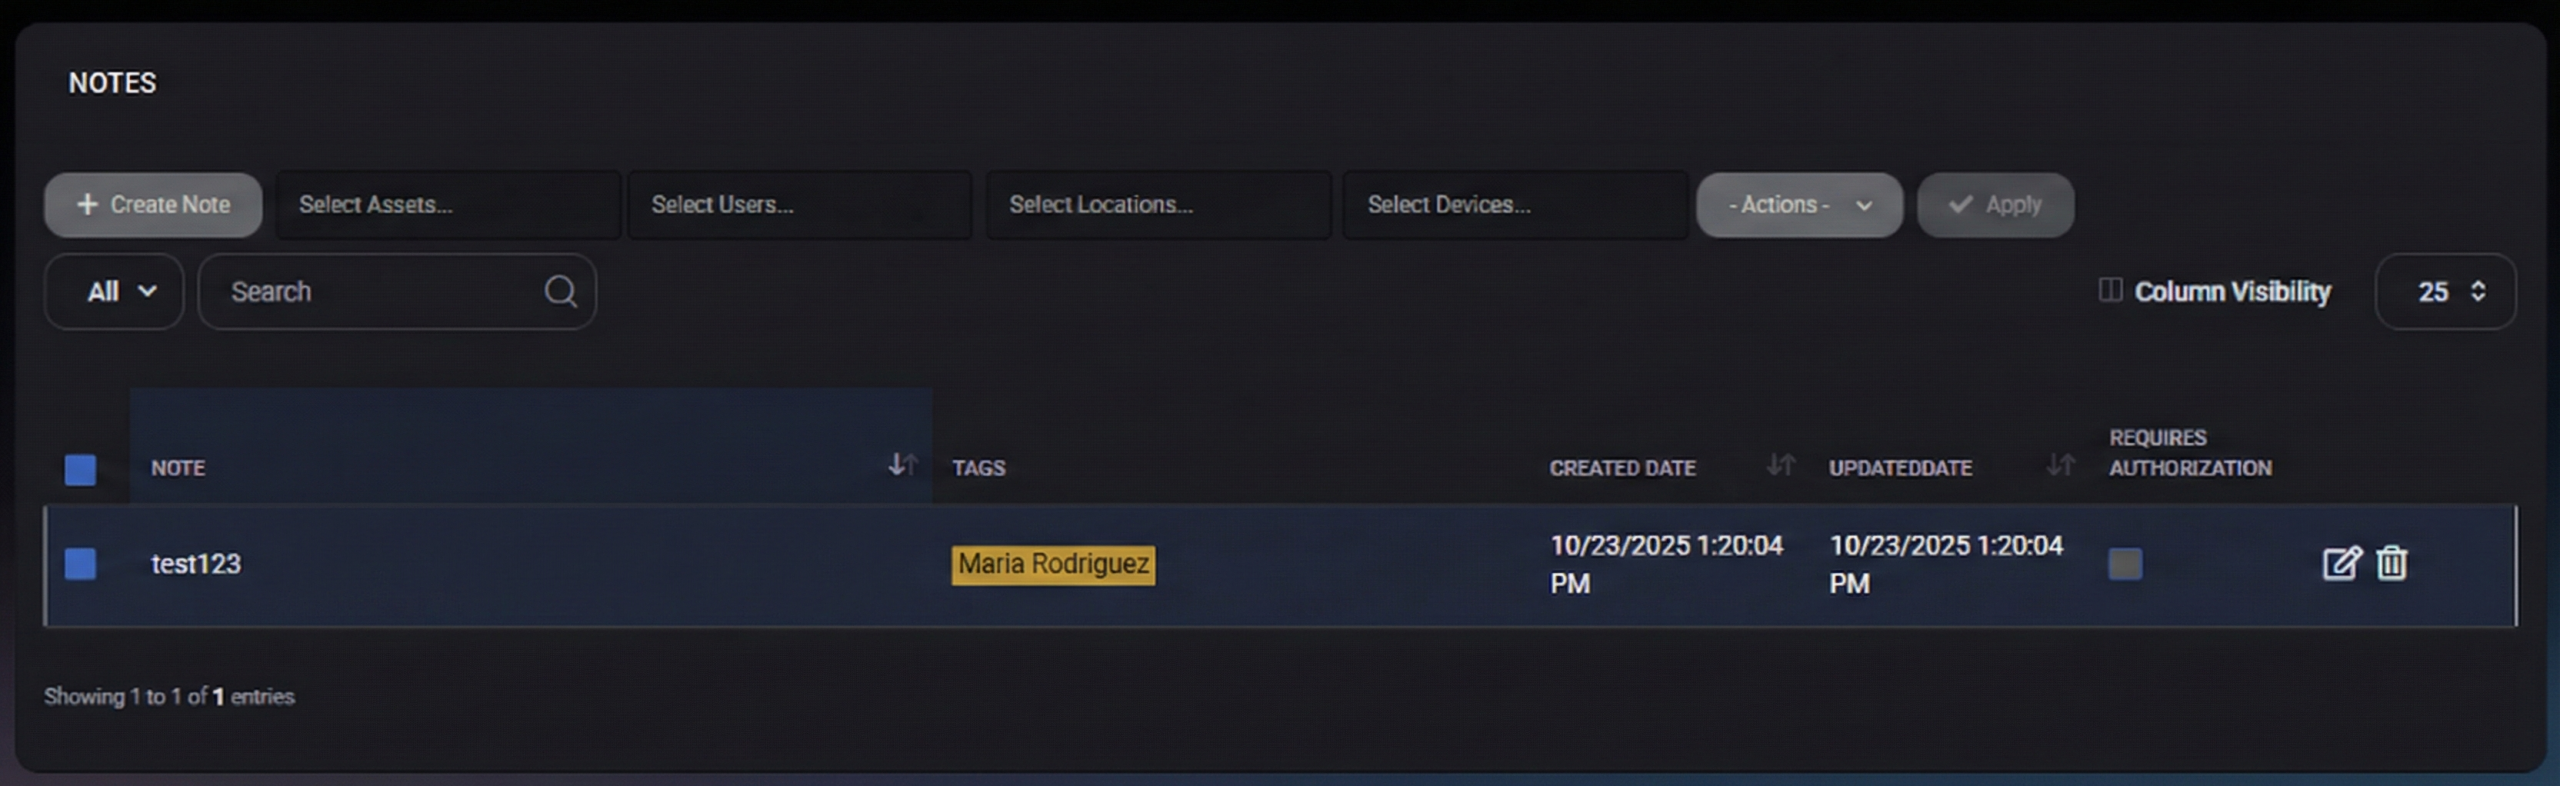
Notes List
The main table displays existing notes and their security context.
Displayed Columns
- Note – A preview/title-like snippet of the note content to identify the entry quickly.
- Tags – Tag context applied to the note (for example, a user tag).
- Created Date – When the note was created.
- Updated Date – When the note was last updated.
- Requires Authorization – Indicates whether additional authorization is required to access the note.
Selection
Each row includes a checkbox for selecting notes. Use selection to apply bulk actions such as tagging updates, access changes, or deletion.
Row Actions
Each note row includes quick action icons on the right side:
- Edit (pencil icon) – Opens the note editor dialog to update content, tags, authorization, and peer access.
- Delete (trash icon) – Deletes the selected note (subject to permissions).
Use row actions for single-item changes. For many notes at once, use bulk actions instead.
Bulk Actions Dropdown
The Actions dropdown provides bulk operations for selected notes. This is the preferred approach when you need consistent security or tagging across multiple entries.
Available Actions
- Set Requires Authorization – Applies a consistent authorization requirement across the selected notes.
- Add Peers With Access – Grants peer access to the selected notes for one or more users (typically with an optional expiration).
- Delete Peers With Access – Removes peer access from the selected notes for one or more users.
- Add Assets Tag – Adds asset tag(s) to selected notes.
- Delete Assets Tag – Removes asset tag(s) from selected notes.
- Add Users Tag – Adds user tag(s) to selected notes.
- Delete Users Tag – Removes user tag(s) from selected notes.
- Add Locations Tag – Adds location tag(s) to selected notes.
- Delete Locations Tag – Removes location tag(s) from selected notes.
- Add Devices Tag – Adds device tag(s) to selected notes.
- Delete Devices Tag – Removes device tag(s) from selected notes.
- Delete Selected – Deletes the selected notes.
How to Perform a Bulk Action
- Select one or more notes using the checkbox column.
- Open Actions and choose the desired operation.
- Click Apply to execute.
Create Note
Click Create Note to open the note editor dialog. This dialog is used to create a new note and define how it is secured and shared.
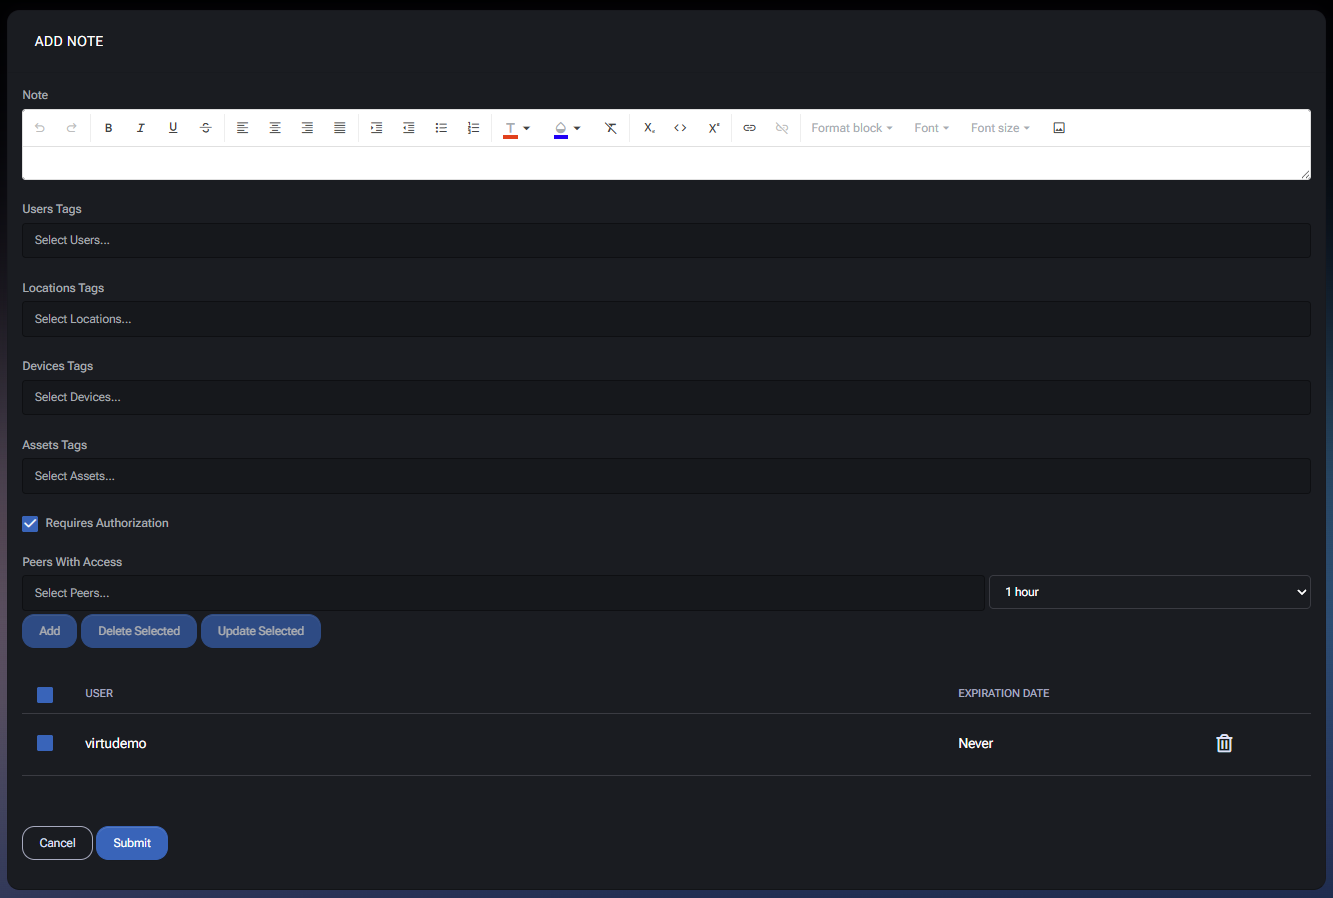
Note Editor
The Note field uses a rich-text editor that supports structured formatting. Typical editor capabilities include:
- Bold, italic, underline, and basic text styling
- Text alignment
- Bulleted and numbered lists
- Formatting blocks and font controls (where enabled)
- Links
Tags are used to scope the note to relevant context so it can be found later through filtering and cross-module visibility.
- Users Tags – Associates the note with one or more users (for example, an employee or contact).
- Locations Tags – Associates the note with one or more locations (office/site/department).
- Devices Tags – Associates the note with one or more devices for operational tracking.
- Assets Tags – Associates the note with one or more assets.
Peers With Access
The Peers With Access section is used to explicitly grant access to specific users (“peers”). This is particularly important for sensitive notes when access needs to be limited to a small set of people, or granted temporarily.
Requires Authorization
When Requires Authorization is enabled, access to the note is controlled more strictly. Combine this with peer access to define exactly who can view the note and under what conditions.
Granting Peer Access
To grant access to a peer:
- In Select Peers, choose one or more users who should have access to the note.
- Select an expiration (for example: 1 hour) if temporary access is required.
- Click Add to apply access for the selected peer(s).
Managing Existing Access
The peer list displays existing access entries, including:
- User – The user who has access.
- Expiration Date – When access ends. Some entries may show Never if no expiration is set.
Use the following actions to manage existing entries:
- Delete Selected – Removes access for selected peer entries.
- Update Selected – Updates selected peer entries (typically used when changing expiration parameters or access settings).
- Trash icon (per-row) – Removes that specific peer access entry.
Dialog Actions
- Submit – Saves the note (content, tags, authorization, and peer access settings).
- Cancel – Closes the dialog without saving changes.
Best Practices
- Write notes with a consistent structure (for example: summary first, then details, then next steps) so they remain readable months later.
- Always add at least one relevant tag (User, Asset, Device, or Location) so the note is discoverable through filters.
- Use Requires Authorization for notes containing credentials, sensitive customer context, or operational/security details.
- Grant peer access with an expiration (for example, 1 hour) when access is temporary (incident response, escalation, handover).
- Prefer bulk actions for tagging and authorization consistency when working with many notes.
- Avoid storing secrets in notes if a dedicated Passwords record is more appropriate for secure storage and auditing.
