Photos
The Photos page provides an album-based image library for your organization. It is designed for storing and organizing visual references such as device photos, site/office images, screenshots, invoices, serial label pictures, diagrams, and other operational attachments that benefit from visual context.
Photos are grouped into albums. Each album can have access controls (authorization and peer-based access), and images can be managed individually or in bulk.
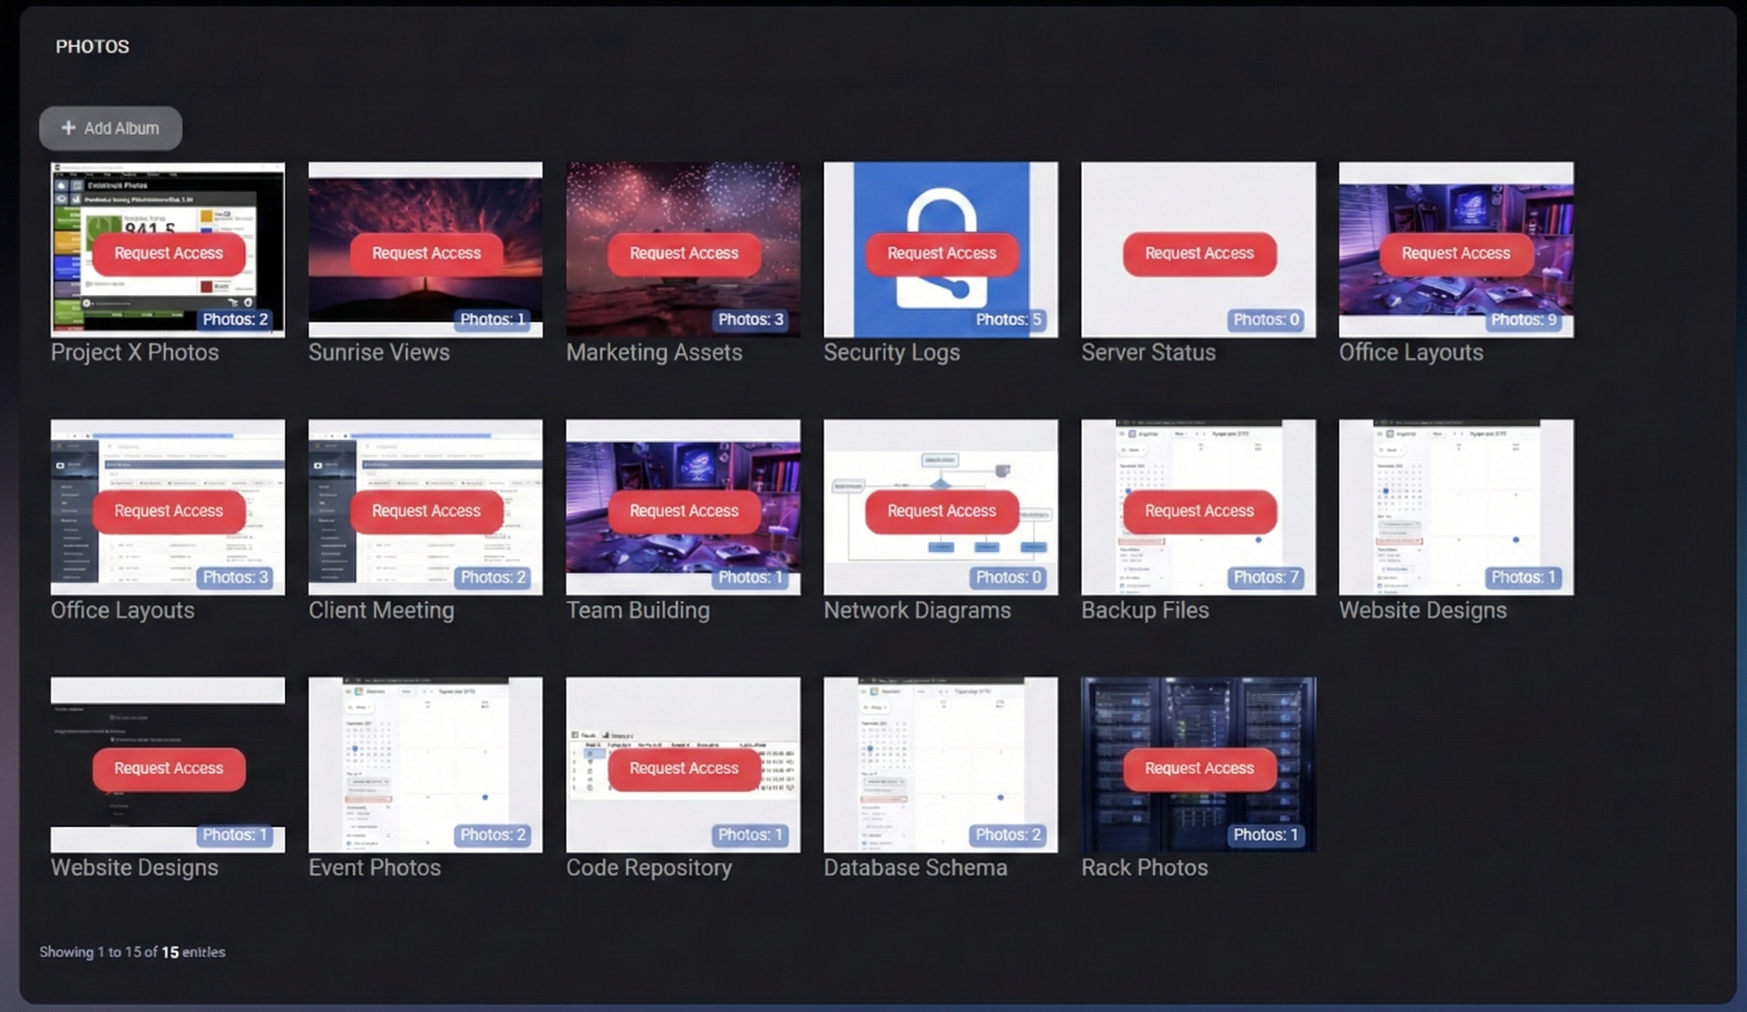
Table of Contents
Photos Overview
The Photos section helps teams keep visual documentation in one place, while still controlling who can view or manage it. Albums can be used to separate topics (for example: Office Layouts, Server Status, Network Diagrams, Security Logs), or to separate customers/projects inside a hosted organization context.
If a user does not have sufficient permissions for an album, the UI may display a Request Access overlay instead of showing the images directly.
Albums Page
The main Photos page displays albums as tiles. Each tile typically includes:
- Album name – The primary label used to identify the album.
- Thumbnail preview – A representative image preview (when available).
- Photos count – The number of images currently stored in the album.
- Access state – Some albums may display Request Access if the current user is not allowed to view them.
Primary Action
- Add Album – Opens the Create Album dialog where you can define album name and access controls.
Create Album
Click Add Album to open the album creation dialog. This dialog is used to define the album identity and how access is controlled.
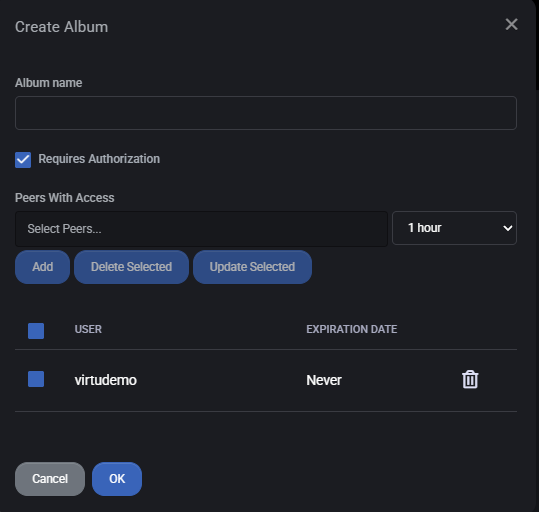
Fields
- Album name – The name of the album. Use a consistent naming pattern so albums are easy to scan and search (for example: Customer – Office Photos or Project X – Rack).
- Requires Authorization – When enabled, access to this album is protected by authorization rules. This is recommended for sensitive images (credentials screenshots, security logs, customer data, internal infrastructure).
Dialog Actions
- OK – Creates the album and saves its access settings.
- Cancel – Closes the dialog without creating the album.
Album Access and Authorization
Albums support explicit access sharing through Peers With Access. This is useful when an album should be accessible only to a specific set of users, or only temporarily.
Peers With Access
In the Create/Edit Album dialog, the Peers With Access section allows you to grant album access to selected peers:
- Select Peers – Choose one or more users who should be able to access the album.
- Expiration (for example: 1 hour) – Defines how long access remains valid. Some entries may be set to Never.
Peer Access Actions
- Add – Grants access to the selected peers using the chosen expiration.
- Delete Selected – Removes access for selected peer entries.
- Update Selected – Updates selected peer entries (typically used to change expiration settings).
- Trash icon (per row) – Removes that single peer access entry.
The peer access table shows at least:
- User – The user who has access.
- Expiration Date – When access ends (or Never if it does not expire).
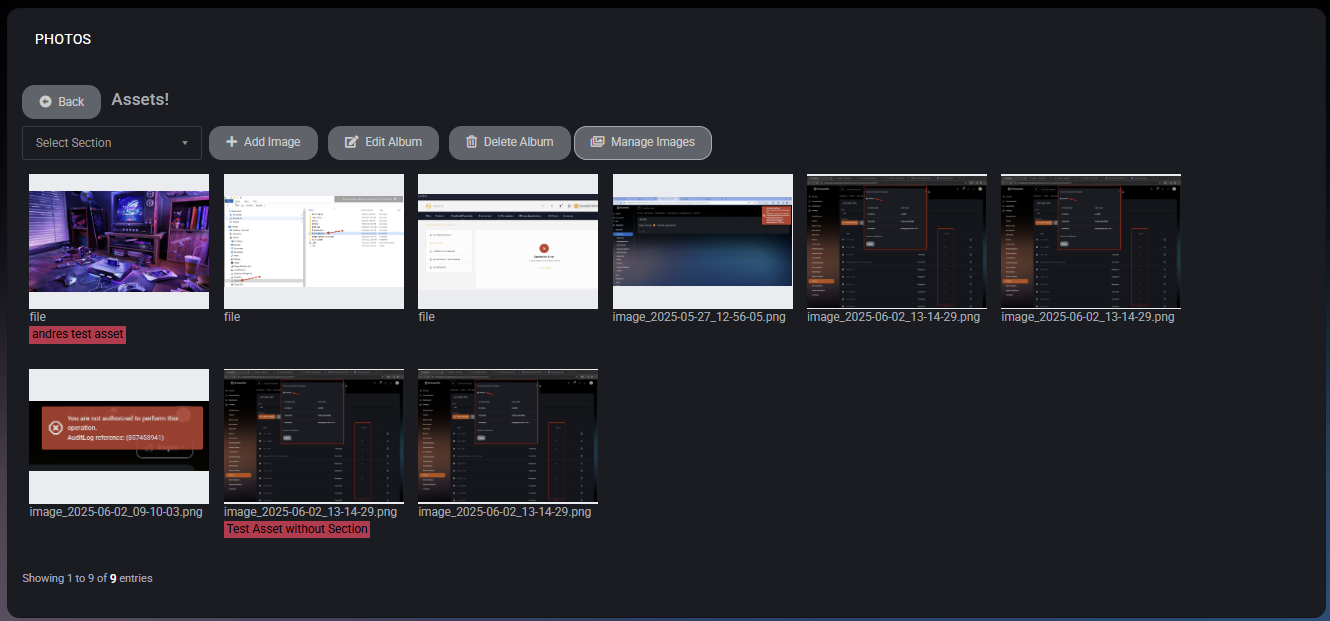
Inside an Album
Click an album tile to open it. Inside an album, MSPControl displays the album content as a grid of images and provides a toolbar for common actions.
- Back – Returns to the albums grid.
- Select Section – Filters or scopes what is shown inside the album (used when the environment supports image categorization by section).
- Add Image – Switches the album into upload mode (drag & drop upload area replaces the image grid).
- Edit Album – Opens the album settings (for example: name and access controls).
- Delete Album – Removes the album (and its content) from the system (subject to permission).
- Manage Images – Switches the album into bulk management mode where images can be selected and updated using actions and tags.
Add Image (Upload Mode)
When you click Add Image, the image grid is replaced by an upload interface. This interface is designed for quickly attaching multiple images in one action.
Upload Experience
- Drag & Drop Area – Drag one or more files onto the upload panel to start uploading.
- Click to Choose – Click the panel to select one or more files using the file picker.
- Done – Closes upload mode and returns you to the album grid, effectively “saving” the current upload set into the album.
Use upload mode when you are adding new photos to the album and do not need to tag or reorganize existing images at the same time.
Manage Images (Bulk Mode)
The Manage Images button switches the album into bulk management mode. This mode is designed for selecting multiple images and applying actions in one operation.
Bulk Mode Controls
- Check All – Selects all visible images in the current album view.
- Actions dropdown – Provides bulk actions such as tagging, moving images to another album, and deletion.
- Apply – Executes the selected action for the currently selected images. This is typically disabled until:
- at least one image is selected, and
- a valid action is chosen.
In bulk mode, the Actions dropdown allows applying contextual tags to images and performing organizational changes.
Available Actions
- Add Assets Tag – Adds asset tag(s) to selected images.
- Delete Assets Tag – Removes asset tag(s) from selected images.
- Add Users Tag – Adds user tag(s) to selected images.
- Delete Users Tag – Removes user tag(s) from selected images.
- Add Locations Tag – Adds location tag(s) to selected images.
- Delete Locations Tag – Removes location tag(s) from selected images.
- Add Devices Tag – Adds device tag(s) to selected images.
- Delete Devices Tag – Removes device tag(s) from selected images.
- Change Album – Moves selected images into another album (useful for reorganizing or correcting uploads).
- Delete Selected – Deletes the selected images from the album.
- Use Asset tags for photos that relate to a specific physical device or tracked item.
- Use User tags for photos tied to a person (handover, onboarding context, workstation assignment).
- Use Location tags for photos tied to a site, room, rack, or office.
- Use Device tags for images that relate to managed endpoints or infrastructure devices.
Best Practices
- Create albums by purpose (for example: Customer Documents, Office Layouts, Racks, Security) rather than dumping everything into a single album.
- Enable Requires Authorization for albums that may contain customer data, access screenshots, or security-related information.
- Use Peers With Access with an expiration (for example: 1 hour) for temporary sharing during incidents or escalations.
- After bulk uploads, use Manage Images to apply consistent tags so photos are discoverable later.
- Use Change Album to correct misfiled photos instead of re-uploading duplicates.
- Regularly delete outdated images (for example, before/after photos after replacement) to keep albums accurate and reduce noise.