
With the new MSPControl Autopilot Agent you can link your customers equipment to MSPControl.
To get the most out of the Autopilot agent you will need to setup and configure a few things in your Azure account and then configure them in your MSPControl environment.
We recommend setting up the following to get the most out of Devices with the Autopilot agent
- Azure IoT Hub - This is what the agent will talk to and will keep the load down on your Portal.
- Azure Storage Account - The IoT Hub will put Telemetry data in here, this will allow graphing in devices.
- Azure Maps Account - This will allow you to use Maps and see where your devices are located.
Create the Storage Account in your Azure Portal
- Login to your Azure Portal and type "Storage Account" in the search bar and click on Storage Accounts from the list

- Click Add

- Select your Resource Group or create a new one
Enter a name for the Storage Account (Must be lowercase)
Chose your location
Account Kind - Storage (general purpose v1)
Performance - Standard
Replication - Locally-redundant storage (LRS)
Click Review and Create

- Once the Storage Account is created click on it and select Containers

- Create a new container and call it something like "telemetry-storage-container" Ensure it is lowercase and click OK

Create an IoT Hub in your Azure Portal
- From your Azure Portal type "IoT Hub" in the search bar and click on IoT Hub from the list

- Click Add

- Select your Resource Group you used or created for the Storage Account
Choose your region
Name your IoT Hub
Click Next Size and Scale

- Select the Pricing and scale tier as S1 Standard Tier (must be a Standard Tier)
Click Review + Create

- Once your IoT Hub has been created click on it and select Message Routing from the left hand menu under the Messaging heading

- Select Custom Endpoints and then click Add and select Storage from the dropdown list

- Enter the name for the endpoint
Select the Storage Container created in the steps above
Ensure the Encoding is selected as AVRO
Click Create

- Select Routes and then click Add

- Enter a name for the route
Select the Endpoint created in the step above
Ensure the route is Enabled
Click Create

Create the Azure Maps Account in your Azure Portal
- From your Azure Portal type "Azure Maps Account" in the search bar and click on Azure Maps Account from the list

- Click Add

- Select your Resource Group you used or created for the Storage Account
Name your Azure Maps Account
Pricing Tier - Standard S0
Confirm you have read and agreed to the Licence and Privacy Statement
Click Create

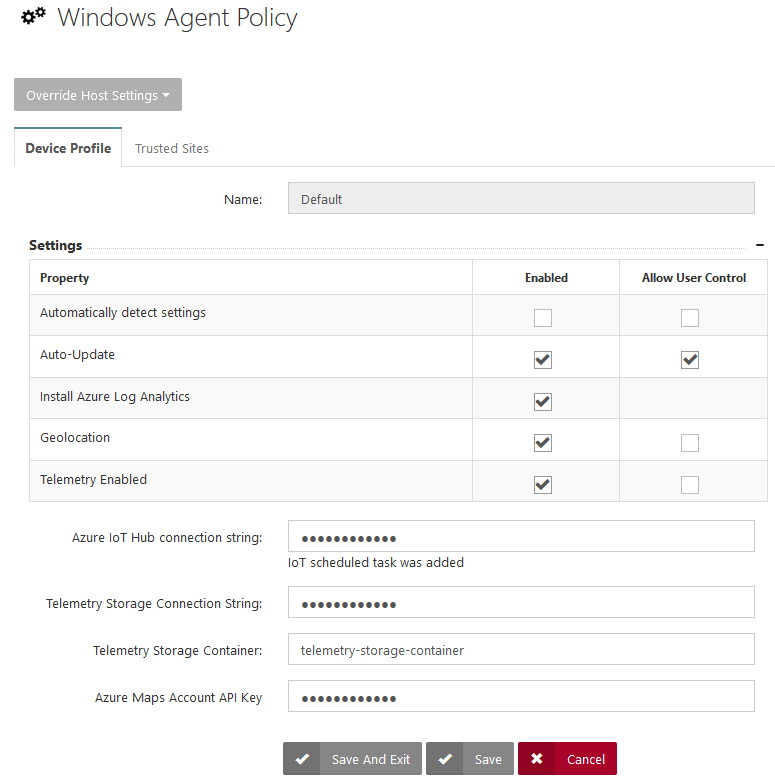
Configure Device Policies on your portal
- Login to your MSPControl Portal and navigate to Settings > Policies > Hosted Organisation > Windows Agent Policy

- Click on Default (you will also need to do the below steps for the Server and Workstation)

- Ensure the following are set as per the below image
(there are more options, but we are only showing the ones you need to configure for this guide)
 To get the Azure IoT Hub Connection String open your Azure IoT Hub from the Azure Portal
Click on Shared Access Policies from the left menu
Click the iothubowner policy in the middle
Copy the Connection String - Primary Key on the right hand side
Paste this into the Azure IoT Hub Connection String input box in your portal

- To get the Telemetry Storage Connection String open your Storage Account you created in your Azure Portal
Click Access Keys from the left menu
Copy the Connection String by clicking the little copy icon
Paste this into the Telemetry Storage Connection String input box in your portal
 Enter the name of your Storage Container created earlier (In our example we used "telemetry-storage-container") into the Telemetry Storage Container input box in your portal
 - To get the Azure Maps Account API Key open your Azure Maps Account you created in your Azure Portal
Click Authentication from the left menu
Copy the Key by clicking the little copy icon
Paste this into the Azure Maps Account API Key input box in your portal

- Click Save and Exit at the bottom of the Windows Agent Policy in your portal
Ensure you do the same for the Server and Workstation Policies
Now when you setup Devices and AD Sync Devices in your portal they will synchronise with via the Azure IoT Hub, the Azure Storage Account will hold the Telemetry Data to allow you to see historic data and provide graphs and the Azure Maps Account will allow you to see where you devices are located via Geolocation.
If you plan on using AD Sync ensure you have configured the Active Directory Password Filter
To configure AD Sync click here